
RabbitMQ is an open-source message broker that acts as the intermediary or middleman for independent applications, giving them a common platform to communicate. Simply said; it is software where queues are defined, to which applications connect in order to transfer a message or messages. The queue-manager software stores the messages until a receiving application connects and takes a message off the queue.

RabbitMQ mainly uses an Erlang-based implementation of the Advanced Message Queuing Protocol (AMQP), which supports advanced features such as clustering and the complex routing of messages.

What is AMQP?
AMQP is an open standard protocol that defines how a system can exchange messages. The protocol defines a set of rules that needs to be followed by the systems that are going to communicate with each other. In addition to defining the interaction that happens between a consumer/producer and a broker, it also defines the representation of the messages and commands being exchanged.
Why should you use RabbitMQ in microservice?
In Microservices architecture you have two ways to communicate between the microservices:
- Synchronous – that is, each service calls directly the other microservice , which results in dependency between the services. Request-Response pattern is an case-study of synchronous. The request-response style is used when the client must have an immediate response or wants the service to complete a task without delay, such as being placed on hold when calling a restaurant to reserve a table
- Asynchronous – you have some message queue where you place all requests between the microservices and the corresponding service takes the request, process it and return the result to the caller without waiting consumer. This is what RabbitMQ (or any other message queue – MSMQ and Apache Kafka are good alternatives) is used for.
How does RabbitMQ work?
To understand RabbitMQ clearly, let’s view the below figure which illustrates the message flow of RabbitMQ
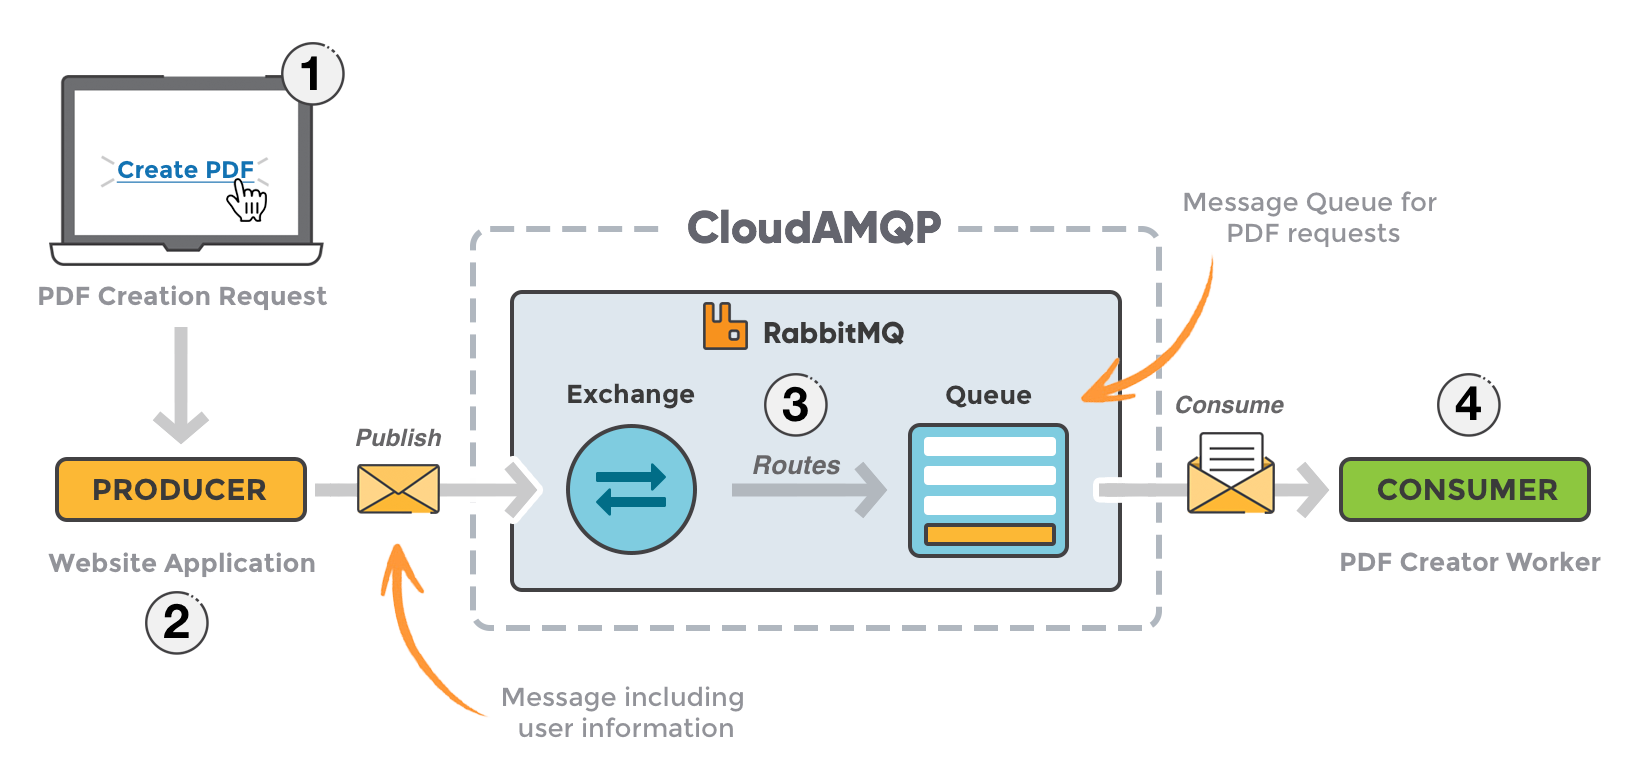
- The user sends a PDF creation request to the web application.
- The web application (the producer) sends a message to RabbitMQ that includes data from the request such as name and email.
- An exchange accepts the messages from the producer and routes them to correct message queues for PDF creation.
- The PDF processing worker (the consumer) receives the task message and starts processing the PDF.
How to install RabbitMQ with Docker
# for RabbitMQ 3.9, the latest series
docker run -it --rm --name rabbitmq -p 5672:5672 -p 15672:15672 rabbitmq:3.9-management
# for RabbitMQ 3.8,
# 3.8.x support timeline: https://www.rabbitmq.com/versions.html
docker run -it --rm --name rabbitmq -p 5672:5672 -p 15672:15672 rabbitmq:3.8-management
How to install RabbitMQ on Ubuntu
Copy all content below to a script file and execute it.
#!/usr/bin/sh

sudo apt-get install curl gnupg apt-transport-https -y

## Team RabbitMQ's main signing key
curl -1sLf "https://keys.openpgp.org/vks/v1/by-fingerprint/0A9AF2115F4687BD29803A206B73A36E6026DFCA" | sudo gpg --dearmor | sudo tee /usr/share/keyrings/com.rabbitmq.team.gpg > /dev/null
## Launchpad PPA that provides modern Erlang releases
curl -1sLf "https://keyserver.ubuntu.com/pks/lookup?op=get&search=0xf77f1eda57ebb1cc" | sudo gpg --dearmor | sudo tee /usr/share/keyrings/net.launchpad.ppa.rabbitmq.erlang.gpg > /dev/null
## PackageCloud RabbitMQ repository
curl -1sLf "https://packagecloud.io/rabbitmq/rabbitmq-server/gpgkey" | sudo gpg --dearmor | sudo tee /usr/share/keyrings/io.packagecloud.rabbitmq.gpg > /dev/null

## Add apt repositories maintained by Team RabbitMQ
sudo tee /etc/apt/sources.list.d/rabbitmq.list <<EOF
## Provides modern Erlang/OTP releases
##
## "bionic" as distribution name should work for any reasonably recent Ubuntu or Debian release.
## See the release to distribution mapping table in RabbitMQ doc guides to learn more.
deb [signed-by=/usr/share/keyrings/net.launchpad.ppa.rabbitmq.erlang.gpg] http://ppa.launchpad.net/rabbitmq/rabbitmq-erlang/ubuntu bionic main
deb-src [signed-by=/usr/share/keyrings/net.launchpad.ppa.rabbitmq.erlang.gpg] http://ppa.launchpad.net/rabbitmq/rabbitmq-erlang/ubuntu bionic main

## Provides RabbitMQ
##
## "bionic" as distribution name should work for any reasonably recent Ubuntu or Debian release.
## See the release to distribution mapping table in RabbitMQ doc guides to learn more.
deb [signed-by=/usr/share/keyrings/io.packagecloud.rabbitmq.gpg] https://packagecloud.io/rabbitmq/rabbitmq-server/ubuntu/ bionic main
deb-src [signed-by=/usr/share/keyrings/io.packagecloud.rabbitmq.gpg] https://packagecloud.io/rabbitmq/rabbitmq-server/ubuntu/ bionic main
EOF

## Update package indices
sudo apt-get update -y

## Install Erlang packages
sudo apt-get install -y erlang-base \
                        erlang-asn1 erlang-crypto erlang-eldap erlang-ftp erlang-inets \
                        erlang-mnesia erlang-os-mon erlang-parsetools erlang-public-key \
                        erlang-runtime-tools erlang-snmp erlang-ssl \
                        erlang-syntax-tools erlang-tftp erlang-tools erlang-xmerl

## Install rabbitmq-server and its dependencies
sudo apt-get install rabbitmq-server -y --fix-missing
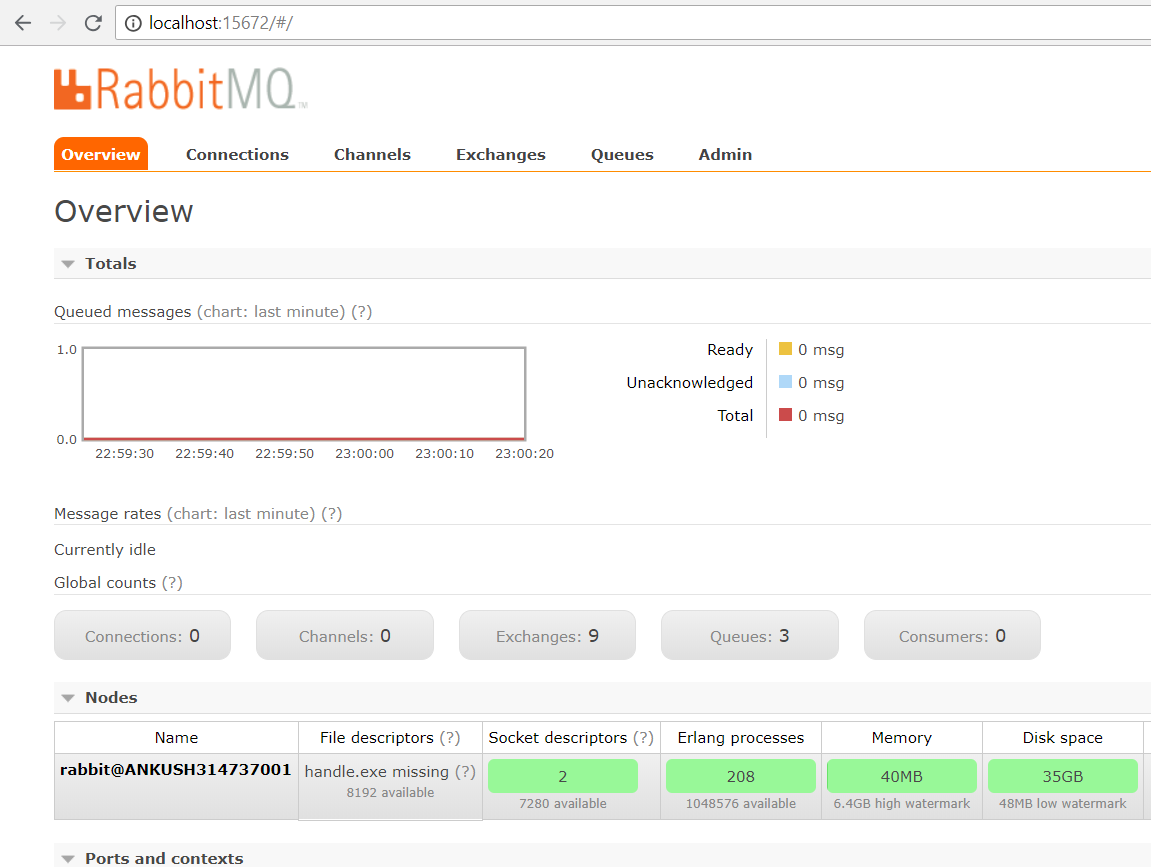
How to install RabbitMQ admin dashboard?
Default after installing RabbitMQ, you can only manage RabbitMQ via the command line. If you want to use web admin, you need to enable Rabbitmq management plugin via this command:
rabbitmq-plugins enable rabbitmq_management
Go to browser & hit this URL http://localhost:15672 with default username/password: guest/guest
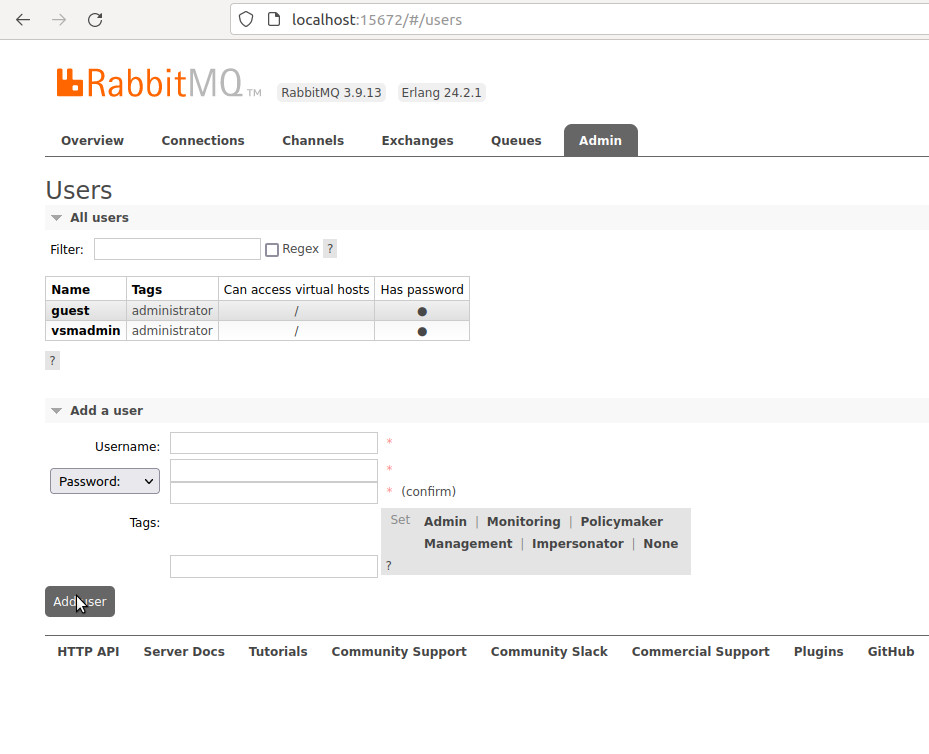
Configuring RabbitMQ users
To add a user in RabbitMQ you can use web management or command line with the below command:
$ sudo rabbitmqctl add_user your_user your_password
Adding user "your_user" ...
$ sudo rabbitmqctl set_user_tags your_user administrator
Setting tags for user "your_user" to [administrator] ...
Or using web management tool
To change the password for an existing user, you can use the below command:
$ sudo rabbitmqctl change_password guest guest123@#
Read more about how to use RabbitMQ management tool

Comments are closed.