Author

Browsing

In this tutorial We will learn how to create an ecommerce website with WordPress and Woocommerce plugin with out using any line of code. You’ll only need 1 hour to create a professional website althought you don’t have any prgramming knowledge. Let’s start.

1. Buy domain and hosting.

If you had domain and hosting, you can skip this step. Without you can buy it at Stablehost with affordable price.

2. Install WordPress

If you are a beginner you can use Softaculous in cPanel for installing WordPress. You can reference this tutorial to know more about installing WordPress with Softaculous

3. Install Wocommerce plugin

Like with all WordPress plugins, you need to navigate to your WordPress Dashboard / Plugins / Add New. Once there, type “woocommerce” in the search field. You will see WooCommerce as the first search result:
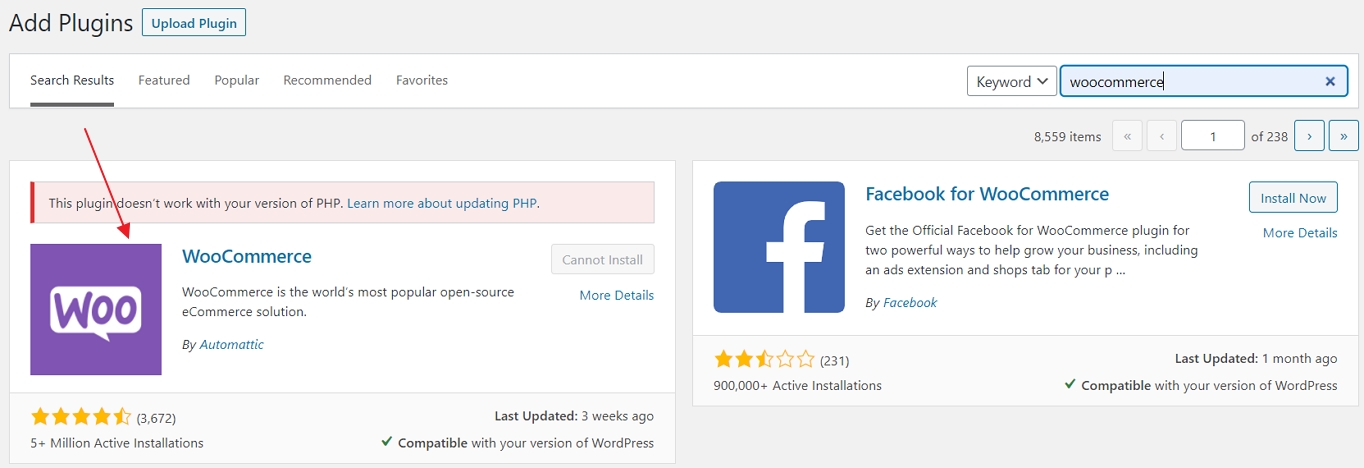
Just click the “Install Now” button next to the plugin.

After a couple of seconds, the text on the button will change to “Activate”. Go ahead and click it.

At this stage, you will see WooCommerce’s on-screen launch/setup wizard. To start, click “Let’s Go!”

Create the Essential Store Pages

Online stores are a particular kind of website, and they need some particular pages to function properly. The first step in the WooCommerce wizard is about creating these pages for you:

  • Shop: this is where your products are going to be displayed.
  • Cart: This is the shopping cart where your customers can adjust their order before proceeding to checkout.
  • Checkout: this is where the customers choose the shipping/delivery method and pay for whatever they are bought.
  • My Account: a kind of profile page for registered customers (they will be able to view their past orders there and manage other details).

All you need to do at this stage of the WooCommerce wizard is click the “Continue” button. WooCommerce will set up those pages for you.

Set Up Locale

The locale is a truly crucial part of your store setup. Those few parameters define your business origin, currency, and preferred units:
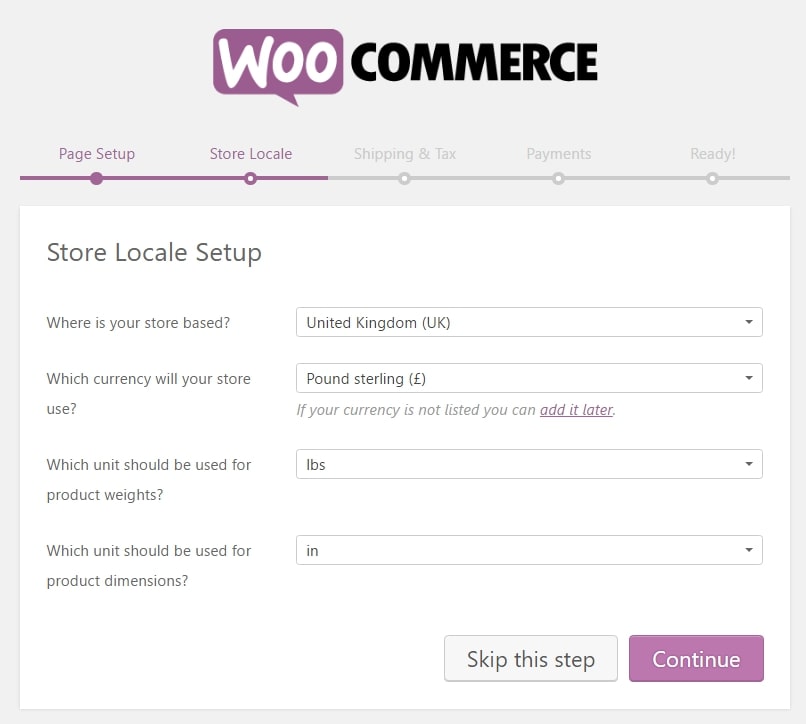
Once you’re done, click “Continue”.

Understand Sales Tax

First, you can select if you’re going to be shipping physical goods or not. If you check the box, WooCommerce will pre-set the remaining shipping-related details in the settings.

Next, tax! WooCommerce has a very neat tax module, the best thing about it is that it helps you figure out the tax rates based on your store location (you have set it in the previous step).

If you’re going to charge sales tax (in most cases you are), just check the main tax box. As soon as you do this, a new set of boxes will appear and inform you of what’s going to happen next.
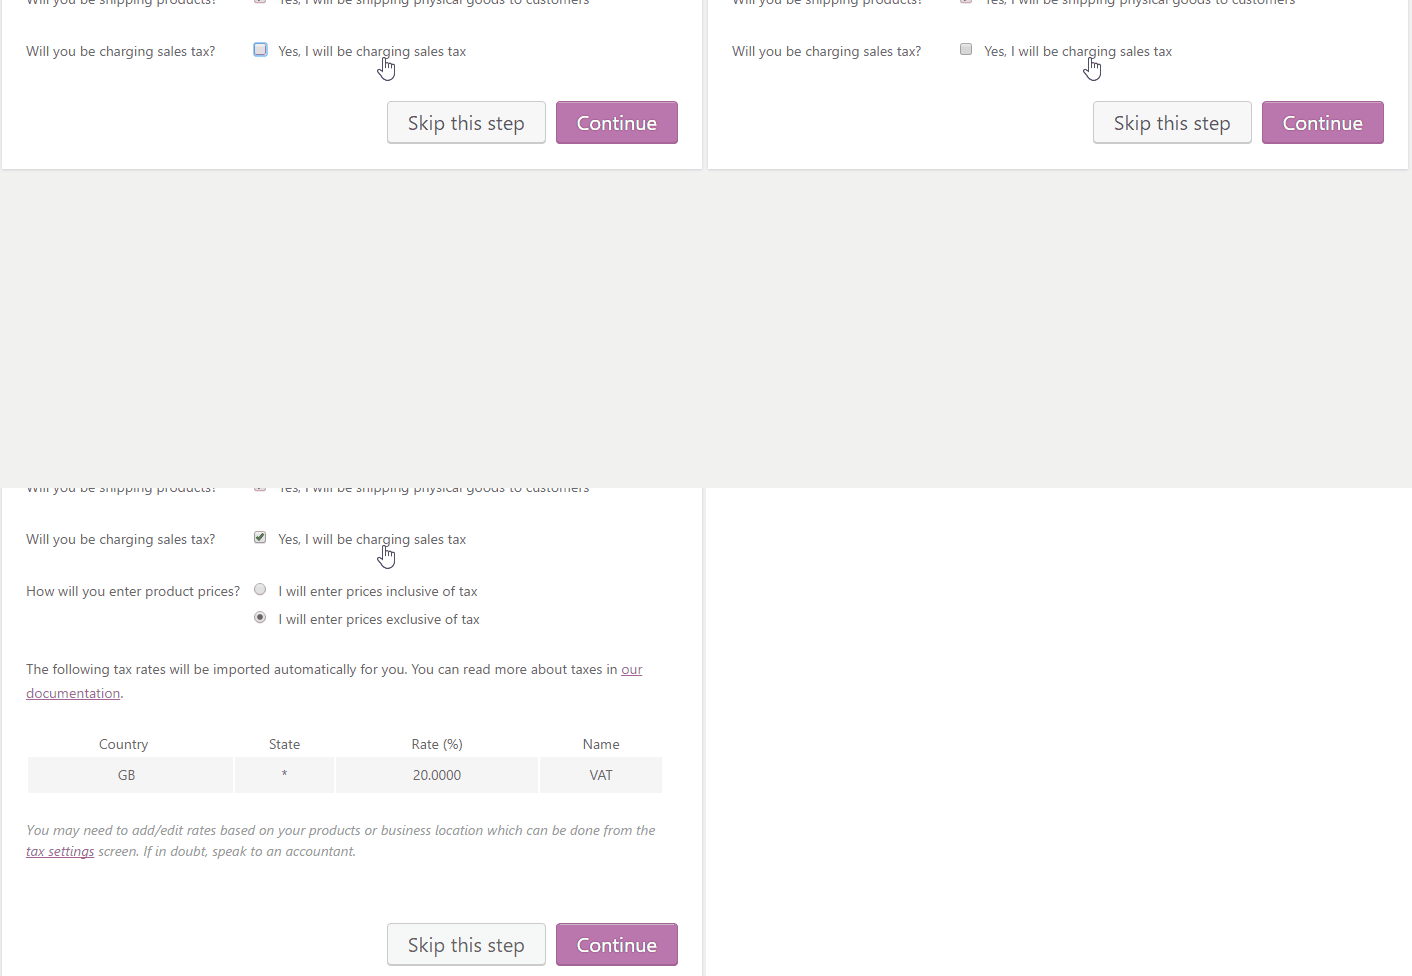
Click “Continue.” choose a payment method, shipping method and then finish setup Woocommerce.
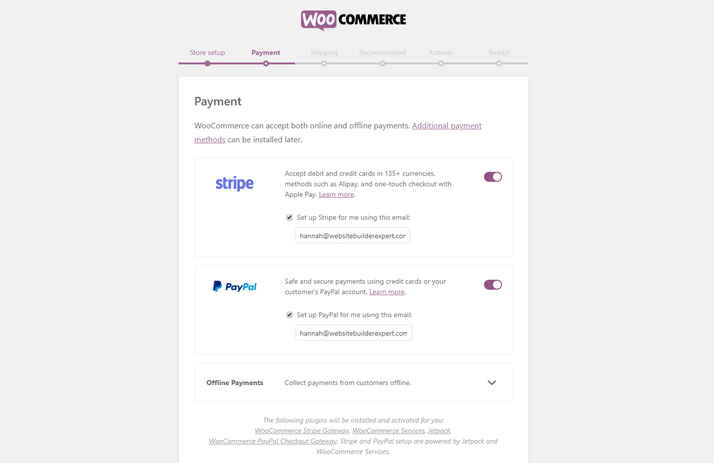
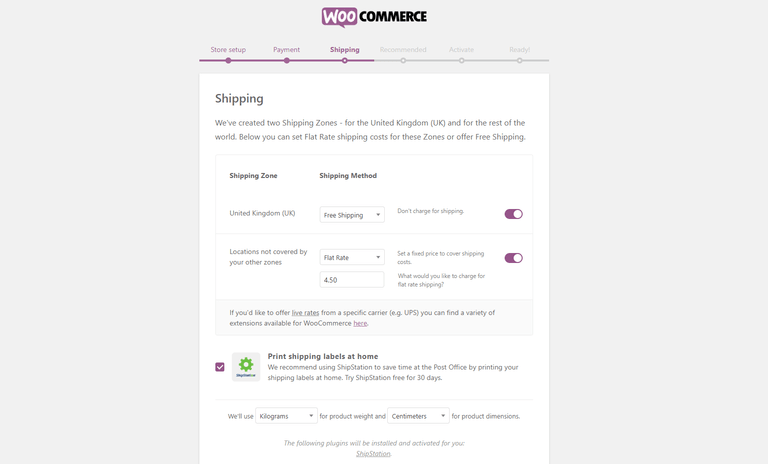
4. Install theme support Woocommerce

Pick a theme that you like, and that compatible with Woocommerce. You can use free theme or premium theme depend on your budget.

Buying premium themes on ThemeForest (huge selection) and Elegant Themes with keyword Woocommerce theme, it’ll return a ton of great Woocommerce theme for you.

You can also find a selection of free WordPress themes in the theme directory or you can download free woocommerce theme at https://athemes.com/collections/free-woocommerce-wordpress-themes/

To install a premium theme on your site you can read how install theme file in WordPress

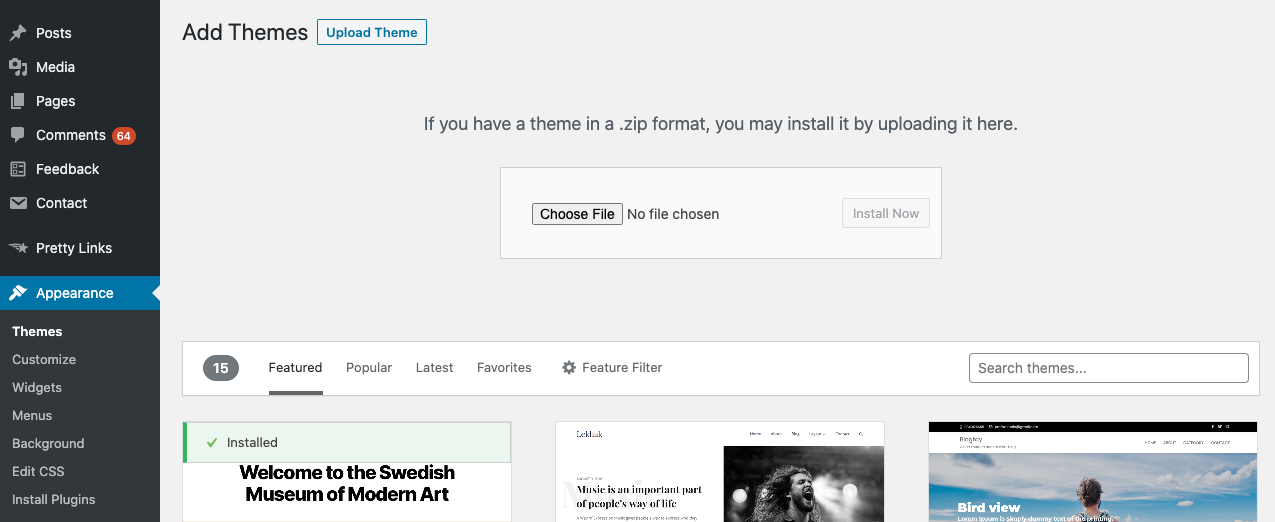
  1. Hover over Appearance, then click Themes. This will take you through to the theme dashboard.
  2. Click the button above the themes that says Add New. This will take you to the WordPress theme dashboard.
  3. Click the blue button at the top that says Upload Theme.
  4. You’ll then be prompted to choose a .zip file from your computer. Choose your new theme file.
  5. You’ll then see a success message, with a link to activate your theme. And that’s it, you’re ready to go!

Setup the product page

Now that you have your theme set up, it’s time to start adding products and their product pages.

At the very least, every product you add must have the following features:

  • Product name
  • Price
  • Image
  • Brief description

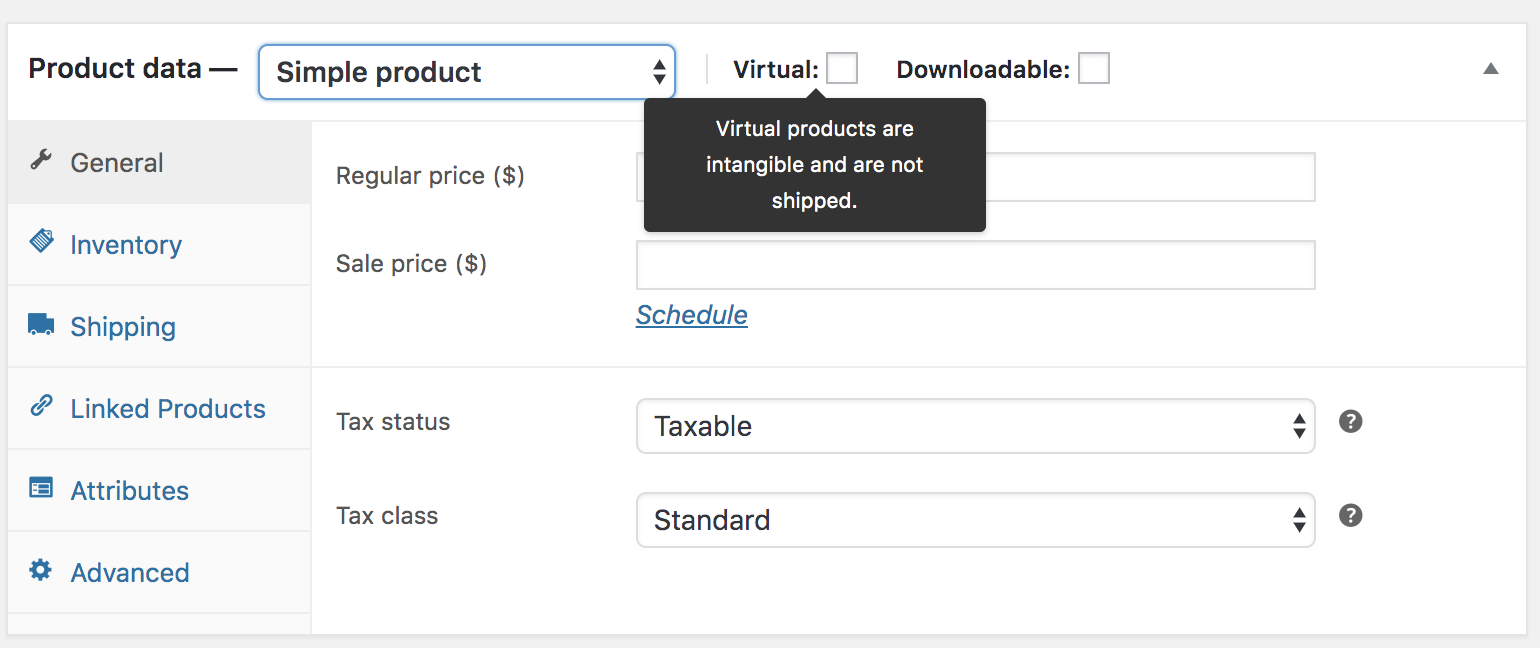
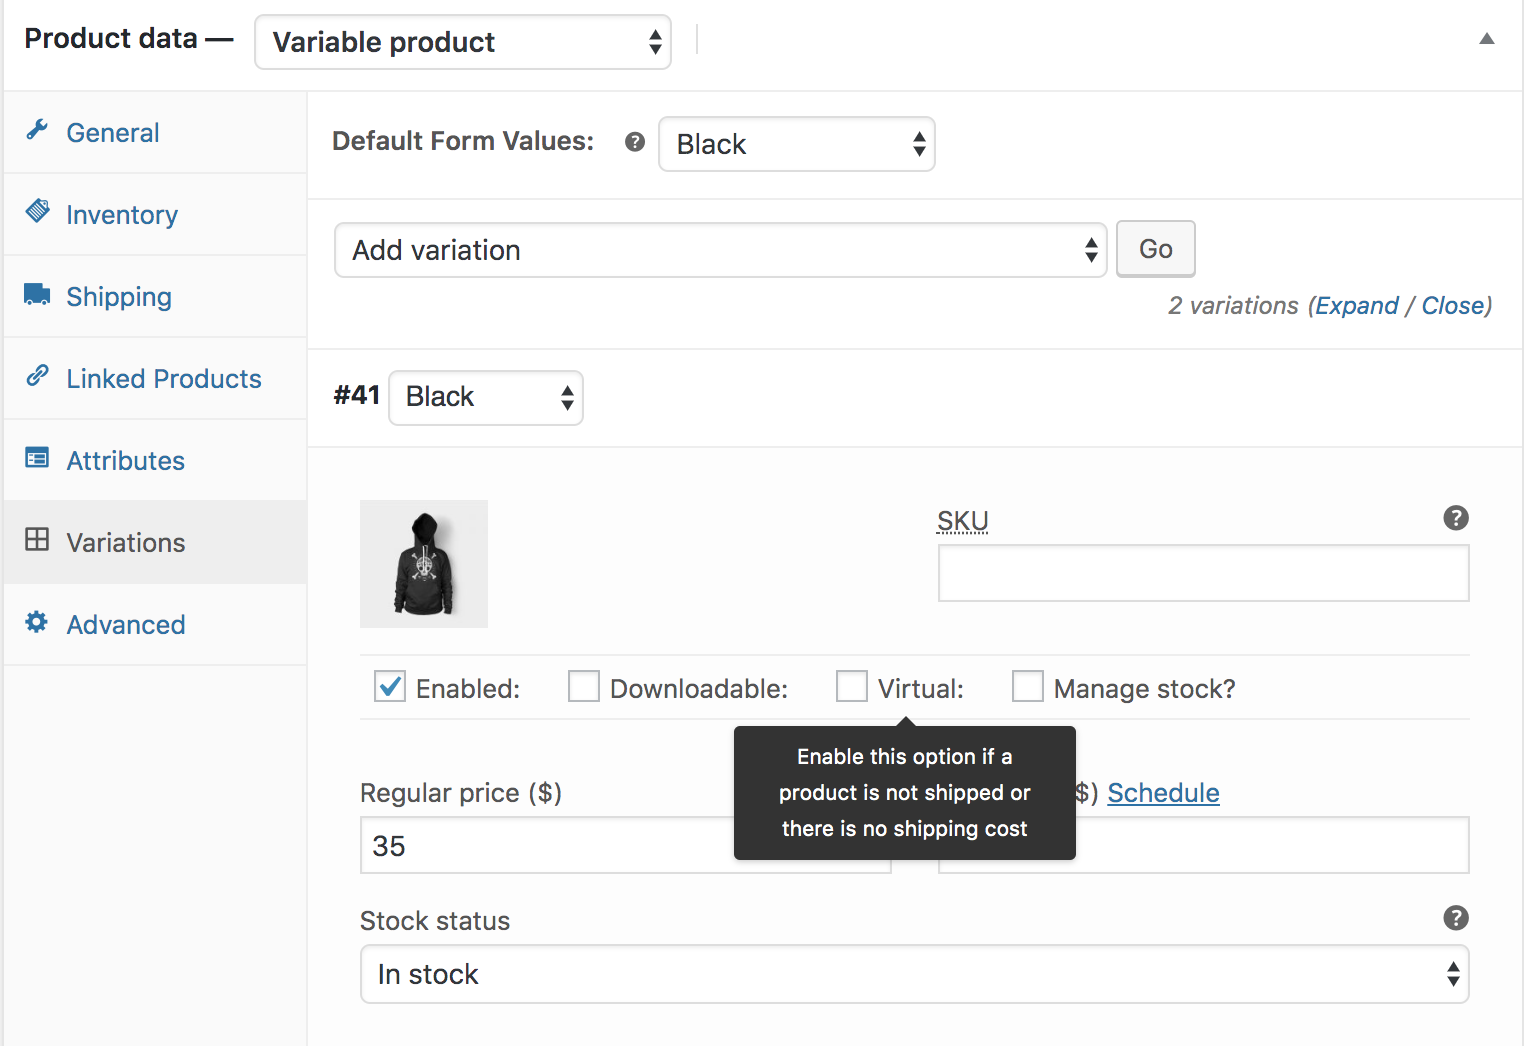
Begin by entering your WordPress admin panel, then select “Products” on the sidebar and select “Add Product”. WooCommerce allows you to add both physical and virtual products to your store.
WordPress is an open-source content management system (CMS) that is available to install using the cPanel Softaculous Apps Installer for free. If you are a beginner install WordPress from a scratch with Softaculous is the best choice for you. With some of simple clicks you will have a WordPress site without any effforts.

Access Softaculous app installer on your cPanel

Access your cPanel account and look for Softaculous icon in the control panel

Access Softaculous from your control panel

Install WordPress

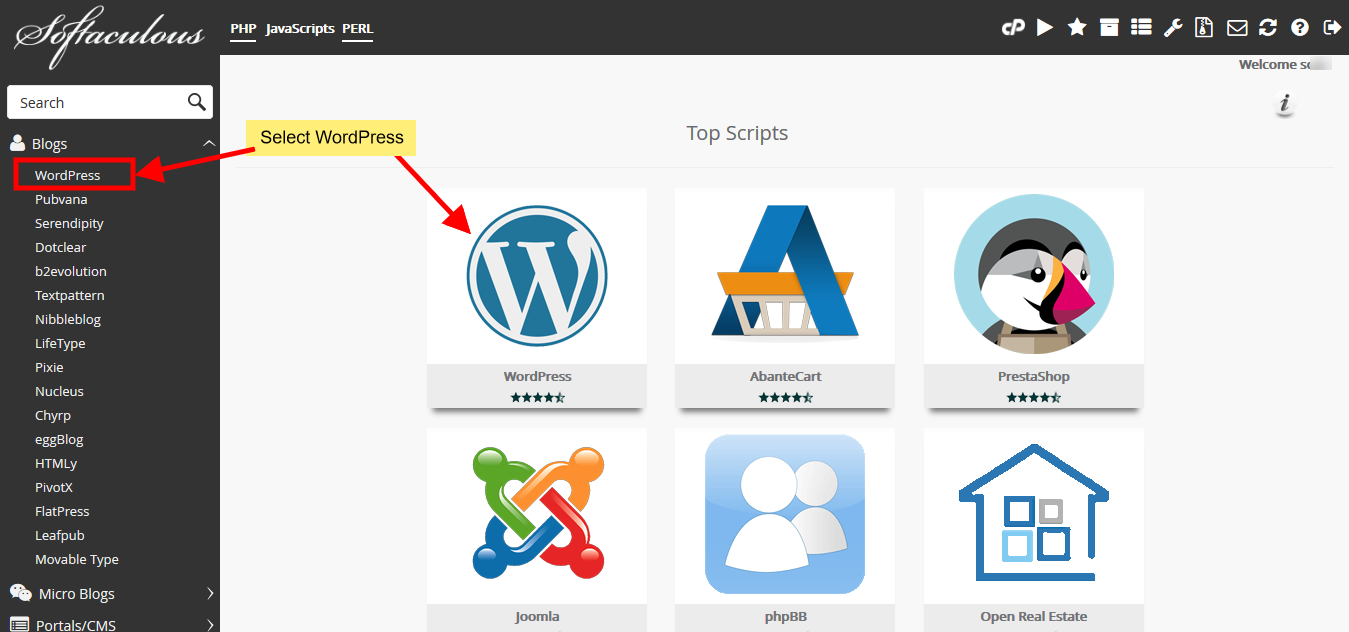
Once you are on the Softaculous end user panel, you will need select WordPress and install it.

Select WordPress
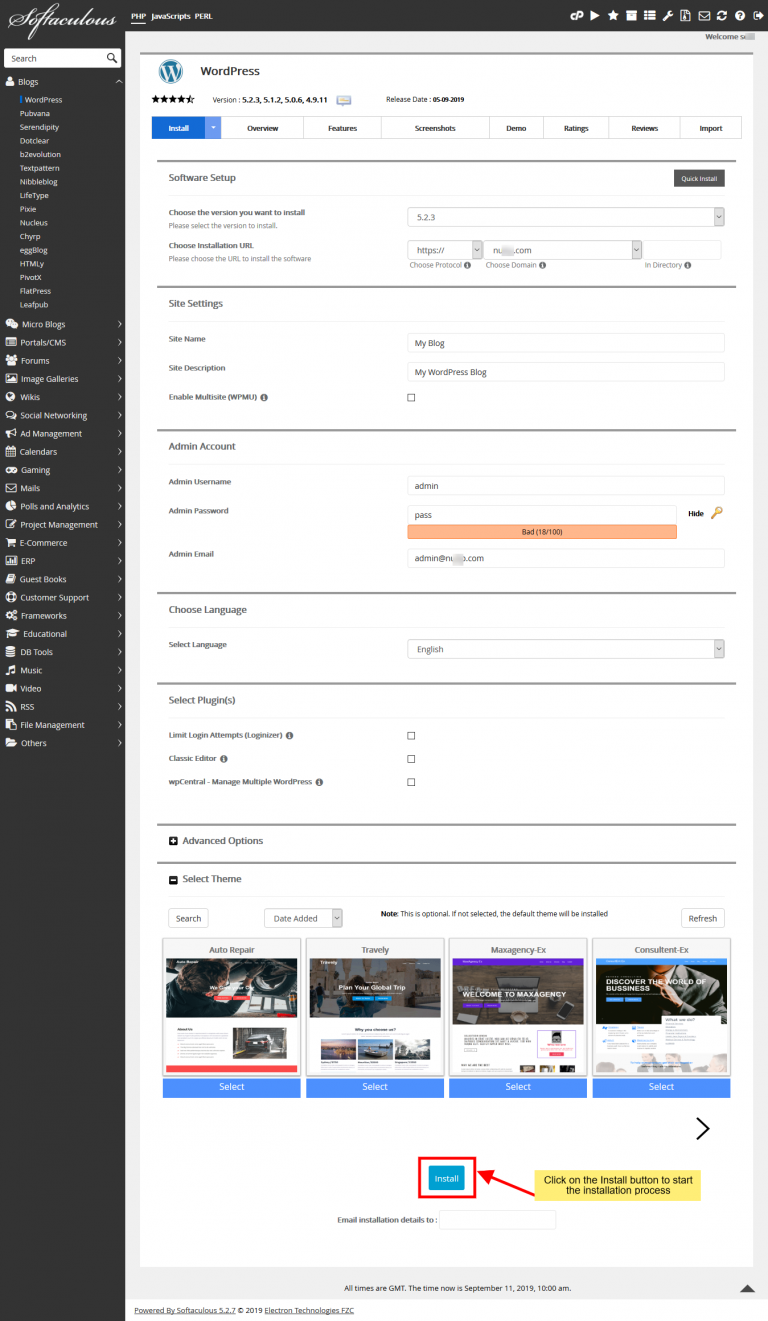
Click on the Install button

After clicking on the Install button, you need to fill in the form below include:

  • Choose Installation URL :Choose the domain and the folder where you want to install WordPress.
  • Note : If you want to install WordPress in document root i.e. example.com and NOT in a sub directory i.e. example.com/wp then leave the In Directory field as blank.
  • Admin Username : Choose the username to be used for WordPress admin account
  • Admin Password : Choose the password to be used for WordPress admin account
  • Admin Email : Choose the email to be used for WordPress admin account
  • Select Language : Select the language in which you want to install WordPress
Fill in the install form

After filling the form click on the Install button to start the installation process.

Access your WordPress Admin

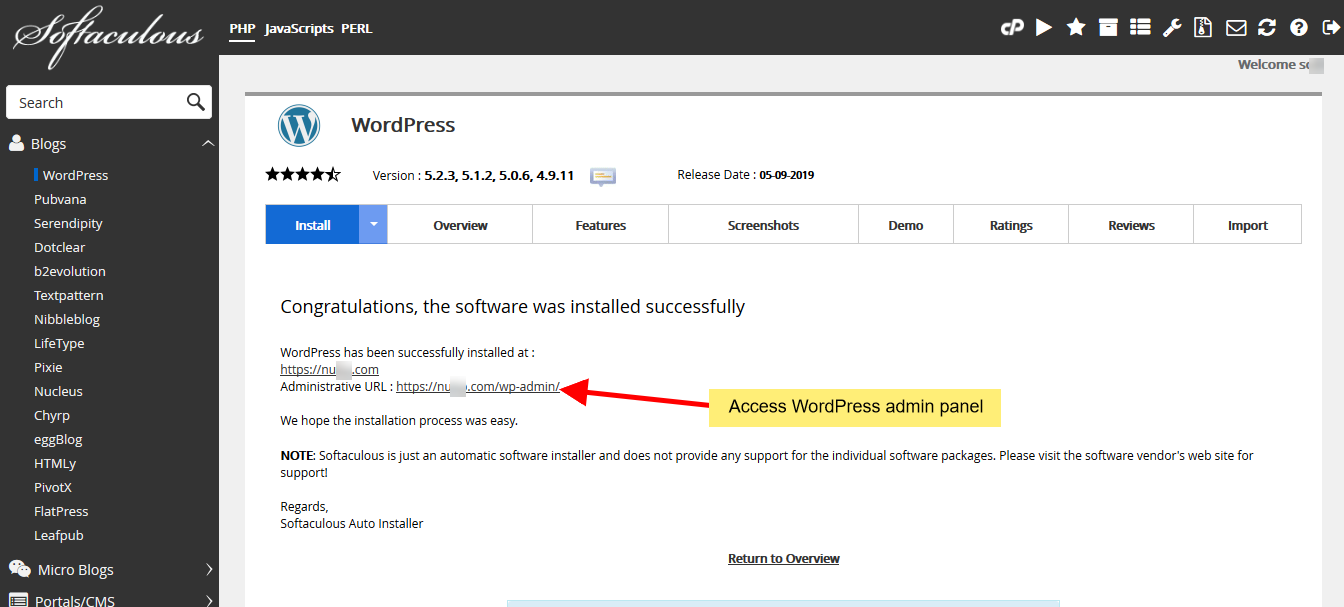
You will see the success message as shown in the screenshot below when the installation is completed. Softaculous will extract WordPress source code and create database for you automatically.

Access WordPress admin panel

You can then access the WordPress admin panel and/or WordPress site.

So simple, is that right? If you have encounter any problem when installing WordPress with Softaculous please drop a comment below. I will support you.

To synchronize your backup data to Google Drive you’ll need install Rclone first. After that you need config authorize your Google Drive with Rclone. You can view setup guide backup vps data with Rclone and Google Drive before practice this tutorial.

Shell script backup multiple source code foder and synchronize data to Google Drive

#!/bin/bash

dest="/home/backup_source"

#The line below will store multiple folders in an array (files)
files=("/var/html/folder1" "/var/html/folder2" "var/html/folder3")

current_date="$( date +%F_%H-%M-%S )"

SERVER_NAME="remote_name:your_backup_folder_on_cloud"
REMOTE_NAME="remote_name:"

rclone -q --min-age 1w delete $SERVER_NAME #Remove all backups older than 1 week
rclone cleanup $REMOTE_NAME #Cleanup Trash

At first, you input list of backup folders in files variable then replace remote_name by your remote name you have configured with Rclone at previous setup guide. Next add this script to crontab.

chmod +x your_script.sh
crontab -e
#input this line to run script on 0:0 every day
0 0 * * * your_path_to_script

With vps data, you can use snapshot feature to backup all vps data but usually this’s a paid feature. Some of server provider don’t event have this feature. So to backup VPS you can use Rclone and move data to some of cloud storage such as: Google Drive, One Drive, Mega, Zoho storage…

Rclone is a command line program to manage files on cloud storage. It is a feature rich alternative to cloud vendors’ web storage interfaces. Over 40 cloud storage products support rclone including S3 object stores, business & consumer file storage services, as well as standard transfer protocols.

Rclone helps you:

  • Backup (and encrypt) files to cloud storage
  • Restore (and decrypt) files from cloud storage
  • Mirror cloud data to other cloud services or locally
  • Migrate data to cloud, or between cloud storage vendors
  • Mount multiple, encrypted, cached or diverse cloud storage as a disk
  • Analyse and account for data held on cloud storage using lsfljsonsizencdu
  • Union file systems together to present multiple local and/or cloud file systems as one

To install Rclone on Linux/Mac/BSD you can use this command:

curl https://rclone.org/install.sh | sudo bash

Below is some of popular commands of rclone

CommandDescription
rcloneShow help for rclone commands, flags and backends.
rclone cleanupClean up the remote if possible.
rclone configEnter an interactive configuration session.
rclone config createCreate a new remote with name, type and options.
rclone config deleteDelete an existing remote name.
rclone config disconnectDisconnects user from remote
rclone config dumpDump the config file as JSON.
rclone config editEnter an interactive configuration session.
rclone config fileShow path of configuration file in use.
rclone config passwordUpdate password in an existing remote.
rclone config providersList in JSON format all the providers and options.
rclone config reconnectRe-authenticates user with remote.
rclone config showPrint (decrypted) config file, or the config for a single remote.
rclone config updateUpdate options in an existing remote.
rclone config userinfoPrints info about logged in user of remote.
rclone copyCopy files from source to dest, skipping already copied.
rclone copytoCopy files from source to dest, skipping already copied.
rclone copyurlCopy url content to dest.
rclone cryptcheckCryptcheck checks the integrity of a crypted remote.
rclone cryptdecodeCryptdecode returns unencrypted file names.
rclone dedupeInteractively find duplicate filenames and delete/rename them.
rclone deleteRemove the files in path.
rclone deletefileRemove a single file from remote.
rclone genautocompleteOutput completion script for a given shell.
rclone genautocomplete bashOutput bash completion script for rclone.
rclone genautocomplete fishOutput fish completion script for rclone.
rclone genautocomplete zshOutput zsh completion script for rclone.
rclone gendocsOutput markdown docs for rclone to the directory supplied.
rclone hashsumProduces a hashsum file for all the objects in the path.
rclone linkGenerate public link to file/folder.
rclone listremotesList all the remotes in the config file.
rclone lsList the objects in the path with size and path.
rclone lsdList all directories/containers/buckets in the path.
rclone lsfList directories and objects in remote:path formatted for parsing.
rclone lsjsonList directories and objects in the path in JSON format.
rclone lslList the objects in path with modification time, size and path.
rclone md5sumProduces an md5sum file for all the objects in the path.
rclone mkdirMake the path if it doesn’t already exist.
rclone mountMount the remote as file system on a mountpoint.
rclone moveMove files from source to dest.
rclone movetoMove file or directory from source to dest.
rclone ncduExplore a remote with a text based user interface.
rclone obscureObscure password for use in the rclone config file.
rclone purgeRemove the path and all of its contents.
rclone rcRun a command against a running rclone.
rclone rcatCopies standard input to file on remote.
rclone rcdRun rclone listening to remote control commands only.
rclone rmdirRemove the empty directory at path.
rclone rmdirsRemove empty directories under the path.
rclone selfupdateUpdate the rclone binary.
rclone serveServe a remote over a protocol.
rclone serve dlnaServe remote:path over DLNA
rclone serve ftpServe remote:path over FTP.
rclone serve httpServe the remote over HTTP.
rclone serve resticServe the remote for restic’s REST API.
rclone serve sftpServe the remote over SFTP.
rclone serve webdavServe remote:path over webdav.
rclone settierChanges storage class/tier of objects in remote.
rclone sha1sumProduces an sha1sum file for all the objects in the path.
rclone sizePrints the total size and number of objects in remote:path.
rclone syncMake source and dest identical, modifying destination only.
rclone testRun a test command
rclone cheat sheet

Here is an overview of the major features of each cloud storage system Rclone supports.

NameHashModTimeCase InsensitiveDuplicate FilesMIME Type
1FichierWhirlpoolNoNoYesR
Amazon DriveMD5NoYesNoR
Amazon S3MD5YesNoNoR/W
Backblaze B2SHA1YesNoNoR/W
BoxSHA1YesYesNo
Citrix ShareFileMD5YesYesNo
DropboxDBHASH ¹YesYesNo
Enterprise File FabricYesYesNoR/W
FTPNoNoNo
Google Cloud StorageMD5YesNoNoR/W
Google DriveMD5YesNoYesR/W
Google PhotosNoNoYesR
HDFSYesNoNo
HTTPNoNoNoR
HubicMD5YesNoNoR/W
JottacloudMD5YesYesNoR
KoofrMD5NoYesNo
Mail.ru CloudMailru YesYesNo
MegaNoNoYes
MemoryMD5YesNoNo
Microsoft Azure Blob StorageMD5YesNoNoR/W
Microsoft OneDriveSHA1YesYesNoR
OpenDriveMD5YesYesPartial
OpenStack SwiftMD5YesNoNoR/W
pCloudMD5, SHA1YesNoNoW
premiumize.meNoYesNoR
put.ioCRC-32YesNoYesR
QingStorMD5NoNoNoR/W
SeafileNoNoNo
SFTPMD5, SHA1YesDependsNo
SugarSyncNoNoNo
TardigradeYesNoNo
WebDAVMD5, SHA1 Yes DependsNo
Yandex DiskMD5YesNoNoR
Zoho WorkDriveNoNoNo
The local filesystemAllYesDependsNo

Backup vps data to Google Drive

After installed Rclone you type

[root@racknerd racknerd]# rclone config
Current remotes:

Name                 Type
====                 ====

e) Edit existing remote
n) New remote
d) Delete remote
r) Rename remote
c) Copy remote
s) Set configuration password
q) Quit config
e/n/d/r/c/s/q> n
name> learncode24h_com
Type of storage to configure.
Enter a string value. Press Enter for the default ("").
Choose a number from below, or type in your own value
 1 / 1Fichier
   \ "fichier"
 2 / Alias for an existing remote
   \ "alias"
 3 / Amazon Drive
   \ "amazon cloud drive"
 4 / Amazon S3 Compliant Storage Providers including AWS, Alibaba, Ceph, Digital Ocean, Dreamhost, IBM COS, Minio, and Tencent COS
   \ "s3"
 5 / Backblaze B2
   \ "b2"
 6 / Box
   \ "box"
 7 / Cache a remote
   \ "cache"
 8 / Citrix Sharefile
   \ "sharefile"
 9 / Compress a remote
   \ "compress"
10 / Dropbox
   \ "dropbox"
11 / Encrypt/Decrypt a remote
   \ "crypt"
12 / Enterprise File Fabric
   \ "filefabric"
13 / FTP Connection
   \ "ftp"
14 / Google Cloud Storage (this is not Google Drive)
   \ "google cloud storage"
15 / Google Drive
   \ "drive"
16 / Google Photos
   \ "google photos"
17 / Hadoop distributed file system
   \ "hdfs"
18 / Hubic
   \ "hubic"
19 / In memory object storage system.
   \ "memory"
20 / Jottacloud
   \ "jottacloud"
21 / Koofr
   \ "koofr"
22 / Local Disk
   \ "local"
23 / Mail.ru Cloud
   \ "mailru"
24 / Mega
   \ "mega"
25 / Microsoft Azure Blob Storage
   \ "azureblob"
26 / Microsoft OneDrive
   \ "onedrive"
27 / OpenDrive
   \ "opendrive"
28 / OpenStack Swift (Rackspace Cloud Files, Memset Memstore, OVH)
   \ "swift"
29 / Pcloud
   \ "pcloud"
30 / Put.io
   \ "putio"
31 / QingCloud Object Storage
   \ "qingstor"
32 / SSH/SFTP Connection
   \ "sftp"
33 / Sugarsync
   \ "sugarsync"
34 / Tardigrade Decentralized Cloud Storage
   \ "tardigrade"
35 / Transparently chunk/split large files
   \ "chunker"
36 / Union merges the contents of several upstream fs
   \ "union"
37 / Webdav
   \ "webdav"
38 / Yandex Disk
   \ "yandex"
39 / Zoho
   \ "zoho"
40 / http Connection
   \ "http"
41 / premiumize.me
   \ "premiumizeme"
42 / seafile
   \ "seafile"
Storage> 15
** See help for drive backend at: https://rclone.org/drive/ **

Google Application Client Id
Setting your own is recommended.
See https://rclone.org/drive/#making-your-own-client-id for how to create your own.
If you leave this blank, it will use an internal key which is low performance.
Enter a string value. Press Enter for the default ("").
client_id>
OAuth Client Secret
Leave blank normally.
Enter a string value. Press Enter for the default ("").
client_secret>
Scope that rclone should use when requesting access from drive.
Enter a string value. Press Enter for the default ("").
Choose a number from below, or type in your own value
 1 / Full access all files, excluding Application Data Folder.
   \ "drive"
rclone configy/n> n
Remote config
Use auto config?
 * Say Y if not sure
 * Say N if you are working on a remote or headless machine
y) Yes (default)
n) No
y/n> n
Please go to the following link: https://accounts.google.com/o/oauth2/auth?access_type=offline&client_id=11111111.apps.googleusercontent.com&redirect_uri=urn%3Aietf%3Awg%3Aoauth%3A2.0%3Aoob&response_type=code&scope=https%3A%2F%2Fwww.googleapis.com%2Fauth%2Fdrive&state=****************
Log in and authorize rclone for access
Enter verification code> ******************************************
Configure this as a Shared Drive (Team Drive)?
y) Yes
n) No (default)
y/n> n
--------------------
[learncode24h_com]
type = drive
scope = drive
token = {"access_token":"************","token_type":"Bearer","refresh_token":"**********","expiry":"2021-04-21T11:40:40.21300654+07:00"}
--------------------
y) Yes this is OK (default)
e) Edit this remote
d) Delete this remote
y/e/d> y
Current remotes:

Name                 Type
====                 ====
ducquyen_dev         drive
leducquyen_it        drive

e) Edit existing remote
n) New remote
d) Delete remote
r) Rename remote
c) Copy remote
s) Set configuration password
q) Quit config
e/n/d/r/c/s/q> q

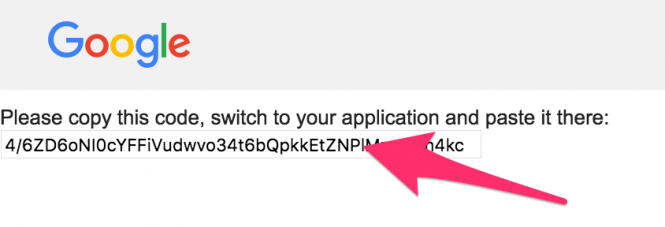
You access generated link by Rclone to grant permission read/write for Rclone and get access token then enter it in terminal like this

That’s all with Rclone. After backup data you type rclone copy to push file to cloud storage

rclone copy /home/backup.tar.gz learcode24h_com:backup_folder
  • learncode24h_com is my remote name configured for my Google Drive
  • backup_folder is folder contains backup data on my Google Drive

For deleting old backup data you can use this command:

rclone -q --min-age 1w delete learncode24h_com:backup_folder #Remove all backups older than 1 week

This script (bash shell) is used for backup database MySQL daily automatically and remove old backup to save storage by duration. To set script run automatically you will need add it to cron job.

#!/bin/bash
#==============================================================================
#TITLE:            mysql_backup.sh
#DESCRIPTION:      script for automating the daily mysql backups on development computer
#AUTHOR:           tleish
#VERSION:          0.4
#USAGE:            ./mysql_backup.sh
#CRON:
  # example cron for daily db backup @ 9:15 am
  # min  hr mday month wday command
  # 15   9  *    *     *    /Users/[your user name]/scripts/mysql_backup.sh

#RESTORE FROM BACKUP
  #$ gunzip < [backupfile.sql.gz] | mysql -u [uname] -p[pass] [dbname]

#==============================================================================
# CUSTOM SETTINGS
#==============================================================================

# directory to put the backup files
BACKUP_DIR=/home/backup_all_db

# MYSQL Parameters
MYSQL_UNAME=your_user
MYSQL_PWORD=your_password

# Don't backup databases with these names
# Example: starts with mysql (^mysql) or ends with _schema (_schema$)
IGNORE_DB="(^mysql|_schema$)"

# include mysql and mysqldump binaries for cron bash user
PATH=$PATH:/usr/local/mysql/bin

# Number of days to keep backups
KEEP_BACKUPS_FOR=14 #days

#==============================================================================
# METHODS
#==============================================================================

# YYYY-MM-DD
TIMESTAMP=$(date +%F)

function delete_old_backups()
{
  echo "Deleting $BACKUP_DIR/*.sql.gz older than $KEEP_BACKUPS_FOR days"
  find $BACKUP_DIR -type f -name "*.sql.gz" -mtime +$KEEP_BACKUPS_FOR -exec rm {} \;
}

function mysql_login() {
  local mysql_login="-u $MYSQL_UNAME"
  if [ -n "$MYSQL_PWORD" ]; then
    local mysql_login+=" -p$MYSQL_PWORD"
  fi
  echo $mysql_login
}

function database_list() {
  local show_databases_sql="SHOW DATABASES WHERE \`Database\` NOT REGEXP '$IGNORE_DB'"
  echo $(mysql $(mysql_login) -e "$show_databases_sql"|awk -F " " '{if (NR!=1) print $1}')
}

function echo_status(){
  printf '\r';
  printf ' %0.s' {0..100}
  printf '\r';
  printf "$1"'\r'
}

function backup_database(){
    backup_file="$BACKUP_DIR/$TIMESTAMP.$database.sql.gz"
    output+="$database => $backup_file\n"
    echo_status "...backing up $count of $total databases: $database"
    $(mysqldump $(mysql_login) $database | gzip -9 > $backup_file)

    rclone sync $backup_file $REMOTE_BACKUP_DATABASE
}


function backup_databases(){
  local databases=$(database_list)
  local total=$(echo $databases | wc -w | xargs)
  local output=""
  local count=1
  for database in $databases; do
    backup_database
    local count=$((count+1))
  done
  echo -ne $output | column -t
}

function hr(){
  printf '=%.0s' {1..100}
  printf "\n"
}


#==============================================================================
# RUN SCRIPT
#==============================================================================
delete_old_backups
hr
backup_databases
hr
printf "All backed up!\n\n"

Add it to cron job, run on 2:30 every day.

chmod +x your_script.sh
crontab -e

30 2 * * * /your_script.sh

When building Laravel web applications, it is almost impossible to avoid encountering bugs. If the errors ‘re just typing wrong or missing the semicolon you will fix them easily, but if the error are logical bugs, it will take you longer to fix. To discover the reason causes bug you can will need to dump a full SQL query for detecting the reason exactly. In this tutorial I will guide you some simple ways to show SQL Query log in Laravel.

Solution 1: Capture SQL Query Log in App Service Provider

Go to app/Providers/AppServiceProvider.php and add the following code:

public function boot()
    {   
        
        /*........add this code to bottom boot function........*/
		
        if (env('APP_ENV') !== 'production') {
            DB::connection()->enableQueryLog();
            Event::listen('kernel.handled', function ($request, $response) {
                if ( $request->has('debug') ) {
                    $queries = DB::getQueryLog();
                    $formattedQueries = [];
                    foreach( $queries as $query ) :
                        $prep = $query['query'];
                        foreach( $query['bindings'] as $binding ) :
                            $prep = preg_replace("#\?#", is_numeric($binding) ? $binding : "'" . $binding . "'", $prep, 1);
                        endforeach;
                        $formattedQueries[] = $this->removeLineBreaks($prep);
                    endforeach;
                    dd($formattedQueries);
                }
            });
        }
    }
}

function removeLineBreaks(string $item){
   return str_replace(["\r\n", "\r", "\n"], ' ', $item);
}

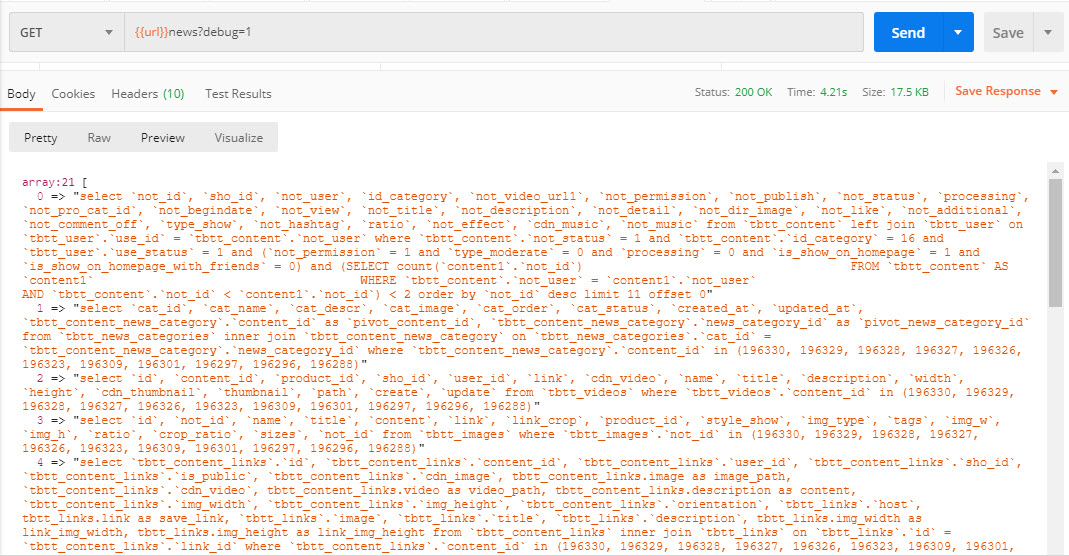
When you run Laravel web application in development environment and add a GET param debug=1 to the end of url, Laravel will listen Query Log and replace binding wildcard question mark by corresponding value. And finally we will collect an array contains all SQL query executed by web application like this:

Solution 2: Use Laravel Debugbar

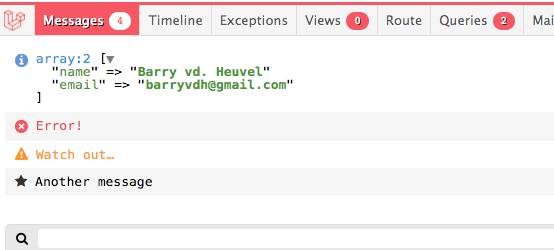
Laravel Debugbar adds a small bar at the bottom of the browser with debug information (e.g the number of queries). With Eloquent it can be easy to make unnecessary database requests so Debugbar helps to identify code that is not performance. It displays this right next to the developer console at the bottom of the browser.

Installing the Laravel Debugbar

In your Laravel 5 project require the package:

composer require barryvdh/laravel-debugbar

Next open config/app.php and inside the “providers” array add:

'Barryvdh\Debugbar\ServiceProvider',

Finally, if you wish to add the facades add this to the “aliases” array:

'Debugbar' => 'Barryvdh\Debugbar\Facade',

The Laravel Debugbar have some useful collectors can help you boost development speed.

  • QueryCollector: Show all queries, including binding + timing
  • RouteCollector: Show information about the current Route.
  • ViewCollector: Show the currently loaded views. (Optionally: display the shared data)
  • EventsCollector: Show all events

Apart from the core collectors, it includes a bunch of useful collectors that you can optionally enable:

  • LaravelCollector: Show the Laravel version and Environment. (disabled by default)
  • SymfonyRequestCollector: replaces the RequestCollector with more information about the request/response
  • LogsCollector: Show the latest log entries from the storage logs. (disabled by default)
  • FilesCollector: Show the files that are included/required by PHP. (disabled by default)
  • ConfigCollector: Display the values from the config files. (disabled by default)
  • CacheCollector: Display all cache events. (disabled by default)

You can learn more about this package, get full installation instructions at barryvdh/laravel-debugbar.

To enable HTTPS on your website, you need to get a certificate (a type of file) from a Certificate Authority (CA). Let’s Encrypt is a Free CA supported by large company like Google, Facebook. Current Sentora panel doesn’t support install SSL of Let’s Encrypt such as Cpanel. For installing SSL Let’s Encrypt on Sentora you will need to install SSL with the command line. In this tutorial I’ll use CentOS 7 to setup SSL Let’s Encrypt on Sentora. Now Let’s go:

1. Install Open SSL for Centos 7/ Ubuntu

yum install –y openssl
apt-get install -y openssl (Ubuntu)

2. Install SSL Let’s Encrypt

yum install –y git (for Ubuntu: apt-get install -y git)
git clone https://github.com/letsencrypt/letsencrypt
cd letsencrypt
./letsencrypt–auto —help

3. Get SSL Let’s Encrypt for your domain

 service httpd stop
./letsencrypt–auto certonly  --standalone -d yourdomain.com
service httpd start

To get SSL Let’s Encrypt for your domain you need to stop webserver (Apache Server), after get SSL successfully you can start it again.

4. Config SSL Let’s Encrypt for your webserver recognize SSL

cd /etc/httpd/conf.d/
nano yourdomain.com-vhost.conf

For unbtu: cd /etc/apache2/sites-available

We’ll need to create a virutal host config file with format file name like this: yourdomainname.com-vhost.conf. Below is a sample file, you will need to replace learncode24h.com by your domain name and Document Root by path to your source website folder. And don’t forget change path log file by your path log file.

<virtualhost *:80>
   ServerName learncode24h.com
   ServerAlias www.learncode24h.com
   ServerAdmin admin@learncode24h.com
   RewriteEngine on
   ReWriteCond %{SERVER_PORT} !^443$
   RewriteRule ^/(.*) https://%{HTTP_HOST}/$1 [NC,R,L]
</virtualhost>

<virtualhost *:443>
        ServerName learncode24h.com
        ServerAlias www.learncode24h.com
        ServerAdmin lducquyen@gmail.com
        DocumentRoot "path/to/source/code"
        php_admin_value suhosin.executor.func.blacklist "passthru, show_source, shell_exec, system, pcntl_exec, popen, pclose, proc_open, proc_nice, proc_terminate, proc_get_status, proc_close, leak, apache_child_terminate, posix_kill, posix_mkfifo, posix_setpgid, posix_setsid,$
        ErrorLog "/var/sentora/logs/domains/admin/learncode24h.com-error.log"
        CustomLog "/var/sentora/logs/domains/admin/learncode24h.com-access.log" combined
        CustomLog "/var/sentora/logs/domains/admin/learncode24h.com-bandwidth.log" common
        <Directory "/var/sentora/hostdata/admin/public_html/learncode24h_com">
          Options +FollowSymLinks -Indexes
          AllowOverride All
          Require all granted
        </Directory>
        AddType application/x-httpd-php .php3 .php
        DirectoryIndex index.html index.htm index.php index.asp index.aspx index.jsp index.jspa index.shtml index.shtm

        SSLEngine on
        SSLProtocol ALL -SSLv2 -SSLv3
        SSLHonorCipherOrder On
        SSLCipherSuite ECDH+AESGCM:DH+AESGCM:ECDH+AES256:DH+AES256:ECDH+AES128:DH+AES:ECDH+3DES:DH+3DES:RSA+AESGCM:RSA+AES:RSA+3DES:!aNULL:!MD5:!DSS
        SSLCertificateFile /etc/letsencrypt/live/learncode24h.com/cert.pem
        SSLCertificateKeyFile /etc/letsencrypt/live/learncode24h.com/privkey.pem
        SSLCertificateChainFile /etc/letsencrypt/live/learncode24h.com/chain.pem
        Header always set Strict-Transport-Security "max-age=63072000;"
        SSLCompression off
</virtualhost>

5. Auto renew SSL Let’s Encrypt

SSL Let’s Encrypt will be expired after 90 days, so you must renew it per 90-days. To save your time and avoid SSL error on your website caused expired SSL, you should renew SSL Let’s Encrypt automatically by using crontab of CentOS

30 2 * * 1 service httpd stop
31 2 * * 1 /root/letsencrypt/letsencrypt–auto renew
35 2 * * 1 service httpd restart

Typing ESC then type wq! –>Enter

6. Check if the SSL Let’s Encrypt has been installed successfully?

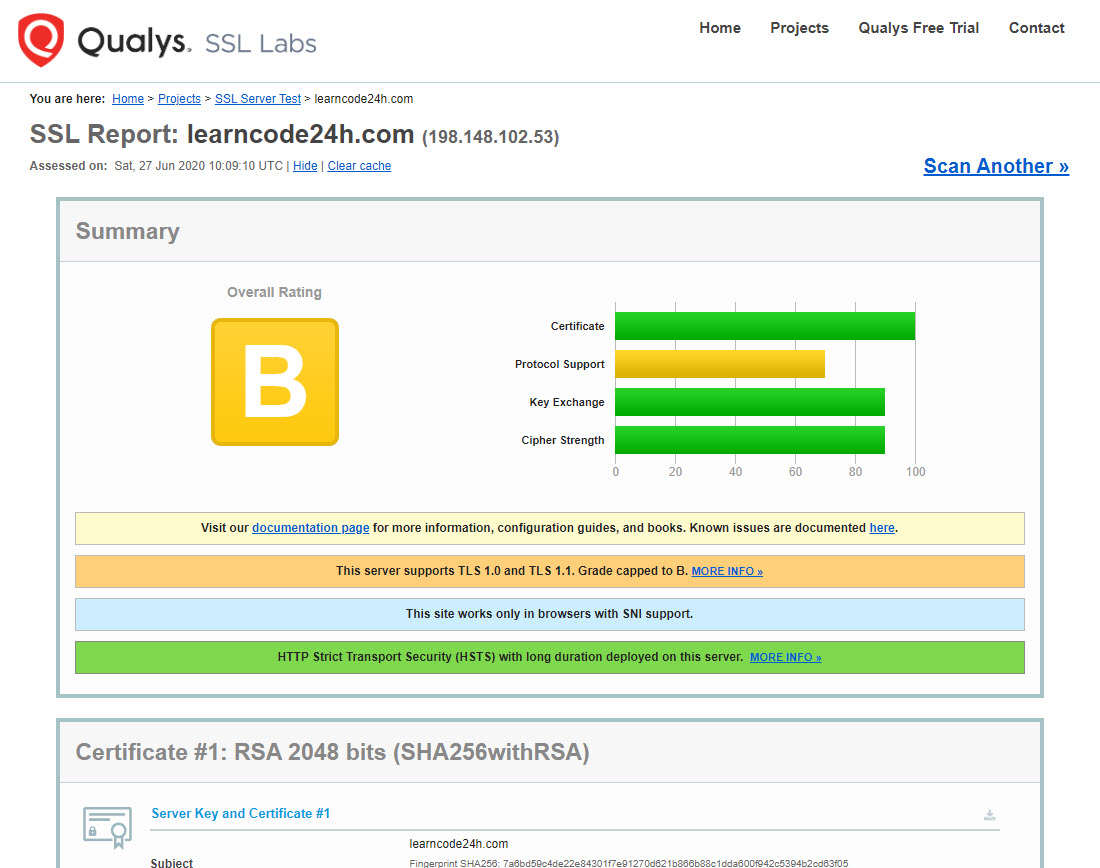
Go to https://www.ssllabs.com/ssltest/ and submit your website domain to get result.

The Loop refers to how WordPress determines what content (posts, pages, or custom content) to display on a page you are visiting. The Loop can display a single piece of content or a group of posts and pages that are selected and then displayed by looping through the content; thus, it’s called the Loop.

Following is a minimal Loop example.

<?php
if ( have_posts() ) :
while ( have_posts() ) : the_post();
//loop content (template tags, html, etc) endwhile;
endif; ?>

The preceding while statement starts the Loop, essentially looping through all posts and pages to be displayed on the page until there are no more. The Loop will continue while content exists to be displayed. Once all content has been displayed, the while loop will end. The have _ posts() function simply checks to see if the list of posts being processed is exhausted, or had no entries to begin with.

Next, the the _ post() function is called to load all of the post data. This function must be called inside your loop for the post data to be set correctly. Calling the _ post() in turn calls the setup _ postdata() function to set up the post metadata such as the author and tags of the content you are displaying in the Loop, as well as the content of the post itself.

Note that by the time this default Loop is called, WordPress has already called the get _ posts() method within the default query object to build the list of appropriate content for the URL being viewed, and the Loop in this case is charged with displaying that list of posts.

The Loop is usually surrounded by HTML tags in your theme template files. The following code shows how the Loop is structured in the core Twenty Fourteen theme that comes with WordPress:

<div id="main-content" class="main-content">
<?php
if ( is_front_page() && twentyfourteen_has_featured_posts() ) {
// Include the featured content template.
get_template_part( 'featured-content' ); }
?>
<div id="primary" class="content-area">
<div id="content" class="site-content" role="main">
<?php
if ( have_posts() ) :
// Start the Loop.
while ( have_posts() ) : the_post();
get_template_part( 'content', get_post_format() );
endwhile;
// Previous/next post navigation. 
twentyfourteen_paging_nav();
else :
// If no content, include the "No posts found" template. 
get_template_part( 'content', 'none' );
endif; ?>
</div></div>
<?php get_sidebar( 'content' ); ?>
</div>

TEMPLATE TAGS

PHP functions used in your WordPress theme templates to display Loop content are called template tags. These tags are used to display specific pieces of data about your website and content. This allows you to customize how and where content is displayed on your website.

Commonly used template tags

  • the_permalink(): Displays the URL of your post.
  • the_title(): Displays the title of the post.
  • the_ID(): Displays the unique ID of your post.
  • the_content(): Displays the full content of your post.
  • the_excerpt(): Displays the excerpt of your post. If the Excerpt field is filled out on the Post edit screen, that will be used. If not, WordPress will auto-generate a short excerpt from your post content.
  • the_time(): Displays the date/time your post was published.
  • the_author(): Displays the author of the post.
  • the_tags(): Displays the tags attached to the post.
  • the_category(): Displays the categories assigned to the post.
  • edit_post_link(): Displays an edit link that is shown only if you are logged in and allowed to edit the post.
  • comment_form(): Displays a complete commenting form for your post.

The following example views the values of a couple of different template tags:

<?php
if ( have_posts() ) :
while ( have_posts() ) : the_post();
?>
<a href="<?php the_permalink(); ?>"><?php the_title(); ?></a> <br />
<?php
the_content();
endwhile; endif;
?>

Using the WP_Query Object

WP _ Query is a class defined in WordPress that makes it easy to create your own custom Loops. Both query _ posts() and get _ posts() use the WP _ Query class to retrieve the WordPress content. When you’re using query _ posts(), the global variable $wp _ query is used as an instance of WP _ Query, making $wp _ query the default data store for several operations. Custom Loops can be used anywhere in your theme template files to display different types of content; they must build on separate instances of a WP _ Query variable.

The following is an example of a custom Loop displaying the five most recent posts on your website:

<?php
$myPosts = new WP_Query( 'posts_per_page=5' );
while ( $myPosts- >have_posts() ): 
$myPosts->the_post();
?>
<?php endwhile; ?>

Post Parameters

Parameters are used to define what content will be returned in your Loop, whether a custom Loop or altering the primary Loop

  • p=2: Loads an individual post by ID.
    name=your-slug: Loads posts based on post slug (permalink tail).
  • post_status=pending: Loads posts by post status. For example, if you choose to see only drafts, use post_status=draft.
  • ignore_sticky_posts: Excludes sticky posts from being returned first. A sticky post is one that always sorts to the top of the list of posts, independent of the other parameters set for the query. You can have multiple sticky posts, making them useful for calling attention to news announcements, highlighting changes, or otherwise grabbing the reader’s attention, and this parameter lets you drop them from their priority slot at the top of the list.
  • post_type=post: Loads posts based on type. If you only want to look at pages, not posts, post_type=page will retrieve them.
  • posts_per_page=5: Number of posts to load per page. This is the default. To show all posts, set this parameter to 1.
  • offset=1: Number of posts to skip before loading

Page parameters

  • page_id=5: Loads an individual page by ID. Like post IDs and user IDs, page IDs can be found in the dashboard by hovering over a page and looking at the URL displayed at the bottom on your browser.
  • pagename=Contact: Loads a page by name, in this case the Contact page.
  • pagename=parent/child: Loads a child page by slug, or hierarchy of slugs (that is, its path)

Category, Tag, and Author Parameters

  • cat=3,4,5: Loads posts based on category ID.
  • category_name: About Us: Loads posts based on category name. Note that if a post belongs to more than one category, it will show up in selections for each of those categories.
  • tag=writing: Loads posts based on tag name.
  • tag_id=34: Loads posts based on tag ID.
  • author=1: Loads posts based on user ID.
  • author_name=brad: Loads posts based on author’s name. author__in & author__not_in ”Loads posts based on user ID

Ordering and Custom Field Parameters

  • orderby=title: Field to order posts by.
  • order=ASC: Defines ascending or descending order of orderby.
  • meta_key=color: Loads posts by custom field name.
  • meta_value=blue: Loads posts by custom field value. Must be used in conjunction with the meta_key parameter.
  • meta_query: Used for more advanced custom field (metadata) queries.

Adding Paging to a Loop

<?php
$temp = $wp_query;
$wp_query= null;
$paged = ( get_query_var( 'paged' ) ) ? get_query_var( 'paged' ) : 1; 
$wp_query = new WP_Query( 'posts_per_page=5&paged='.$paged );
while($wp_query->have_posts() ) : $wp_query->the_post();?>
 <h2>
   <a href="<?php the_permalink(); ?>"><?php the_title(); ?></a> 
 </h2>
<?php the_excerpt(); ?>
endwhile; ?>

<div class="navigation">
<div class="alignleft"><?php previous_posts_link( '« Previous' );
?></div>
<div class="alignright"><?php next_posts_link( 'More »' ); ?></div>
</div>
<?php
$wp_query = null;
$wp_query = $temp; 
?>

First, you have to store the original $wp _ query variable into the temporary variable $temp. Next, you set $wp _ query to null to completely flush it clean. This is one of the few times it’s acceptable to overwrite a global variable value in WordPress.

Now set your new WP _ Query object into the $wp _ query variable and execute it by calling the object’s query() function to select posts for your custom Loop. Notice the $paged variable added to the end of the query. This stores the current page, using the get _ query _ var() function, so WordPress knows how to display the navigation links.

WordPress is the most popular CMS (content management system) in the world being used by millions of websites. The best thing about WordPress is that it is a Free Open Source project which can be used by anyone over the web which means you can use it for anything purposes such as blog site, ecommerce site…

To install WordPress you need download the WordPress package and install it in your web server’s directory tree, and then navigate to your top level URL and complete the configuration. One (compound) sentence describes it completely.

Step 1: Download and install XAMPP on your computer

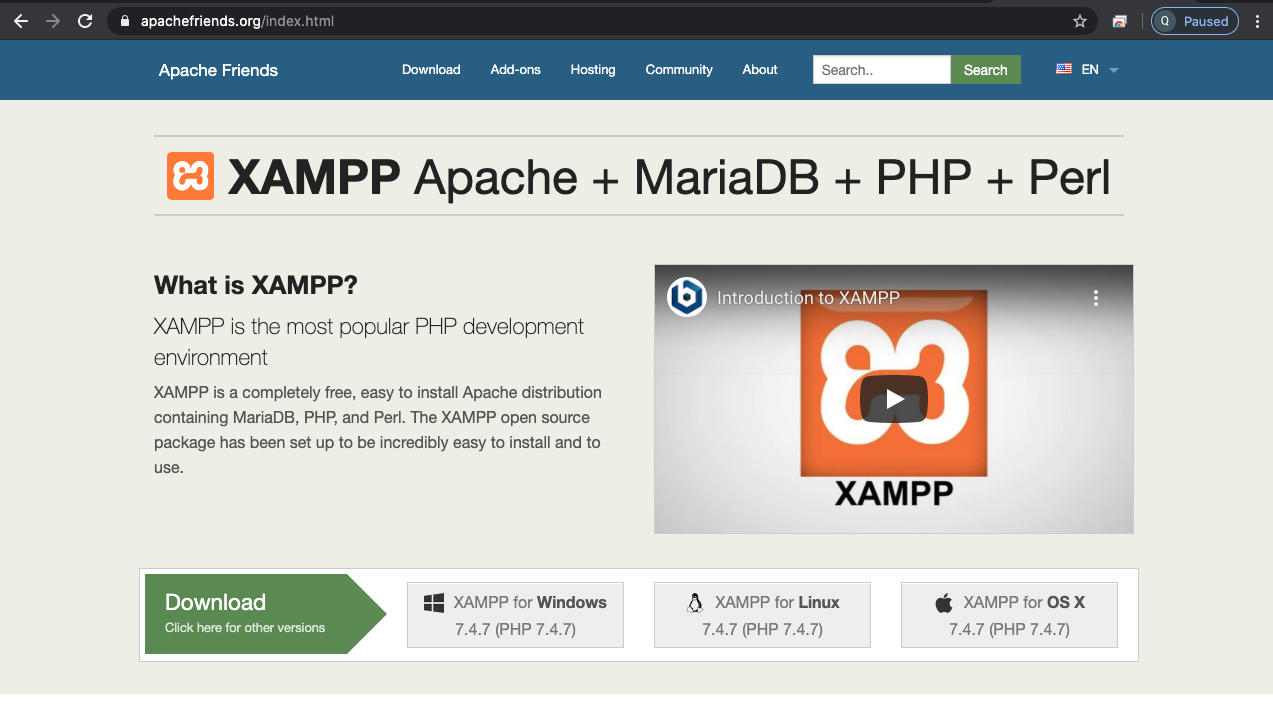
The first step on your way to install WordPress locally is to download and install the XAMPP software at https://www.apachefriends.org/index.html. XAMPP is a bundle web server include PHP, MySQL, PHP, Apache. By using XAMPP you will save a lot of time for configuring web server working.

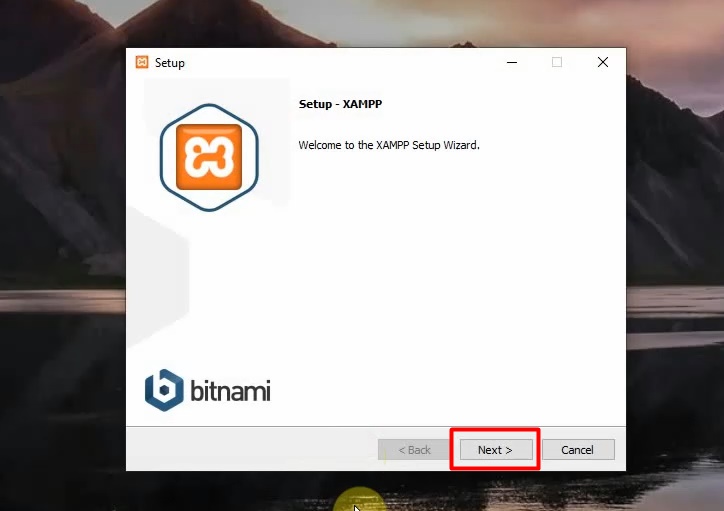
Double click downloaded file and install it.

Just click Next to continue.

On the next screen, you can choose which components to install. To install WordPress, you do not need all of the components. In addition to the required components, all you need are:

  • MySQL
  • PHPMyAdmin

You can select which folder to install XAMPP in. I always leave it as the default

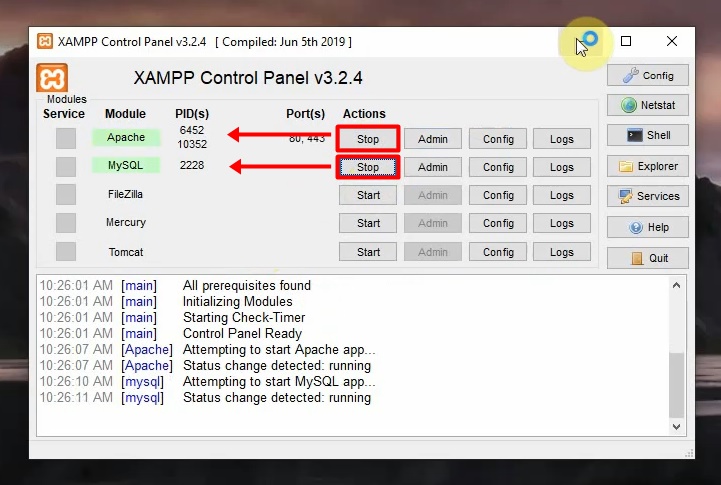
Then you click Next until the installation is completed. After installation completed, you need start both modules Apache and MySQL from control panel:

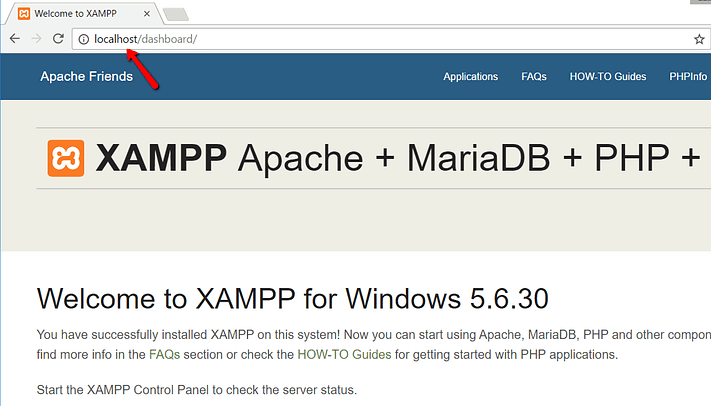
And now you should be able to test that your local server is working by going to http://localhost/ in your web browser.

everything on localhost

If all went well, you now have a functioning XAMPP server on your Windows PC!

Step 2: Add the WordPress files

First, you need to go to https://wordpress.org/download/ and download the latest version of WordPress.

Then, in Windows, navigate to the folder where you installed XAMPP. For me, that’s C:/xampp. It should be something similar for you. Then, in that folder, find the htdocs subfolder:

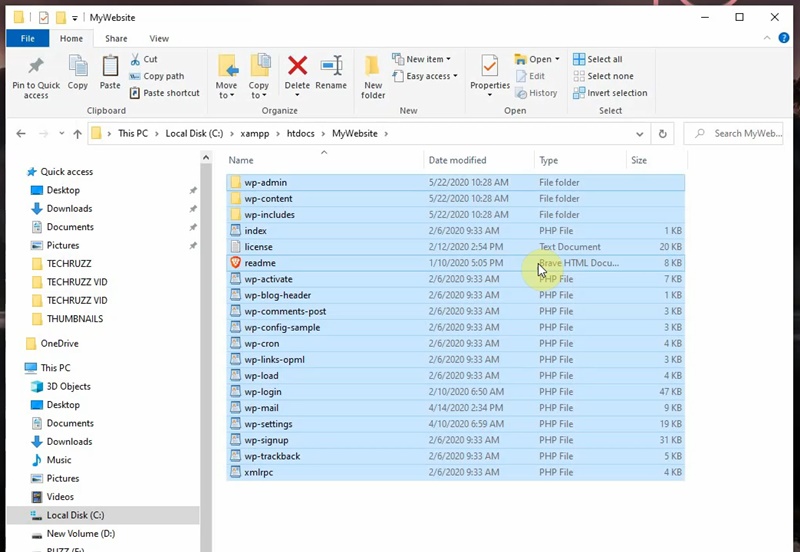
In htdocs, create a new folder for your test site. This folder name will become the sub-name used to access your site. For example, if you make the folderMyWebsite, you’ll access your site by going to http://localhost/MyWebsite.

Once you create the folder, extract the WordPress .zip file you downloaded from wordpress.org into it:

Step 3: Create a database for WordPress

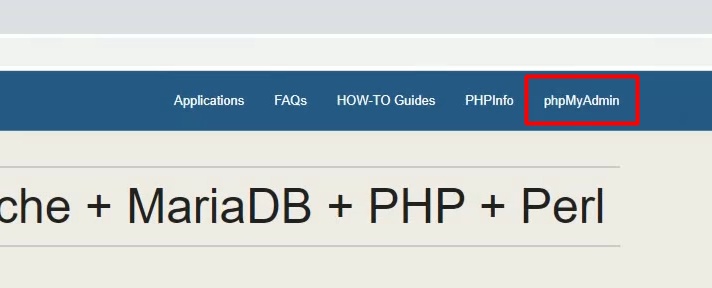
Next, you need to create a MySQL database for your WordPress install. To do that, launch PHPMyAdmin from localhost page:

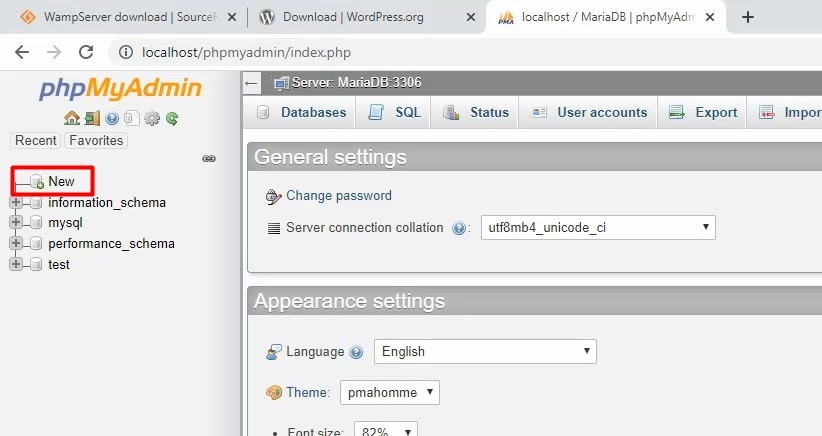
Then click new and create database for WordPress:

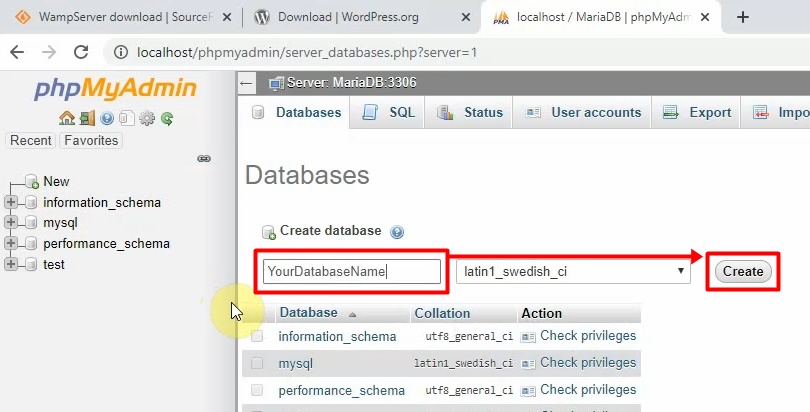
You need enter a name for your database and charset for database then click Create. Your name can be anything just remember it because you’ll need it for the next step:

Step 4: Install WordPress locally via the on-screen installer

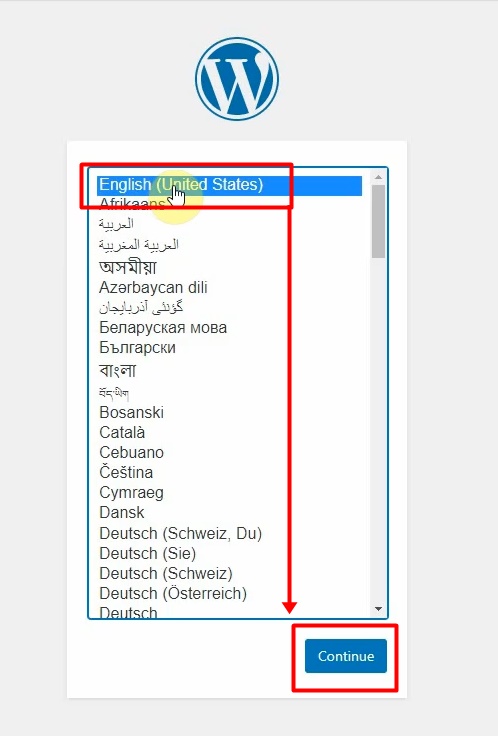
When you visit your test site, you should see the normal WordPress installer. Remember, your test site is just http://localhost/FOLDERNAME:

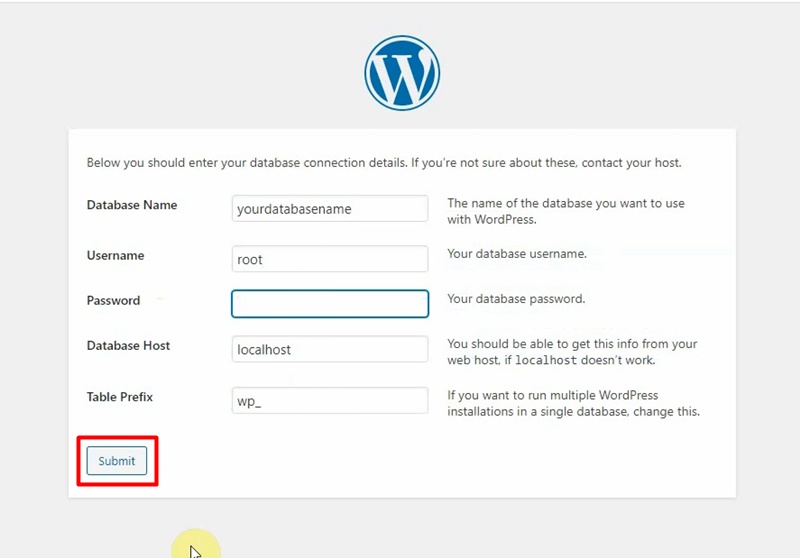
The only step where this process will differ from a normal install is the database details. When you get to the database details, enter them like this:

  • Database Name = Name of the database you created in PHPMyAdmin
  • Username = root
  • Password = leave blank

Then finish the rest of the WordPress install process like normal.

Once you complete the process, you should see your brand new WordPress install running perfectly on your local host.

Step 5: Install theme WordPress

To install WordPress template you can use some free theme available on WordPress or using an external theme and upload it to your site. If you use an external theme for installing WordPress template you need make sure all theme files must be zipped in a folder before uploaded to server.

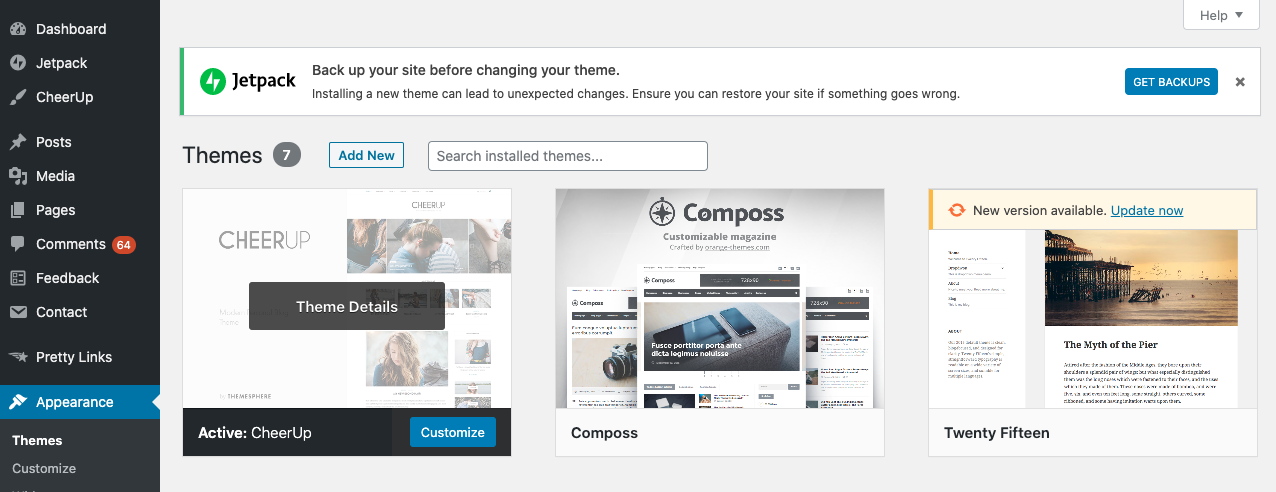
In Sidebar Menu you need to select Appearance -> Themes. In this tutorial I will install WordPress theme from an external theme file, so I click Add New button for uploading my theme. After install process completed you’ll active your theme before using.

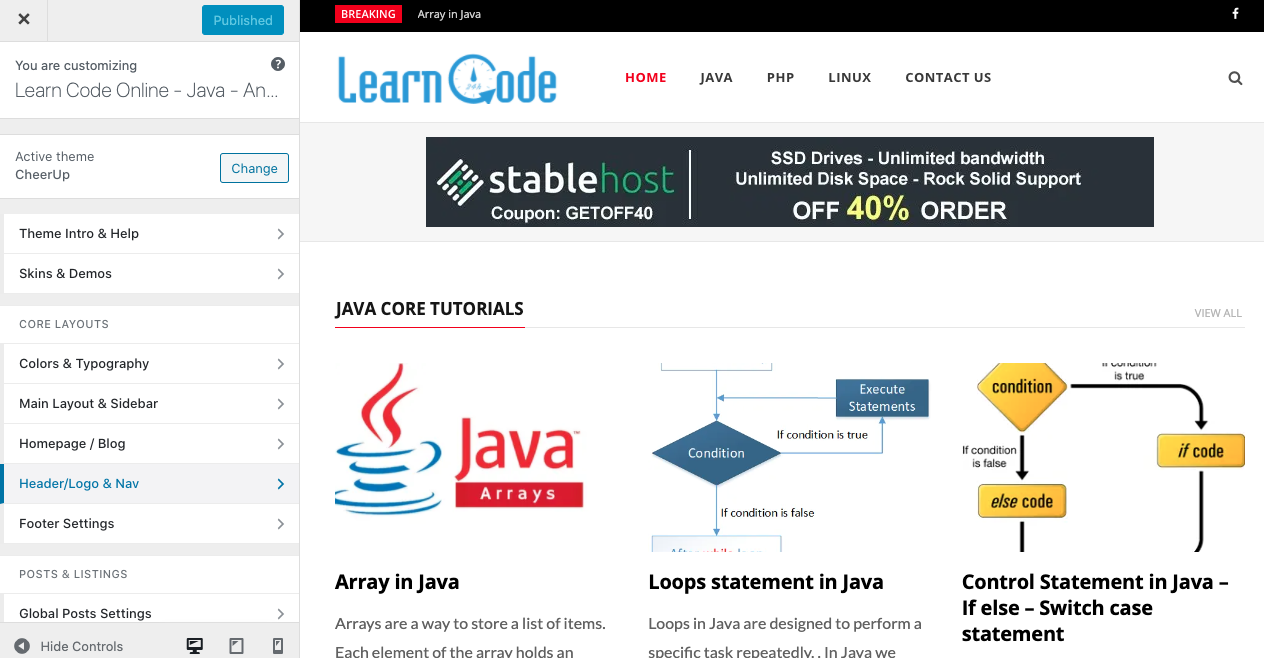
After completing the installation of the theme you need to configure the settings of the theme by access Customize menu:

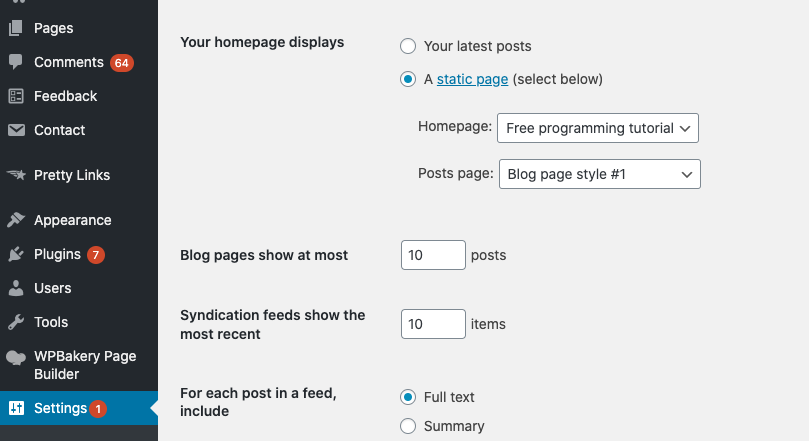
To set up a homepage for your website with installed theme, you need to access Setting->Reading menu and pick an available page in Homepage dropdown box.