Author

Browsing

After you had read 2 articles about Kafka: What is Apache Kafka? and How to install Apache Kafka on Windows you can be confident to develop a Kafka application with Java by using Spring Boot framework.

Create Kafka application in Java

In this tutorial I will use IntelliJ IDEA to develop Kafka application, you can download IntelliJ at https://www.jetbrains.com/idea/.

Step1: Create Spring Project and choose Gradle instead of Maven (you can also choose Maven if you like)
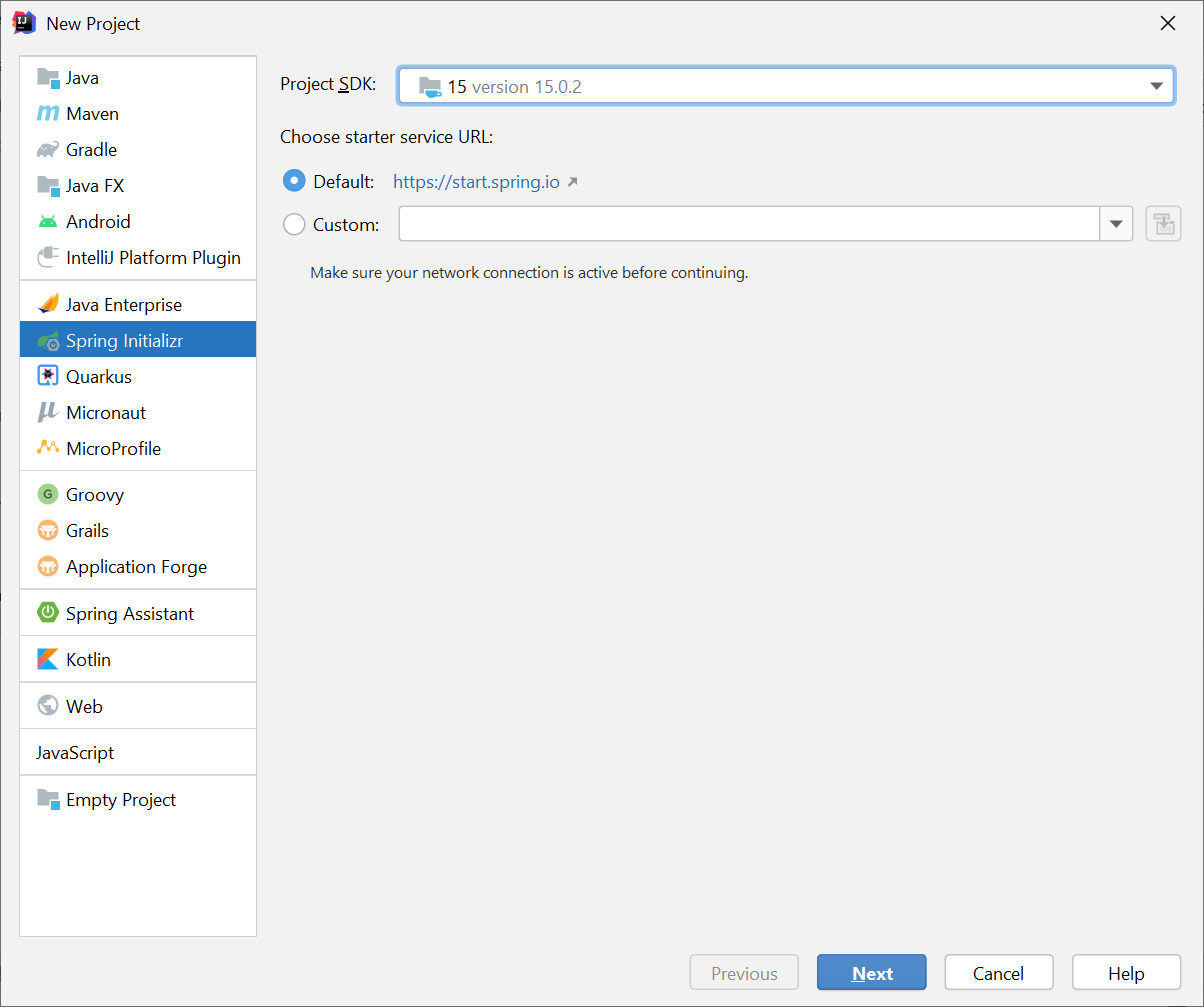
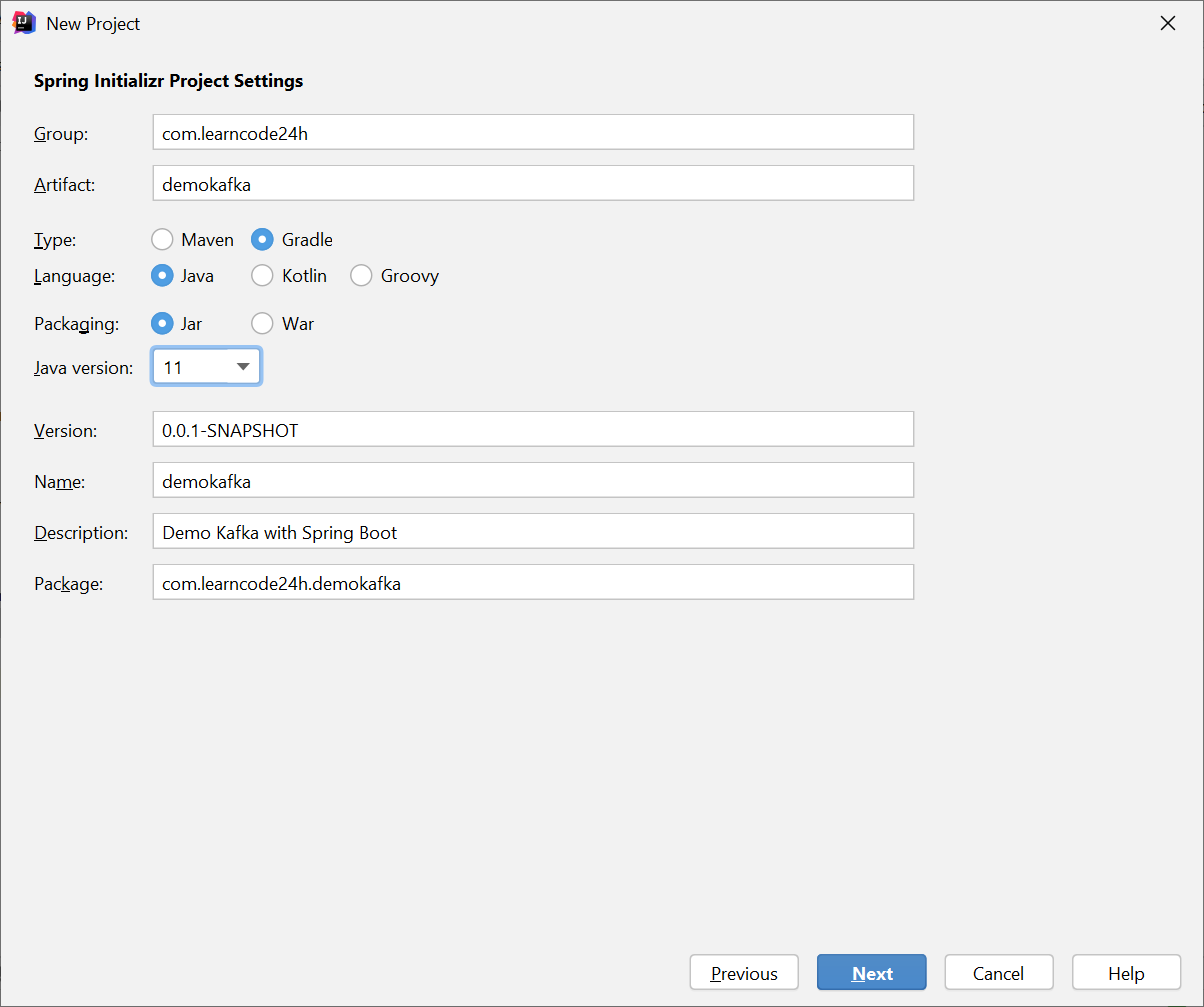
Open build.gradle and replace

org.springframework.boot:spring-boot-starter by org.springframework.boot:spring-boot-starter-web

build.gradle

plugins {
    id 'org.springframework.boot' version '2.4.5'
    id 'io.spring.dependency-management' version '1.0.11.RELEASE'
    id 'java'
}

group = 'com.learncode24h'
version = '0.0.1-SNAPSHOT'
sourceCompatibility = '11'

repositories {
    mavenCentral()
}

dependencies {
    implementation 'org.springframework.boot:spring-boot-starter-web'
    implementation 'org.springframework.kafka:spring-kafka'
    testImplementation 'org.springframework.boot:spring-boot-starter-test'
    testImplementation 'org.springframework.kafka:spring-kafka-test'
}

test {
    useJUnitPlatform()
}

create config folder then create ProducerConfiguration.java

ProducerConfiguration.java

package com.learncode24h.demokafka.config;

import org.apache.kafka.clients.producer.ProducerConfig;
import org.apache.kafka.common.serialization.StringSerializer;
import org.springframework.context.annotation.Bean;
import org.springframework.context.annotation.Configuration;
import org.springframework.kafka.core.DefaultKafkaProducerFactory;
import org.springframework.kafka.core.KafkaTemplate;
import org.springframework.kafka.core.ProducerFactory;
import java.util.HashMap;
import java.util.Map;

@Configuration
public class ProducerConfiguration {
    private static final String KAFKA_BROKER = "localhost:9092";
    @Bean
    public ProducerFactory<String, String> producerFactory() {
        return new DefaultKafkaProducerFactory<>(producerConfigurations());
    }

    @Bean
    public Map<String, Object> producerConfigurations() {
        Map<String, Object> configurations = new HashMap<>();
        configurations.put(ProducerConfig.BOOTSTRAP_SERVERS_CONFIG, KAFKA_BROKER);
        configurations.put(ProducerConfig.KEY_SERIALIZER_CLASS_CONFIG, StringSerializer.class);
        configurations.put(ProducerConfig.VALUE_SERIALIZER_CLASS_CONFIG, StringSerializer.class);
        return configurations;
    }
    @Bean
    public KafkaTemplate<String, String> kafkaTemplate() {
        return new KafkaTemplate<>(producerFactory());
    }
}

This class creates a ProducerFactory which knows how to create producers based on the configurations you provided. You’re also specified to connect to your local Kafka broker and to serialize both the key and the values with String.

Then you need to declared a KafkaTemplate bean to do operations such as sending a message to a topic and efficiently hides under-the-hood details from you.

Next, we will create a KafkaController, you’ll access a url to send messages to Kafka broker. I will create KafkaController in controller package.

KafkaController.java

package com.learncode24h.demokafka.controller;

import org.springframework.kafka.core.KafkaTemplate;
import org.springframework.web.bind.annotation.GetMapping;
import org.springframework.web.bind.annotation.RequestParam;
import org.springframework.web.bind.annotation.RestController;
import java.util.List;

@RestController
public class KafkaController {
    private KafkaTemplate<String, String> template;

    public KafkaController(KafkaTemplate<String, String> template) {
        this.template = template;
    }

    @GetMapping("/kafka/produce")
    public void produce(@RequestParam String message) {
        template.send("test", message);
    }
}

Now let’s start Kafka ZooKeeper, Kafka server and a consumers to monitor Kafka application send messages to broker.

Start Kafka ZooKeeper

C:\kafka\config>zookeeper-server-start.bat zookeeper.properties

Start Kafka Broker

C:\kafka\config>kafka-server-start.bat server.properties

Create topic test

C:\kafka\config>kafka-topics --create --zookeeper localhost:2181 --replication-factor 1 --partitions 1 --topic test

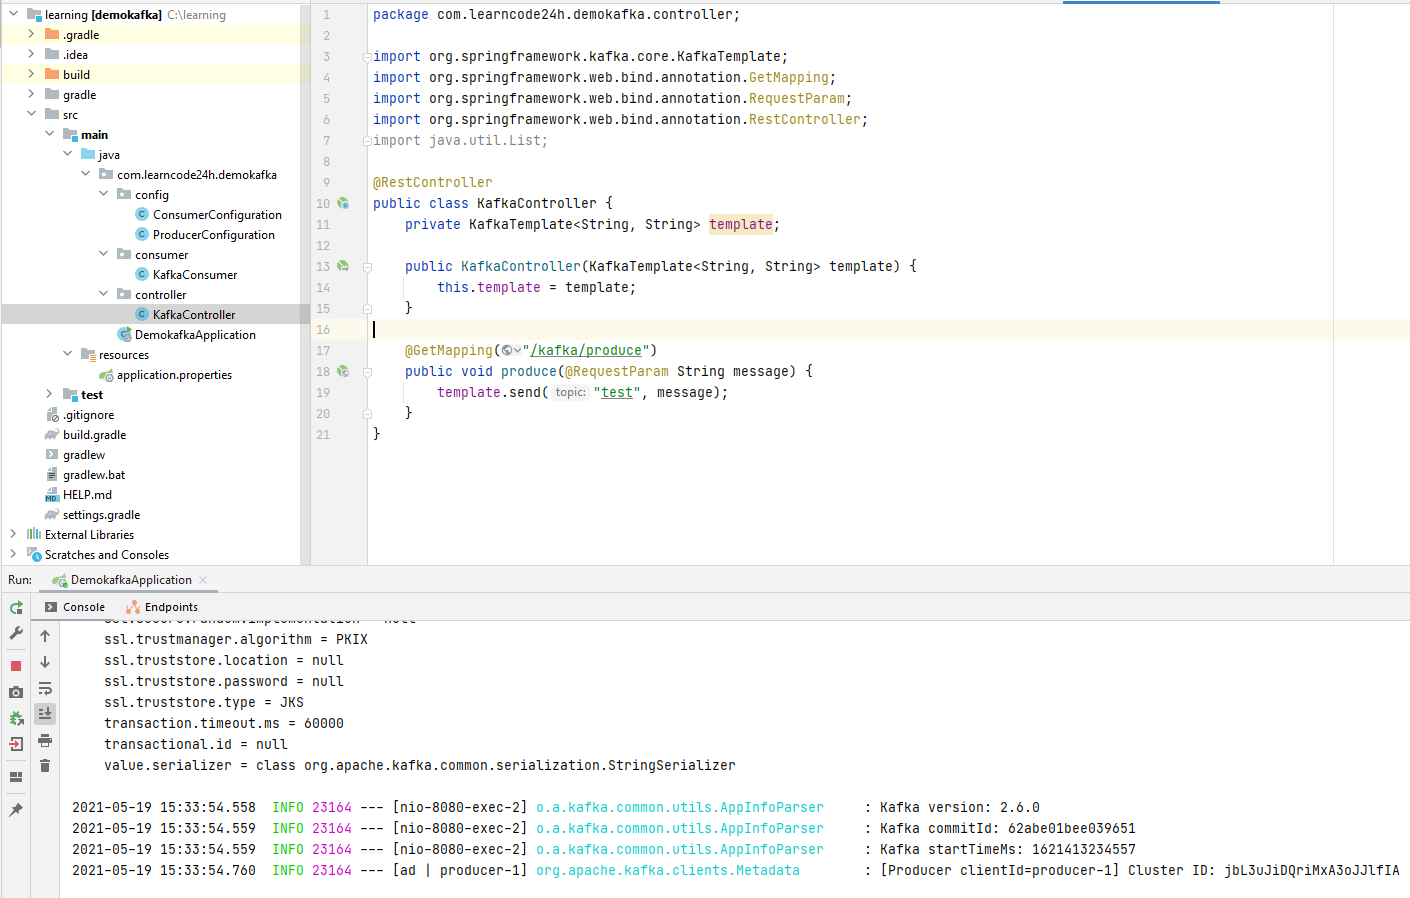
Run Kafka project and you will see a created producer in log.
Start consumer

C:\kafka\config>kafka-console-consumer.sh --bootstrap-server localhost:9092 --topic test

Open your web browser and access http://localhost:8080/kafka/produce?message=hello and http://localhost:8080/kafka/produce?message=welcome%20to%20learncode24h.com. After you hit enter, the created producer will send message “hello” and “welcome to learncode24h.com” to broker. Consumer subscribes topic test will print out these messages.

Create Kafka Consumer

Instead of listening message from terminal, we will implement consumer in Java. Create ConsumerConfiguration.java in config package

ConsumerConfiguration.java

package com.learncode24h.demokafka.config;

import org.apache.kafka.clients.consumer.ConsumerConfig;
import org.apache.kafka.common.serialization.StringDeserializer;
import org.springframework.context.annotation.Bean;
import org.springframework.context.annotation.Configuration;
import org.springframework.kafka.config.ConcurrentKafkaListenerContainerFactory;
import org.springframework.kafka.core.ConsumerFactory;
import org.springframework.kafka.core.DefaultKafkaConsumerFactory;
import java.util.HashMap;
import java.util.Map;

@Configuration
public class ConsumerConfiguration {
    private static final String KAFKA_BROKER = "localhost:9092";
    private static final String GROUP_ID = "kafka-group";

    @Bean
    public ConsumerFactory<String, String> consumerFactory() {
        return new DefaultKafkaConsumerFactory<>(consumerConfigurations());
    }

    @Bean
    public Map<String, Object> consumerConfigurations() {
        Map<String, Object> configurations = new HashMap<>();
        configurations.put(ConsumerConfig.BOOTSTRAP_SERVERS_CONFIG, KAFKA_BROKER);
        configurations.put(ConsumerConfig.GROUP_ID_CONFIG, GROUP_ID);
        configurations.put(ConsumerConfig.KEY_DESERIALIZER_CLASS_CONFIG, StringDeserializer.class);
        configurations.put(ConsumerConfig.VALUE_DESERIALIZER_CLASS_CONFIG, StringDeserializer.class);
        return configurations;
    }

    @Bean
    ConcurrentKafkaListenerContainerFactory<String, String> kafkaListenerContainerFactory() {
        ConcurrentKafkaListenerContainerFactory<String, String> factory = new ConcurrentKafkaListenerContainerFactory<>();
        factory.setConsumerFactory(consumerFactory());
        return factory;
    }
}

The code above creates a factory and connects to your broker. It also configures your consumer to deserialize a String for both the key and the value, matching the producer configuration.

The Group ID is mandatory and used by Kafka to allow parallel data consumption. If you only have a consumer you can skip this param. The ConcurrentKafkaListenerContainerFactory bean allows your app to consume messages in more than one thread.

Now that your Java app is configured to find consumers inside your Kafka broker, let’s start listening to the messages sent to the topic. Create KafkaConsumer.java in consumer package

KafkaConsumer.java

package com.learncode24h.demokafka.consumer;

import org.springframework.kafka.annotation.KafkaListener;
import org.springframework.stereotype.Component;
import java.util.ArrayList;
import java.util.List;

@Component
public class KafkaConsumer {
    private final List<String> messages = new ArrayList<>();

    @KafkaListener(topics = "test", groupId = "kafka-group")
    public void listen(String message) {
        synchronized (messages) {
            messages.add(message);
        }
    }
    public List<String> getMessages() {
        return messages;
    }
}

This class is responsible for listening to changes in the testtopic. It does so by using the KafkaListener annotation. Every time a new message is sent from a producer to the topic, your app receives a message inside this class. It adds a message to the list of messages received and makes it available to other classes through the getMessages() method.

Next, let’s create an endpoint that displays a list of consumed messages. Go back to the KafkaController and add getMessage method.

KafkaController

package com.learncode24h.demokafka.controller;

import com.learncode24h.demokafka.consumer.KafkaConsumer;
import org.springframework.kafka.core.KafkaTemplate;
import org.springframework.web.bind.annotation.GetMapping;
import org.springframework.web.bind.annotation.RequestParam;
import org.springframework.web.bind.annotation.RestController;
import java.util.List;

@RestController
public class KafkaController {
    private KafkaTemplate<String, String> template;
    private KafkaConsumer kafkaConsumer;

    public KafkaController(KafkaTemplate<String, String> template, KafkaConsumer kafkaConsumer) {
        this.template = template;
        this.kafkaConsumer = kafkaConsumer;
    }

    @GetMapping("/kafka/produce")
    public void produce(@RequestParam String message) {
        template.send("test", message);
    }

    @GetMapping("/kafka/messages")
    public List<String> getMessages() {
        return kafkaConsumer.getMessages();
    }
}

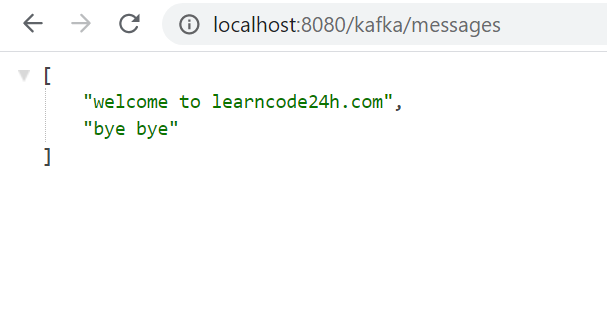
Now rebuild project, go to your browser then access http://localhost:8080/kafka/produce?message=welcome%20to%20learncode24h.com and http://localhost:8080/kafka/produce?message=bye%20bye

Open url http://localhost:8080/kafka/messages and you will see all messages.
Download source at https://github.com/learncode24h/demokafka

Hope you are clear about What is Kafka? through my previous post. Continue, we will go through how we can install Apache Kafka on Windows and how to create topic, producer, consumer in Kafka.

Step 1: Download JDK, if your PC has installed JDK, you can skip this step.

You can download JDK at https://www.oracle.com/java/technologies/javase-downloads.html. To check JDK installed successfully you type java -version in terminal like this

Step2: Download and install Apache Kafka binary

Download Apache Kafka at https://kafka.apache.org/downloads and remember choose binary version, don’t choose source version.

Extract Apache Kafka to C:/kafka folder or any folder that you like, then we proceed to configure Kafka log folder and ZooKeeper folder.
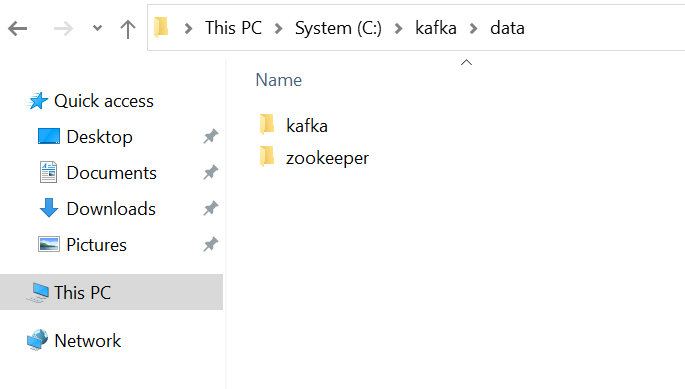
Create data folder in C:/kafka then create kafka folder contains kafka server logs and zookeeper folder contains log data in this folder.
Open config/server.properties and change log.dirs to the previous created kafka folder.

log.dirs=C:/kafka/data/kafka

Open config/zookeeper.properties and change dataDir to the previous created data folder

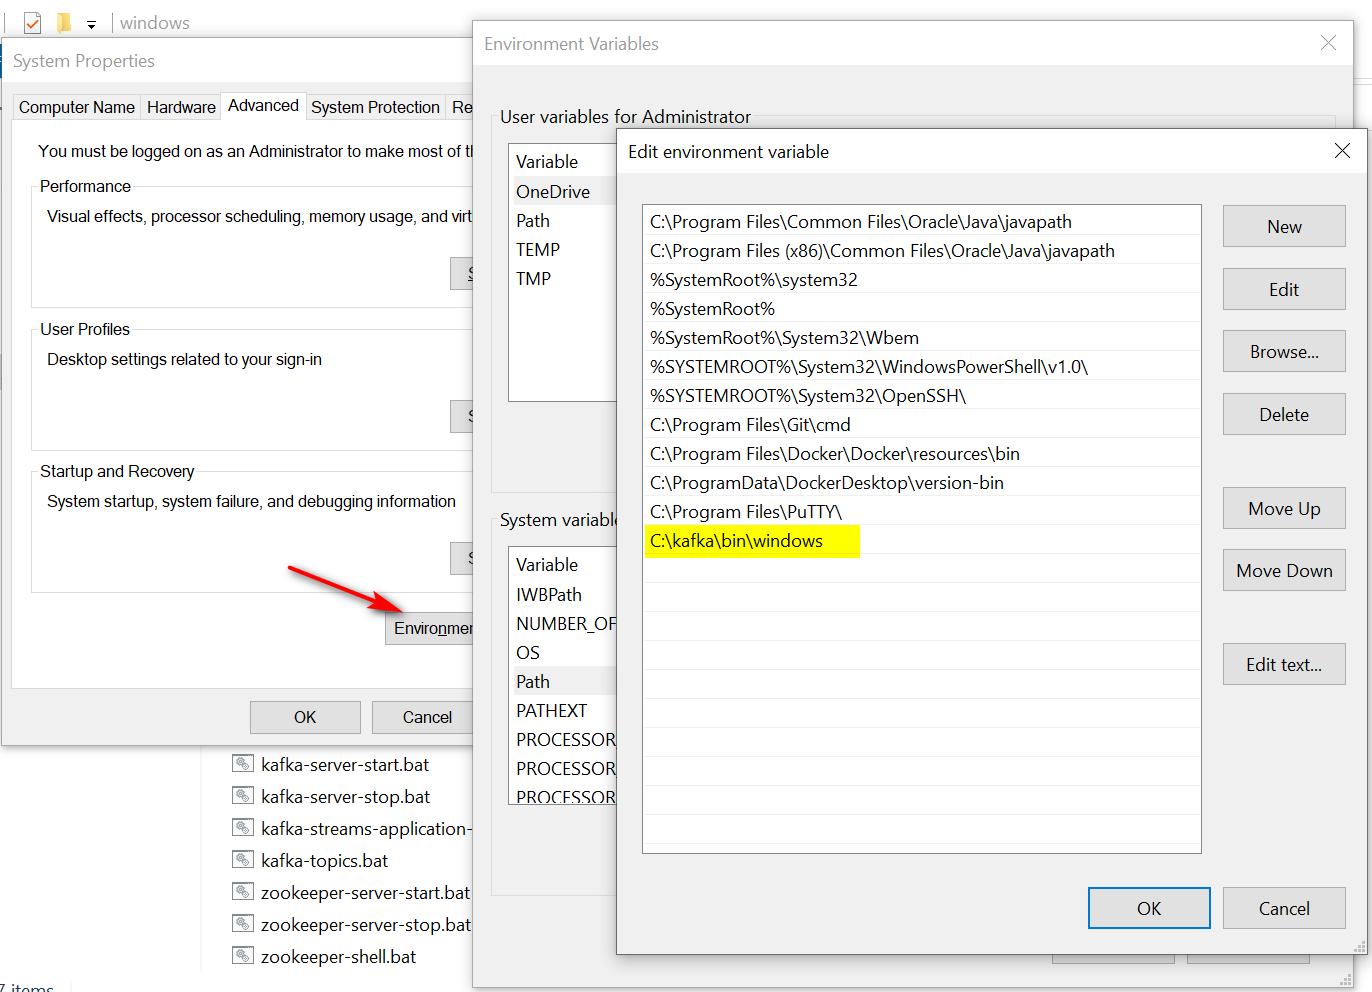
Step 3: Add Kafka bin folder to your Path environment variable.

Add C:\kafka\bin\windows to your Path enviroment variable

Step 4: Start ZooKeeper and Apache Kafka

Zookeeper keeps track of status of the Kafka cluster nodes and it also keeps track of Kafka topics, partitions etc. Zookeeper it self is allowing multiple clients to perform simultaneous reads and writes and acts as a shared configuration service within the system. The Zookeeper atomic broadcast (ZAB) protocol is the brains of the whole system, making it possible for Zookeeper to act as an atomic broadcast system and issue orderly updates.

Start ZooKeeper

Start ZooKeeper by change your directory to C:\kafka\config and execute the following command

cd C:\kafka\config
zookeeper-server-start zookeeper.properties

And make sure ZooKeeper started successfully (yellow highlight in the following figure). ZooKeeper’ll listen on 2181 port.

Start Apache Kafka

Open new command prompt, then navigate to config folder and Start Apache Kafka by the following command

kafka-server-start server.properties

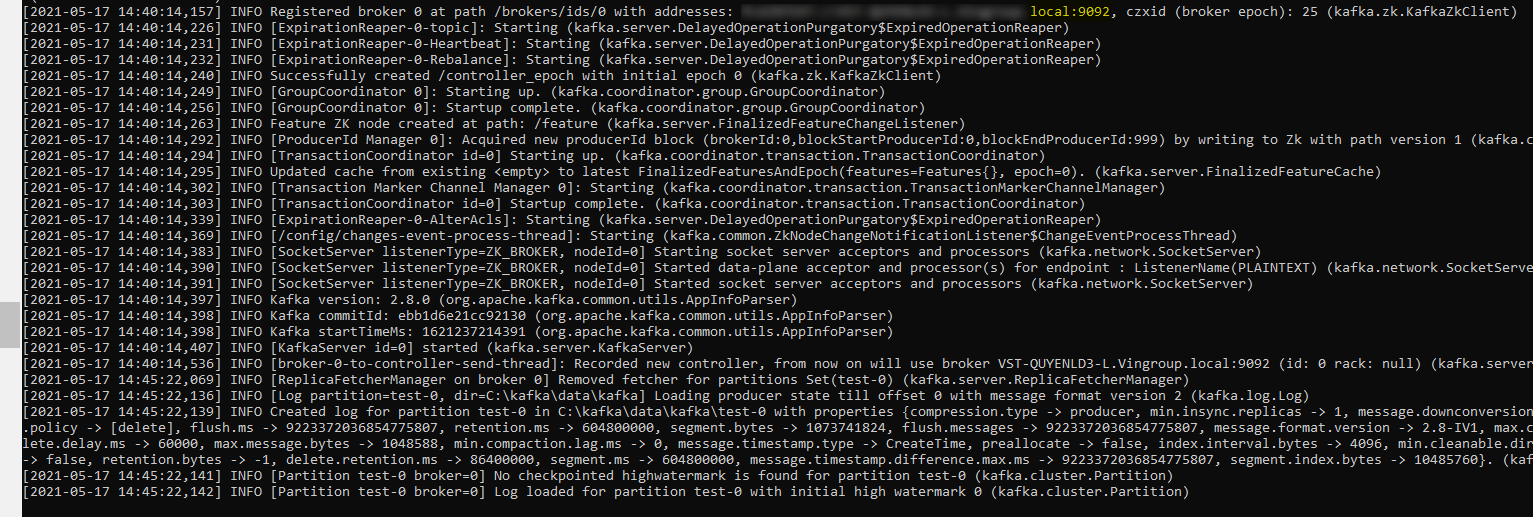
After started successfully, Kafka will create a broker and listen on port 9092.

Step 5: Create Kafka topic

Now  we will create a topic with the name test and a replication factor of 1 because we have only one Kafka server running.

What is Kafka replication factor?

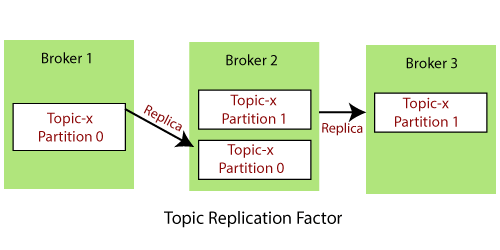
A replication factor is the number of copies of data over multiple brokers. The replication factor value should be greater than 1 always (between 2 or 3). This helps to store a replica of the data in another broker from where the user can access it.

For example, suppose we have a cluster containing three brokers: Broker 1, Broker 2, and Broker 3. A topic, namely Topic-X is split into Partition 0 and Partition 1 with a replication factor of 2 as the following figure.

Replication factor

If you have a cluster with more than one Kafka server running, you can increase the replication-factor accordingly, which will increase the data availability and act like a fault-tolerant system.

Open new command prompt and type the following command to create topic test with only have 1 partition

kafka-topics.bat --create --zookeeper localhost:2181 --replication-factor 1 --partitions 1 --topic test

Step 6: Create Kafka producer

Open new command prompt and create Kafka producer subscribe test topic by the following command:

kafka-console-producer --broker-list localhost:9092 --topic test

Step 7: Create Kafka consumer

Next we will create a consumer subscribe topic test. When you create a consumer without specifying consumer group, Kafka will assign a default group for your consumer.

Open new commadn prompt and type the following command to create a consumer

kafka-console-consumer --bootstrap-server localhost:9092 --topic test

if you want to assign a group for your consumer, you need add –group <group_name> to the command

kafka-console-consumer --bootstrap-server localhost:9092 --topic test --group my-created-consumer-group

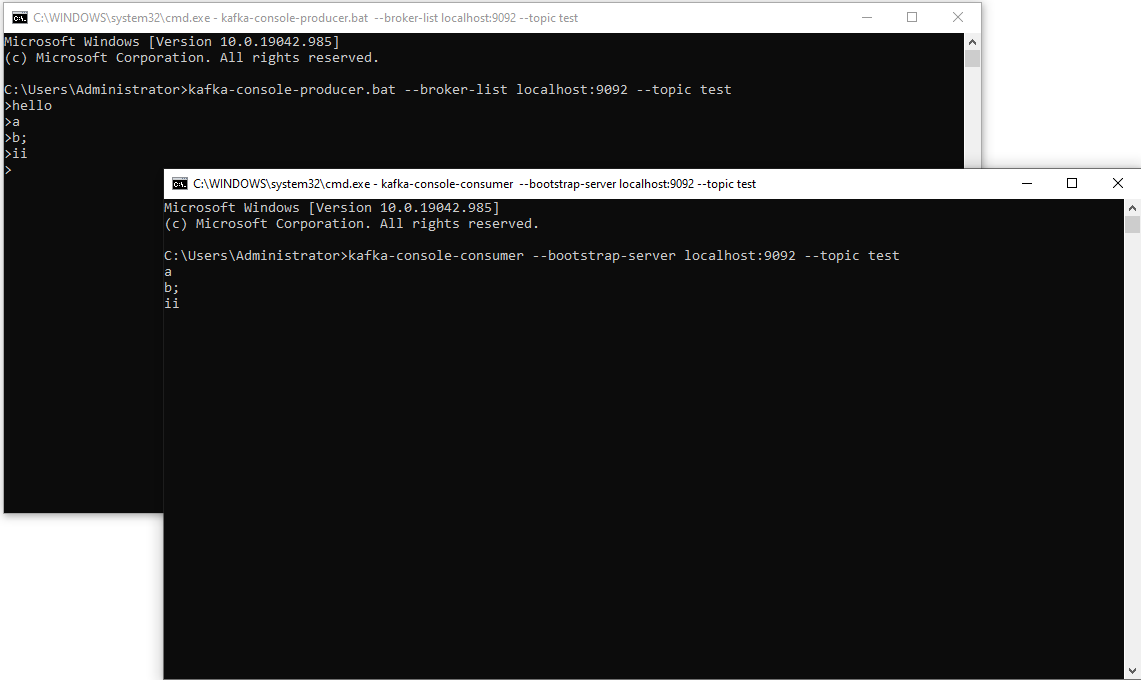
Now when you type any character on producer terminal, you will receive same message on consumer terminal.

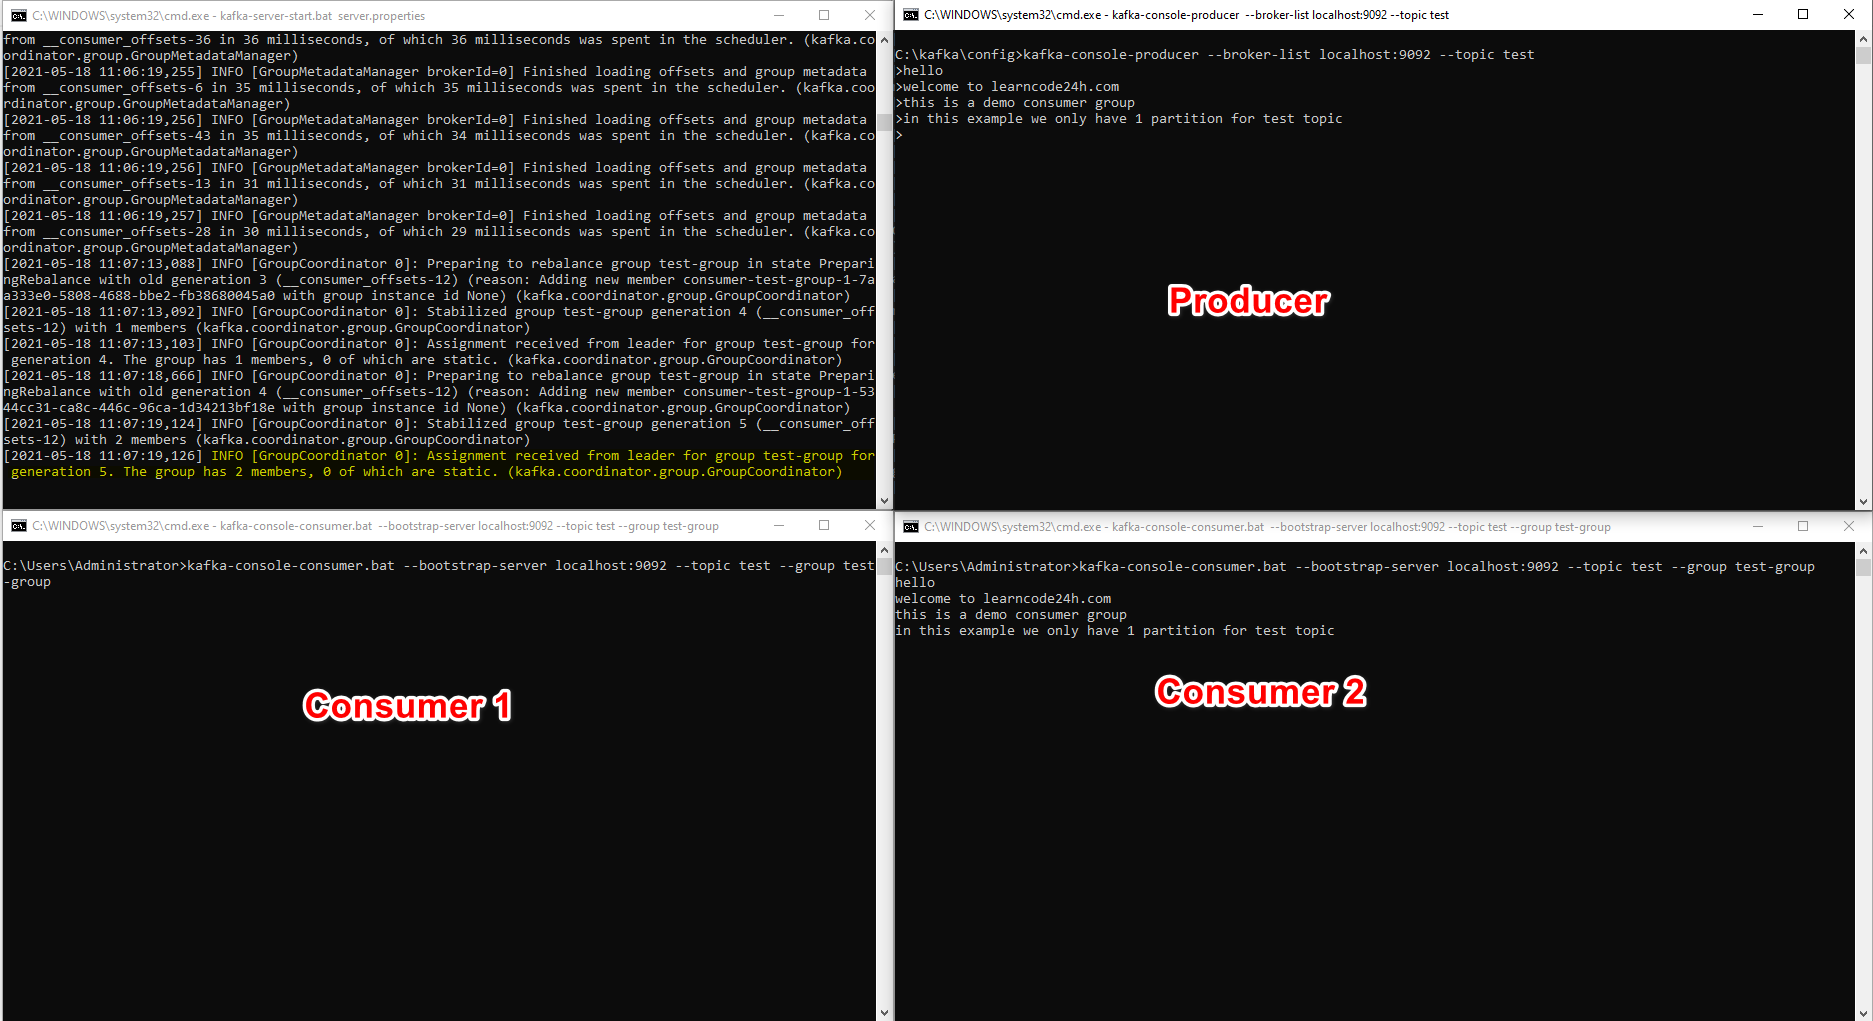
Suppose we add 2 consumers to same group (test-group), at this time, if you send any message on producer, you will receive same message on only a consumer instead of load balancing because we only have a partition.

2 consumer in consumer gropup subsribe topic with 1 partition

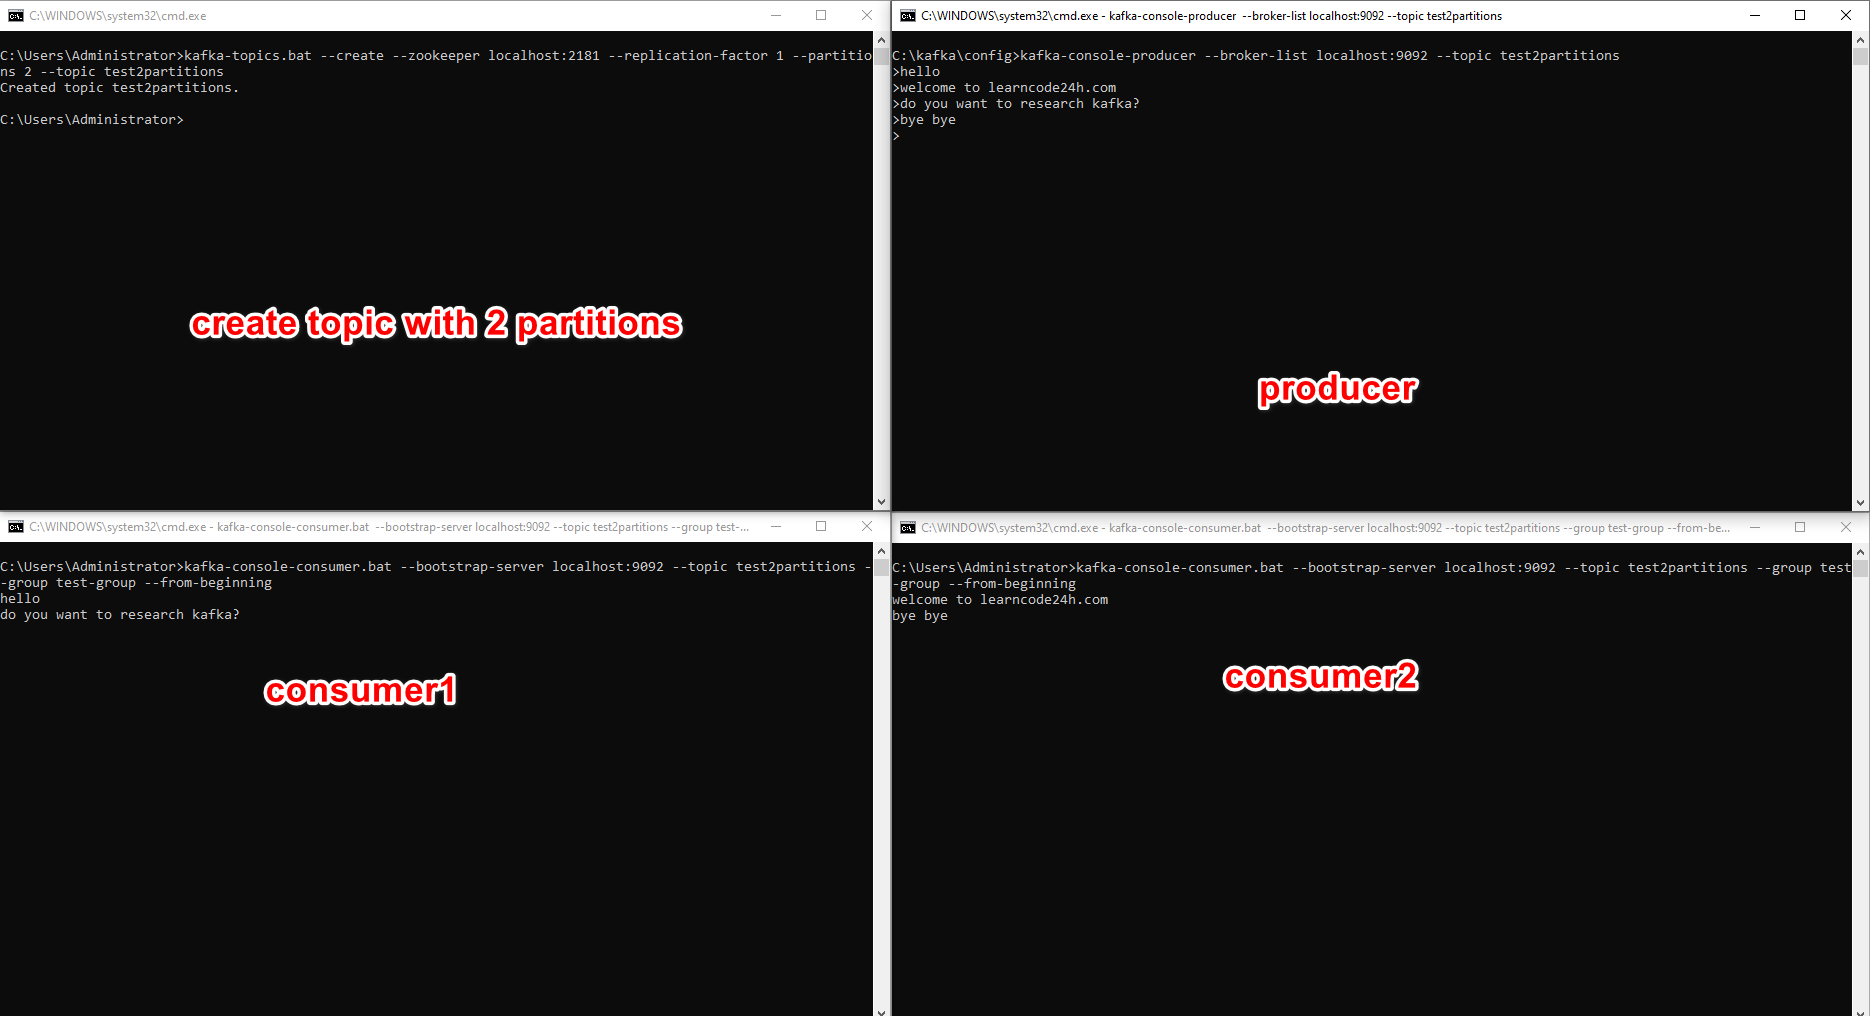
Now we will create a topic with 2 partitions by the following command:

kafka-topics.bat --create --zookeeper localhost:2181 --replication-factor 1 --partitions 2 --topic 

You can review infomation of the created topic by the command

kafka-topics --zookeeper 127.0.0.1:2181 --topic test2partitions --describe
describe topic

Next we will create 2 consumers to subscribe test2partitions topic, 2 consumers will be assigned same group.

kafka-console-consumer --bootstrap-server localhost:9092 --topic test2partitions --group test-group
load balancing consumer-group

Some popular commands Kafka

To get messages from the beginning of the subscribed topic you need to add –from-beginning to the create consumer command like this

kafka-console-consumer --bootstrap-server localhost:9092 --test --from-beginning

Delete test topic from all brokers

kafka-run-class kafka.admin.TopicCommand --delete --test --zookeeper localhost:2181

Apache Kafka was originally developed by LinkedIn, and was subsequently open-sourced in early 2011. Kafka gained the full Apache Software Foundation project status in October 2012. Kafka was born out of a need to track and process large volumes of site events, such as page views and user actions, as well as for the aggregation log data. In this tutorial we’ll discover what is Kafka? and most popular definitions in Kafka

Who is using Kafka?

  • Twitter use Kafka for its mobile application performance management and analytics product, which has been clocked at five billion sessions per day in February 2015. Twitter processes this stream using a combination of Apache Storm, Hadoop, and AWS Elastic MapReduce.
  • Netflix uses Kafka as the messaging backbone for its Keystone pipeline — a unified event publishing, collection, and routing infrastructure for both batch and stream processing. As of 2016, Keystone comprises over 4,000 brokers deployed entirely in the Cloud, which collectively handle more than 700 billion events per day.
  • Tumblr relies on Kafka as an integral part of its event processing pipeline, capturing up 500 million page views a day back in 2012.
  • Square uses Kafka as the underlying bus to facilitate stream processing, website activity tracking, metrics collection and monitoring, log aggregation, real-time analytics, and complex event processing.
  • Pinterest employs Kafka for its real-time advertising platform, with 100 clusters comprising over 2,000 brokers deployed in AWS. Pinterest is turning over in excess of 800 billion events per day, peaking at 15 million per second.
  • Uber is among the most prominent of Kafka adopters, processing in excess of a trillion events per day is mostly for data ingestion, event stream processing, database changelogs, log aggregation, and general-purpose publish-subscribe message exchanges.

Kafka architecture

Kafka architecture

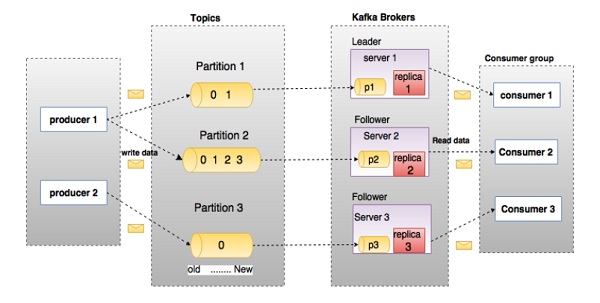
Kafka is a public/subscribe system based on event data with the participation of 4 actors: producers, consumers, brokers and zookeepers.

  • Broker nodes: Responsible for the bulk of I/O operations and durable persistence within the cluster. A Kafka broker receives messages from producers and stores them on disk by specific partition and keyed by unique offset. Kafka broker allows consumers to fetch messages by topic, partition and offset. Kafka brokers can create a Kafka cluster by sharing information between each other directly or indirectly using Zookeeper.
  • ZooKeeper nodes: Under the hood, Kafka needs a way of managing the overall controller status within the cluster. ZooKeeper is primarily used to track the status of nodes in the Kafka cluster and maintain a list of Kafka topics and messages.
  • Producers: Kafka producers handle sending message to brokers by topic
  • Consumers: Client applications that read from topics.

In the above diagram, a topic is configured into three partitions. Partition 1 has two offset with index are 0 and 1. Partition 2 has four offset with index are 0, 1, 2, and 3. Partition 3 has one offset with index equal 0. The replica is a clone of each partition with same id and offset.

Assume, if the replication factor of the topic is set to 3, then Kafka will create 3 identical replicas of each partition and place them in the cluster to make available for all its operations. In the above picture replication factor is 1 (1 partition only have 1 clone version). To balance a load in cluster, each broker stores one or more of those partitions. Multiple producers and consumers can publish and retrieve messages at the same time.

Kafka component concepts

Broker nodes

Broker acts an man in the middle help transport data between producer and consumer. Broker persits data to partitions and guarantees data can be extended over a period of time and canvas scenarios that involve component failure.

A broker is one of the units of scalability in Kafka, by increasing the number of brokers, one can achieve improved I/O, availability, and durability characteristics. A broker’s able to coordinate with the other message brokers as well as talking to ZooKeeper. Usually each server is a broker, certaintly you can also create multiple broker on a server but it isn’t recommended.

Topic

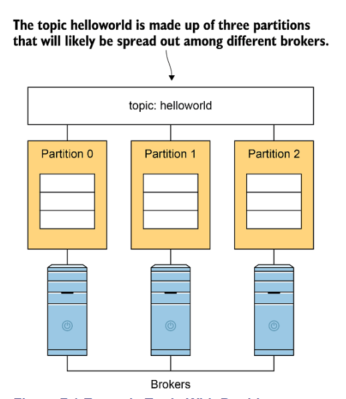
Kafka Topic is a place recevive message from producers. Topics are split into partitions. For each topic, Kafka keeps a mini-mum of one partition. Each such partition contains messages in an immutable ordered sequence. A partition is implemented as a set of segment files of equal sizes. So we can imagine a topic is a logical aggregation of partitions. Split topic to multiple partitions help Kafka can process records parallel.

Kafka topic

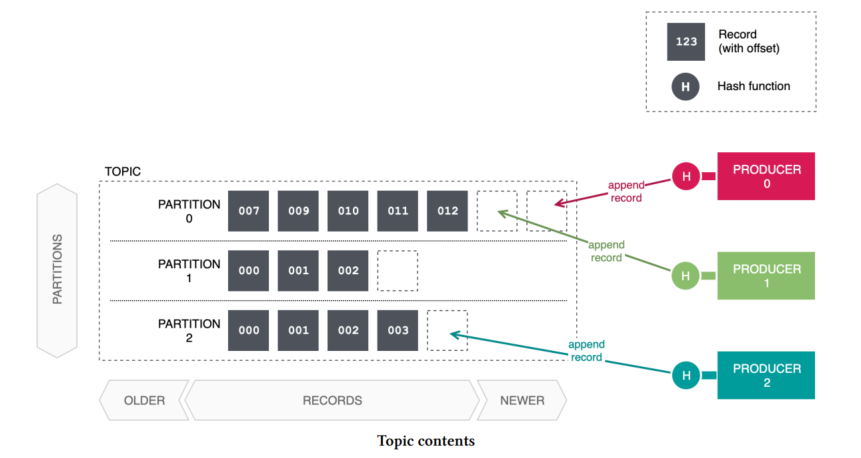
When a producer publish a record, producer automatically select a partition on the basis of a record’s key. A producer will digest the byte content of the key using a hash function (Kafka uses murmur2 for this purpose). The highest-order bit of the hash value is masked off to force it to a positive integer, before taking the result, modulo the number of partitions, to arrive at the final partition number. Same record when saving Kafka will select same partition but if you change the number of partitions, hash value of record will be changed and Kafka can select another partition when saving record. The contents of the topic and the producer’s interactions with the topic are depicted below.

Such is the nature of hashing, a records with different hashes may also end up in the same partition due to hash collisions.

Consumer groups and load balancing

Kafka’s producer-topic-consumer topology adheres to a flexible and highly generalised multipoint-to-multipoint model, meaning that there may be any number of producers and consumers simultaneously interacting with a topic.

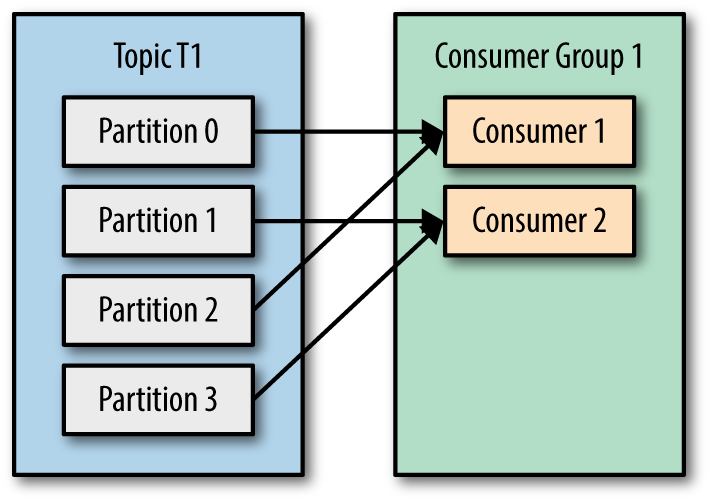
A consumer is a process or thread that attaches to a Kafka cluster via a client library. When multiple consumers are subscribed to a topic and belong to the same consumer group, each consumer in the group will receive messages from a different subset of the partitions in the topic.

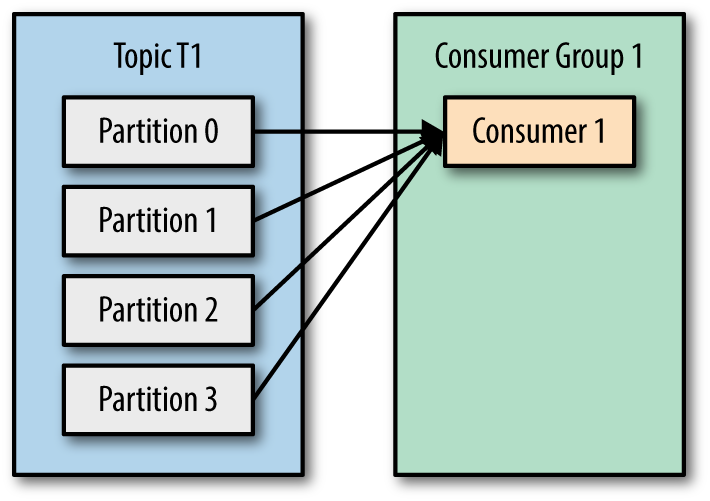
Let’s take topic T1 with four partitions. Now suppose we created a new consumer C1, which is the only consumer in group G1, and use it to subscribe to topic T1. Consumer C1 will get all messages from all four T1 partitions.

1 consumer subscribes 1 topic divided into 4 partitions

If we add another consumer C2, to group G1, each consumer will only get messages from two partitions. For example: messages from partition 0 and 2 consumed by C1 and messages from partitions 1 and 3 consumed by consumer C2.

2 consumers in group subscribes 1 topic divided into 4 partitions

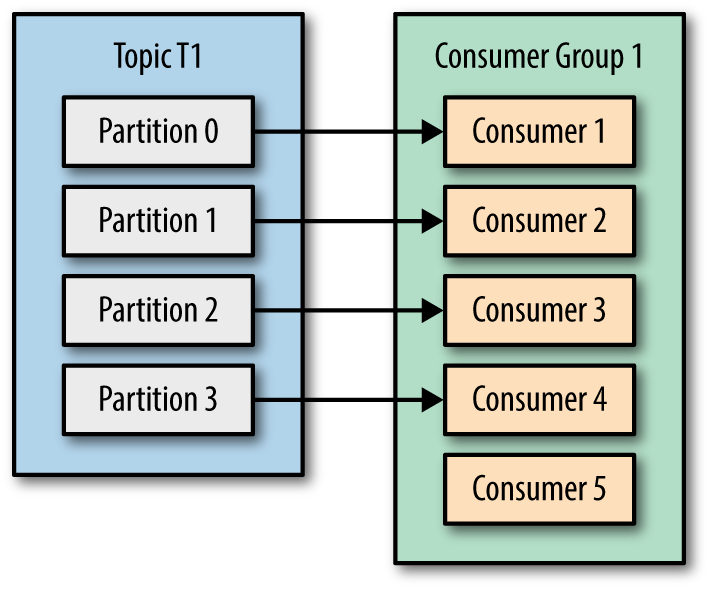
If we add more consumers to a single group G1 subscribe single topic, and number of consumers is more than number of partitions, some of the consumers will be idle and get no messages at all because Kafka ensures that a partition may only be assigned to at most one consumer within its consumer group.

More consumers in a group than partitions means idle consumers

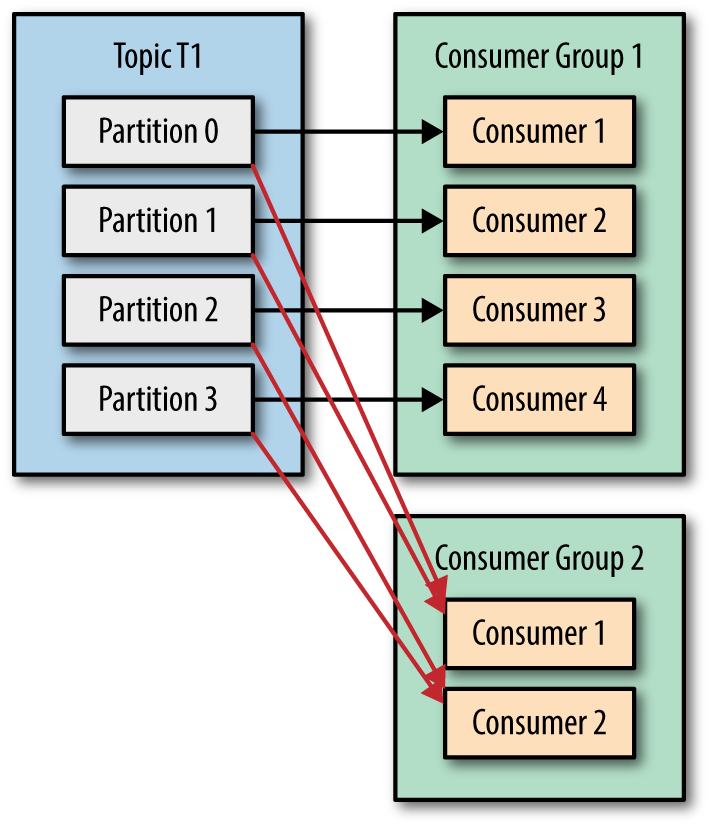
if we add a new consumer group G2 with a single consumer, this consumer will get all the messages in topic T1 independent of what G1 is doing. G2 can have more than a single consumer, in which case they will each get a subset of partitions, just like we showed for G1, but G2 as a whole will still get all the messages regardless of other consumer groups. Multiple consumer groups can subscribe same topics because:

  1. Offsets are “managed” by the consumers, but “stored” in a special __consumer_offsets topic on the Kafka brokers.
  2. Offsets are stored for each (consumer group, topic, partition) tuple. This combination is also used as the key when publishing offsets to the __consumer_offsets topic so that log compaction can delete old unneeded offset commit messages and so that all offsets for the same (consumer group, topic, partition) tuple are stored in the same partition of the __consumer_offsets topic (which defaults to 50 partitions)

The JPA (Java Persistence API) – a part of Spring Data – is an Object Relational Mapping (ORM) framework – a part of the Java EE platform. JPA simplifies the implementation of the data access layer by letting developers work with an object oriented API instead of writing SQL queries by hand. The most popular JPA implementations are Hibernate, EclipseLink, and OpenJPA.

Spring Data integrates with most of the popular data access technologies, including JPA, MongoDB, Redis, Cassandra, Solr, ElasticSearch, etc.

Using Spring Data JPA with Spring Boot – Install JPA Spring

Create a Spring Boot Maven project and add the following dependencies to pom.xml, in this example I will use H2 database, if you haven’t installed H2 database yet, you can download it at https://www.h2database.com/

<dependencies>
		
		<dependency>
			<groupId>org.springframework.boot</groupId>
			<artifactId>spring-boot-starter-test</artifactId>
			<scope>test</scope>
		</dependency>

		<dependency>
			<groupId>org.springframework.boot</groupId>
			<artifactId>spring-boot-starter-data-jpa</artifactId>
		</dependency>

		<dependency>
			<groupId>com.h2database</groupId>
			<artifactId>h2</artifactId>
		</dependency>

	</dependencies>

Coreconcept

The central interface in Spring Data repository abstraction is Repository . It takes the domain class to manage as well as the id type of the domain class as type arguments. This interface acts primarily as a marker interface to capture the types to work with and to help you to discover interfaces that extend this one. The CrudRepository provides sophisticated CRUD functionality for the entity class that is being managed.

public interface CrudRepository<T, ID extends Serializable>
    extends Repository<T, ID> {
                                                                                                                       (1)
    <S extends T> S save(S entity);
                                                                                                                       (2)
    T findOne(ID primaryKey);
                                                                                                                       (3)
    Iterable<T> findAll();

    Long count();
                                                                                                                       (4)
    void delete(T entity);
                                                                                                                       (5)
    boolean exists(ID primaryKey);
                                                                                                                       (6)
    // … more functionality omitted.
}
  1. Saves the given entity.
  2. Returns the entity identified by the given id.
  3. Returns all entities.
  4. Returns the number of entities.
  5. Deletes the given entity.
  6. Indicates whether an entity with the given id exists.

Query data in Spring JPA with JPQL

In order to execute query data in Spring with JPA, we can annotate the method with the @Query annotation.

import java.util.List;
import org.springframework.data.jpa.repository.JpaRepository;
import org.springframework.data.jpa.repository.Query;
import org.springframework.data.repository.query.Param;
import org.springframework.stereotype.Repository;
import stackjava.com.sbdataquery.entities.Customer;
@Repository
public interface CustomerRepository extends JpaRepository<Customer, Integer> {
  @Query("SELECT e FROM Customer e ORDER BY e.name DESC")
  List<Customer> findAllOrderByNameDesc();
  @Query(value = "SELECT e.* FROM customer e ORDER BY e.name DESC", nativeQuery = true)
  List<Customer> findAllOrderByNameDescNative();
  @Query("SELECT e FROM Customer e WHERE e.name = ?1")
  List<Customer> findByName(String name);
  @Query("SELECT e FROM Customer e WHERE e.name = :name AND e.address = :address")
  List<Customer> findByNameAndAddress(@Param("name") String name, @Param("address") String address);
  @Query("SELECT e FROM Customer e WHERE e.name like ?1")
  List<Customer> findByNameLike(String name);
}

@Repository marks this class use JPA for query data. When we using ?1, ?2 or :name, :address in SQL statement, Spring Boot will bind method parameters to place holders in SQL statement automatically. Besides, JPA also supply another way to interact with data via method naming.

Derived Query Methods

For simple queries, it’s easy to derive what the query should be just by looking at the corresponding method name in our code.

In Spring JPA, the mechanism for constructing the query through the name of the method is specified by the following prefixes: find…By, read…By, query…By, count…By, and get…By. The rest will be parsed by the attribute’s name (first capital capitalization). If we have multiple conditions, the properties can be combined with the letters And or Or.

interface PersonRepository extends JpaRepository<User, Long> {
      // short version
    Person findByLastname(String lastname);
    // full version
    Person findPersonByLastname(String lastname);

    Person findAllByLastname(String lastname);

    List<Person> findByEmailAddressAndLastname(EmailAddress emailAddress, String lastname);

    // findDistinctPeople and remove duplicate record (distinct query)
    List<Person> findDistinctPeopleByLastnameOrFirstname(String lastname, String firstname);
    List<Person> findPeopleDistinctByLastnameOrFirstname(String lastname, String firstname);

    //Search LastName in-cases-sensitive
    List<Person> findByLastnameIgnoreCase(String lastname);

    // Search Lastname and First name in-case-sensitive
    List<Person> findByLastnameAndFirstnameAllIgnoreCase(String lastname, String firstname);

    // OrderBy Firstname ASC
    List<Person> findByLastnameOrderByFirstnameAsc(String lastname);
    // OrderBy Firstname Desc
    List<Person> findByLastnameOrderByFirstnameDesc(String lastname);
    // same as WHERE name LIKE '%value'
    List<User> findByNameEndingWith(String suffix);
    //same as WHERE name LIKE '%value%'.
    List<User> findByNameLike(String likePattern);
}

After a decade of setting property values in Spring XML configuration and calling setter methods on bean instances, Spring Boot provides an easier way for setting property values via configuration files (properties file and yaml file).

Spring provides the @PropertySource annotation to specify the list of configuration files and Spring Boot takes it one step further by automatically registering a PropertyPlaceHolderConfigurer bean using the aplication.properties file in the root classpath by default. You can also create profile specific configuration files using the filename as application-{profile}.properties

For example, you can have application.properties, which contains the default properties values, application-dev.properties, which contains the dev profile configuration, and application-prod.properties, which contains the production profile configuration values. If you want to configure properties that are common for all the profiles, you can configure them in application-default.properties.

After create properties files, we need to set the created profile for the beans or app config.

@Bean
@Profile("!prod")
public CommandLineRunner dataLoader(IngredientRepository repo,
UserRepository userRepo, PasswordEncoder encoder) {
...
}

Here, the exclamation mark (!) negates the profile name. Effectively, it states that the CommandLineRunner bean will be created if the profile prod is not active.

It is also possible to use @Profile on an entire @Configuration annotated class. In the following example, the bean will only be created if both profiles prod, qa profiles aren’t active

@Profile({"!prod", "!qa"})
@Configuration
public class DevelopmentConfig {
@Bean
public CommandLineRunner dataLoader(IngredientRepository repo,
UserRepository userRepo, PasswordEncoder encoder) {
...
}
}

Activating profiles

Spring handle a list of active profile names in spring.properties.active property.

spring:
 profiles:
  active:
   - prod

But that is perhaps the worst possible way to set an active profile. Instead, you should set the profile via the environment variable SPRING_PROFILES_ACTIVE like this

% export SPRING_PROFILES_ACTIVE=prod

How to binding Configuration Properties value to properties

Spring provides the @Value annotation to bind any property value to a bean property. Suppose you had the
following application.properties file:

jdbc.driver=com.mysql.jdbc.Driver
jdbc.url=jdbc:mysql://localhost:3306/testdatabase
jdbc.username=root
jdbc.password=pass

You can bind these property values into bean properties using @Value as follows:

@Configuration
public class AppConfig
{
@Value("${jdbc.driver}")
private String driver;
@Value("${jdbc.url}")
private String url;
@Value("${jdbc.username}")
private String username;
@Value("${jdbc.password}")
private String password;
...........
}

Or you can also simply annotate DataSourceConfig with @ConfigurationProperties(prefix=”jdbc”) to
automatically bind the properties that start with jdbc.*.

@Component
@ConfigurationProperties(prefix="jdbc")
public class AppConfig
{
private String driver;
private String url;
private String username;
private String password;
...........
}

By using prefix value in @ConfigurationProperties, Spring Boot will get value in properties file automatically based on property name in your bean without specifying @value annotation.

Using special property values in Spring Boot

When setting properties, you are not limited to declaring their values as hard-coded and String numeric values. Instead, you can derive their values from other configuration properties, for example

greeting:
  welcome: You are using ${spring.application.name}.

Memcached is a free, high-performance and distributed memory object caching system written in C language. It is often used to speed up dynamic database-driven websites by caching data and objects in RAM to reduce the number of times an external data source (such as a database or API) must be read..

Memcached works by storing the content of the website database table and query in the memory, increasing website performance drastically. Memcached is now used by many companies including Facebook, Reddit, Wikipedia, Craigslist, Yellowbot, YouTube, Pinterest, Google App Engine, Google Cloud Platform…

In this tutorial I will instruct you how to install Memcached on CentOS 6, 7, 8 and config Memcached in WordPress to speed up your site.

Installing Memcached on CentOS 8

 We will use the default dnf package manager to install Memcached by the following command:

dnf install memcached libmemcached -y

After Memcached has been installed, you need to enable it

systemctl enable memcached --now

Installing Memcached on CentOS 6, 7

## CentOS 7 and 6
yum install memcached

Installing Memcached on Ubuntu 18.04

apt-get install memcached libmemcached-tools php-memcached -y

Configuring Memcached on CentOS

The configuration of Memcached is located in the /etc/sysconfig/memcached file on CentOS and /etc/memcached.conf on Ubuntu. In this file you can edit cache size for Memcached depend on memory capacity on your server.

Edit Memcached config on CentOS 8

Configuring Memcached on Ubuntu

nano /etc/memcached.conf
# Run memcached as a daemon. This command is implied, and is not needed for the
-d

# Log memcached's output to /var/log/memcached
logfile /var/log/memcached.log

# memory
-m 2048

# Default connection port is 11211
-p 11211

# Run the daemon as root. The start-memcached will default to running as root if no
# -u command is present in this config file
-u memcache

# Specify which IP address to listen on. The default is to listen on all IP addresses
-l 127.0.0.1

# Limit the number of simultaneous incoming connections. The daemon default is 1024
-c 500

# Use a pidfile
-P /var/run/memcached/memcached.pid

After edited config file, you don’t forget to restart Memcached by command

systemctl restart memcached

Next we need to allow Memcached port on IPtables Firewall and then restart IPtables (on CentOS) or UFW firewall (on Ubuntu)

Allow Memcached port on CentOS

iptables -A INPUT -m state --state NEW -m tcp -p tcp --dport 11211 -j ACCEPT
service iptables restart

Allow Memcached port on Ubuntu

sudo ufw allow from client_server_private_IP/32 to any port 11211

Test Memcached is working?

To test Memcached is recogrnized by PHP you need to create a test php file in public_html

nano /var/www/html/test.php

Then add the following lines

<?php
phpinfo();
?>

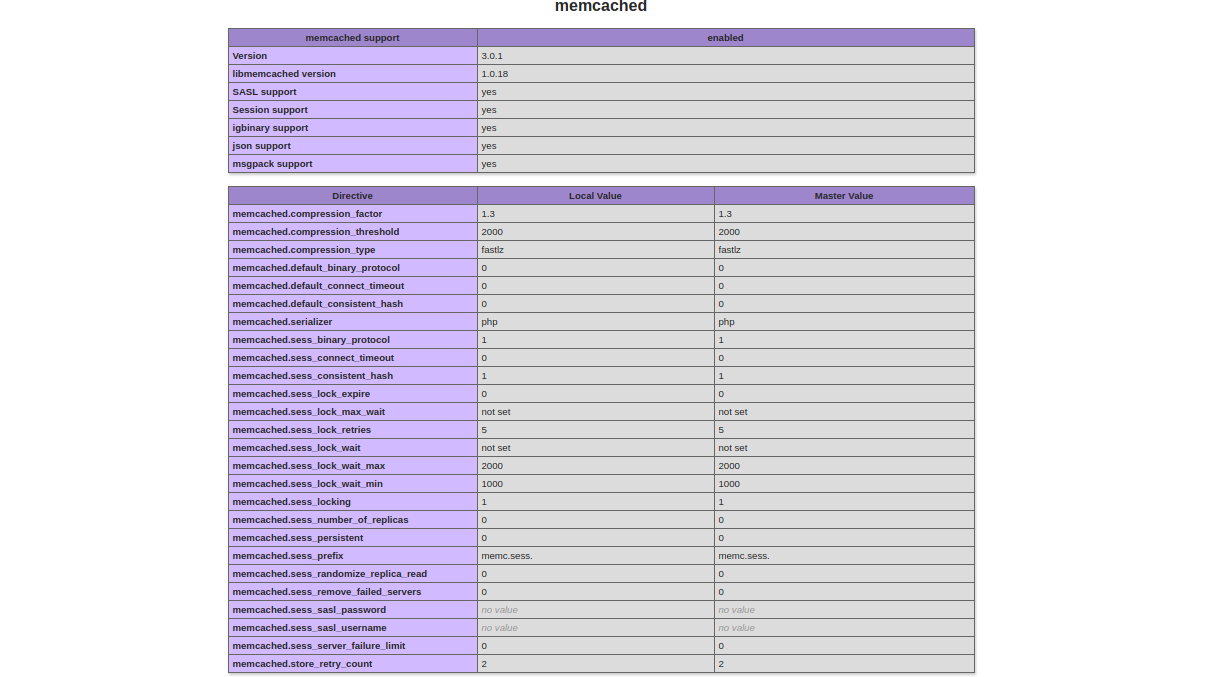
Save and close the file. Then access the URL http://your-server-ip/test.php. You should get the following page if Memcached enabled:

Setup Memcached for WordPress to speedup your WordPress site

To speedup WordPress site you need to install W3 total cache at wordpress.org/plugins/w3-total-cache/, then go to Performance ->Page Cache page and set Memcached for Object Cache Method.

Spring Beans are Java Objects or Instances which will be created and managed by Spring IOC/DI container.

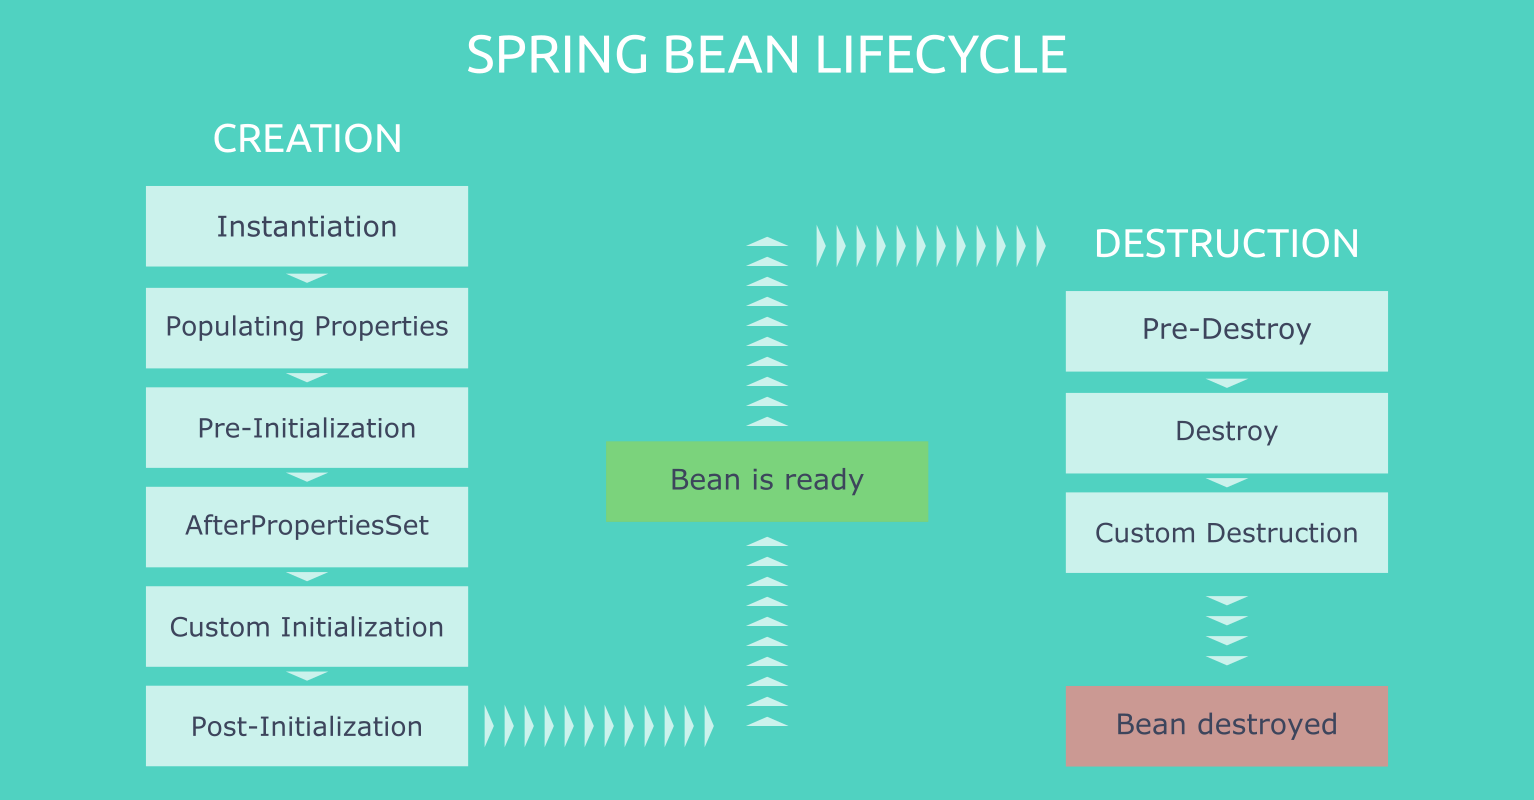
Below is the lifecycle of Spring Beans

  • 1.  Bean Definition
    Spring Bean will be defined using stereotype annotations or XML Bean configurations.
  • 2.  Bean Creation and Instantiate
    As soon as bean created and It will be instantiated and loaded into ApplicationContext and JVM memory.
  • 3. Populating Bean properties
    Spring container will create a bean idscopedefault values based on the bean definition.
  • 4. Post-initialization
    Spring provides Aware interfaces to access application bean meta-data details and callback methods to hook into the bean life cycle to execute custom application-specific logic.
  • 5. Ready to Serve
    Now, Bean is created and injected all the dependencies and should be executed all the Aware and callback methods implementation. Bean is ready to serve.
  • 6. Pre-destroy
    Spring provides callback methods to execute custom application-specific logic and clean-ups before destroying a bean from ApplicationContext.
  • 7. Bean Destroyed
    Bean will be removed or destroyed from and JVM memory.

Using Spring @PostConstruct and @PreDestroy annotations

The @PostConstruct annotation is used on a method that needs to be executed after dependency injection is done to perform any initialization. You can use annotation @PostConstruct for setup configuration before initializing bean.

The @PreDestroy annotation is used on methods as a callback notification to signal that the instance is in the process of being removed by the container. You can use @PreDestroy annotation for release memory after bean has finished processing.

package com.learncode24h.lifecycle.spring;

import java.util.HashMap;
import java.util.Map;

import javax.annotation.PostConstruct;
import javax.annotation.PreDestroy;

import org.springframework.stereotype.Component;

@Component
public class MailService {

   private Map<String, String> map=null;
   
   public MailService() {
      map=new HashMap<>();
   }

   public void send(String mailTo){
      System.out.println("Send email to - " + mailTo + "success");
   }
   
   @PostConstruct
   public void init() {
      map.put("host", "mail.example.com");
      map.put("port", "25");
      map.put("from", "admin@abc.com");
      System.out.println("Init config email " + map);
   }

   @PreDestroy
   public void destroy() {
      map.clear();
      System.out.println("Release memory");
   }
}
package com.learncode24h.lifecycle.spring;

import org.springframework.context.annotation.ComponentScan;
import org.springframework.context.annotation.Configuration;

@Configuration
@ComponentScan(basePackages = "com.learncode24h.lifecycle.spring")
public class AppConfig {
   
}

@ComponentScan annotation scans all beans, whose class is annotated by the @Componentannotation in a package, specified bybasePackages attribute.

package com.learncode24h.lifecycle.spring;

import org.springframework.context.annotation.AnnotationConfigApplicationContext;

public class MainApp {
   public static void main(String[] args) {
      AnnotationConfigApplicationContext context = 
            new AnnotationConfigApplicationContext(AppConfig.class);
      
      // Send mail 1
      MailService mailService1 = context.getBean(MailService.class);
      mailService1.send("contact@learncode24h.com);

      // Send mail 2
      MailService mailService2 = context.getBean(MailService.class);
      mailService2.send("admin@learncode24h.com");

      context.close();
   }
}

Result printed

Init config mail- {port=25, host=mail.example.com, from=admin@abc.com}
Send email to - contact@learncode24h.com
Send email to - admin@learncode24h.com
Release memory

Sometime you try to install a new plugin from plugins store or a zip file and unfortunately your site has been crashed. You can’t access your website and get the error message when access siteThere has been a critical error on your website. Please check your site admin email inbox for instructions. Learn more about debugging in WordPress.

If you have a backup for your website, you can revert your backup easily. But if you don’t have any backup versions, don’t worry you can fix this error easily by disable all WordPress plugins and find out the plugin causing the error.

There are 2 popular solutions to disable all plugins in WordPress:

  • Disable all WordPress plugins via table wp_options
  • Disable all WordPress plugins by renaming plugins folder

Disable all WordPress plugins via wp_options table

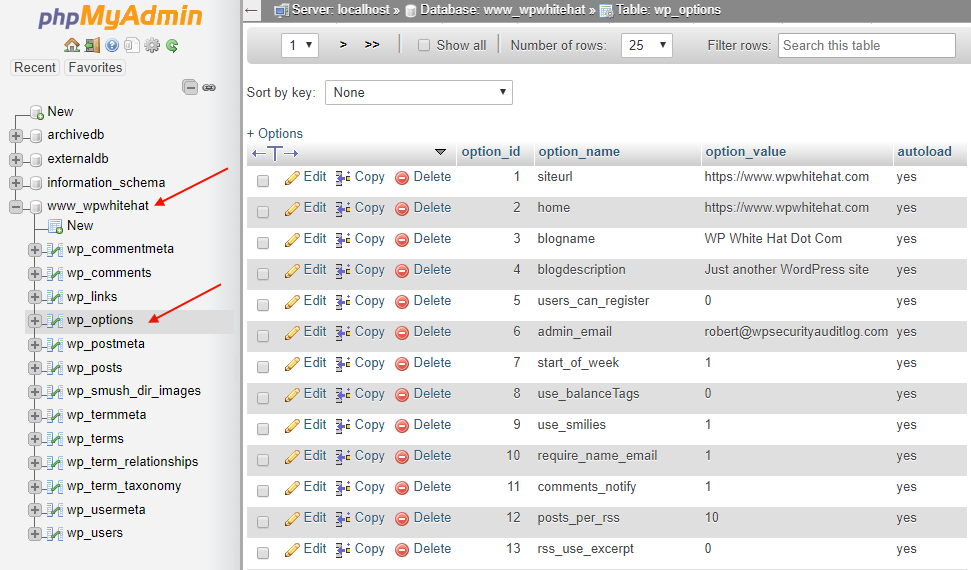
Go to your cPanel account and access phpMyAdmin, then open table wp_options

wp_options table

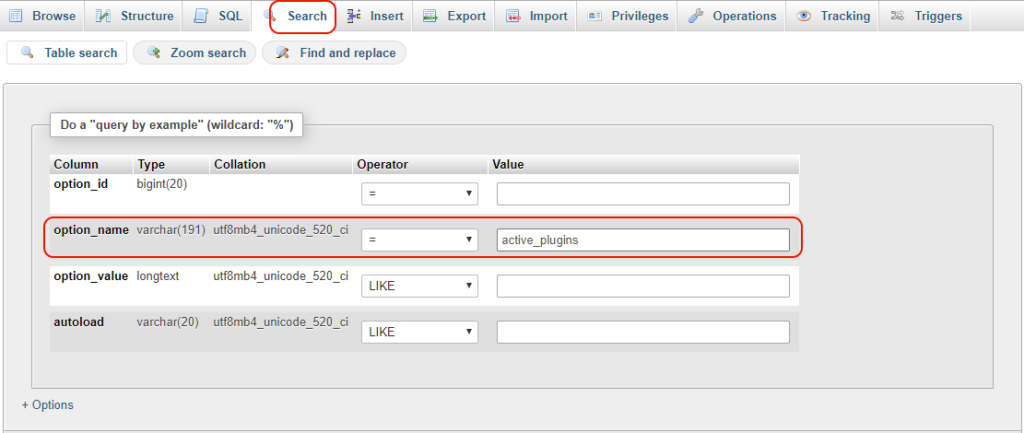
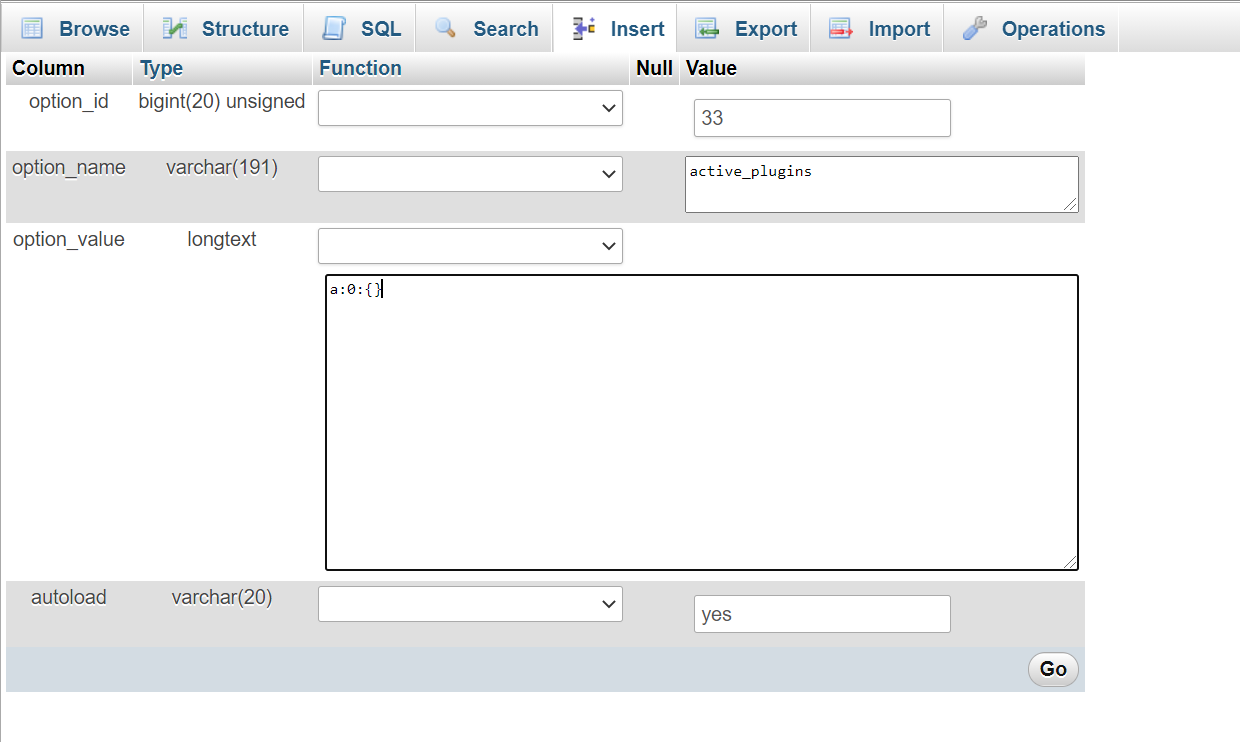
Search option_name active_plugins and replace by option_value a:o:{}

Disable WordPress plugins by reset option_value

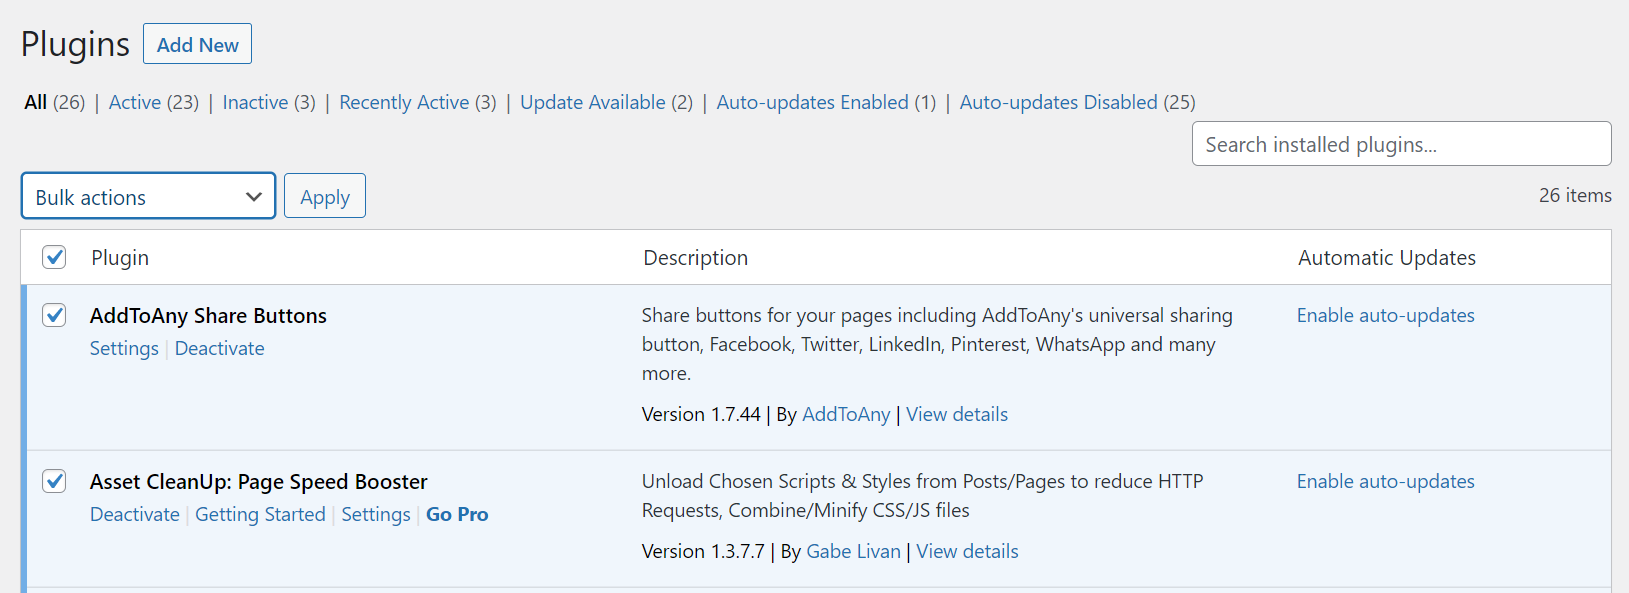
Reactive your WordPress plugins by access https://your_domain/wp-admin/plugins.php and don’t forget remove the crashed plugin you have installed before.

Disable all WordPress plugins by renaming plugins folder

I pretty like this solution because it’s simple than previous solution. To disable WordPress Plugin you only need

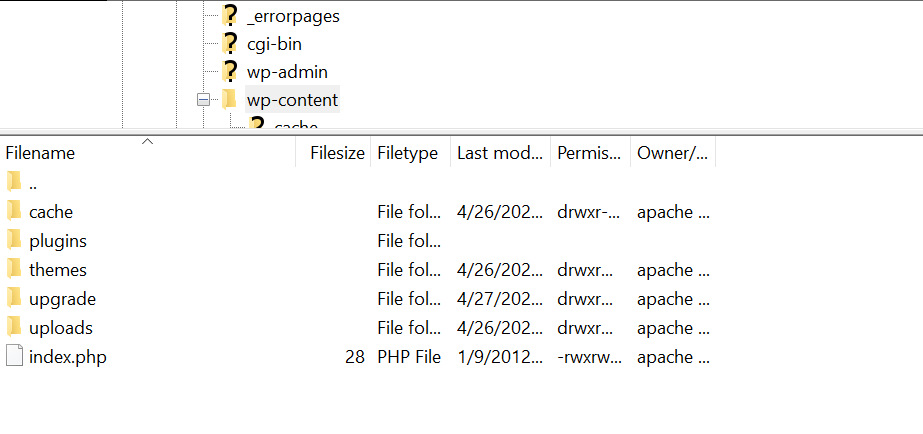
  • Access FTP and rename plugins folder at your_site_folder/wp-content/plugins to plugins_old
  • Access https://your_domain/wp-admin/plugins.php. Now all WordPress plugins will be disabled.
  • Rename plugins_old to plugins.
  • You need enable the disabled plugins again except the crashed plugin you have installed before.

Before learning about Spring Dependency Injection we’ll introduce the concepts of IoC (Inversion of Control) and DI (Dependency Injection). These are two important definitions in Spring Framework that you must to know.

Singleton pattern

Singleton pattern is a design pattern that lets you ensure that a class has only one instance while providing a global access point to this instance.

package com.learncode24h.singleton;
 
public class LearnCode24hSingleton {
 
    private static final LearnCode24hSingleton  INSTANCE = new LearnCode24hSingleton ();
 
    // Private constructor to avoid client applications to use constructor
    private LearnCode24hSingleton () {
         
    }
 
    public static LearnCode24hSingleton getInstance() {
        return INSTANCE;
    }
}

Spring IoC Container

In Java, if you initialize an object with new keyword, JVM will create for you an instance, with the large projects you can create so many objects that you can’t manage theme and lead to memory leak for your web application. Spring resolve this problem by restricting a singleton to one object per Spring IoC container. In practice, this means Spring will only create one bean for each type per application context.

Spring’s approach differs from the strict definition of a singleton since an application can have more than one Spring container. Therefore, multiple objects of the same class can exist in a single application if we have multiple containers.

In Spring We can implement dependency injection with:

  • constructor-based dependency injection
  • setter-based dependency injection
  • field-based dependency injection.

Constructor-Based Dependency Injection

In constructor-based dependency injection, the dependencies required for the class are provided as arguments to the constructor. The container will invoke a constructor with arguments each representing a dependency we want to set.

@Component
class Cake {

  private Flavor flavor;
  private Sugar sugar;

  Cake(Flavor flavor, Sugar sugar) {
    this.flavor = flavor;
    this.sugar = sugar;
  }

  Flavor getFlavor() {
    return flavor;
  }

  Sugar getSugar(){
    return sugar;
  }
}

Before Spring 4.3, we had to add an @Autowired annotation to the constructor. With newer versions, this is optional if the class has only one constructor. When using Autowired you notify to Spring container create and keep and singleton instance (bean) and ready to inject to an another object require it.

In the Cake class above, since we have only one constructor, we do not have to specify the @Autowired annotation. Consider the below example with two constructors:

@Component
class Cake {

  private Flavor flavor;
  private Sugar sugar;

   @Autowired
   Cake(Flavor flavor) {
    this.flavor = flavor;
  }

  Cake(Flavor flavor, Sugar sugar) {
    this.flavor = flavor;
    this.sugar = sugar;
  }

  Flavor getFlavor() {
    return flavor;
  }

  Sugar getSugar(){
    return sugar;
  }
}

When you have a class with multiple constructors, you must explicitly add the @Autowired annotation to any one of the constructors that you want to notify for Spring knows which constructor to use to inject the dependencies, Spring’ll look for the correct dependency in Spring Container and inject them to the constructor marked with @Autowired annotation.

By using @Component annotation you have created a bean in Spring Container. And then this bean will be available in Spring container to inject to any constructors or fields.

Setter-based injection

For setter-based DI, the Spring container will call setter methods of our class after invoking a no-argument constructor or no-argument static factory method to instantiate the bean. Let’s look at the following example, in this example we’ll inject bean via xml configuration:

@Configuration
public class Order{
 private Product product;

@Bean
public Order create() {
    Order order = new Order();
    order.addProduct(this.product);
    return order;
}
 public Product getProduct() {
  return product;
 }
 public void setProduct(Product product) {
  this.product= product;
 }
<?xml version="1.0" encoding="UTF-8"?>
<beans xmlns="http://www.springframework.org/schema/beans" 
xmlns:xsi="http://www.w3.org/2001/XMLSchema-instance" 
xsi:schemaLocation="http://www.springframework.org/schema/beans http://www.springframework.org/schema/beans/spring-beans-4.0.xsd">
 
  <!-- defining Product bean -->
  <bean id="productBean" class="com.learncode24h.Product" />
 
  <!-- Defining Order bean and inject Product bean-->
  <bean id="orderBean" class="com.learncode24h.Order">
      <property name="product" ref="productBean" />
  </bean>

</beans>

Below is an exampe about how to create multiple beans without using @Component annotation

@Configuration
public class AppConfig {

    @Bean
    public Bean1 createBean1() {
        return new Bean1();
    }

    @Bean
    public Bean2 createBean2() {
        return new Bean2(createBean1());
    }
}

Use @Configurationannotation on top of any class to declare that this class provides one or more @Bean methods and may be processed by the Spring container to generate bean definitions and service requests for those beans at runtime. You will probably be wondering when using @Configuration and when using @Component to declare bean? We’ll look at the following example

DatabaseConnector.java
public abstract class DatabaseConnector {
    public abstract Connection connect(String url, String user, String pass);
}

From this parent class, we create 3 child classes corresponding to 3 types of database.

MongoDbConnector.java
public class MongoDbConnector extends DatabaseConnector {
    @Override
    public Connection connect(String url, String user, String pass) {
        Class.forName("mongodb.jdbc.MongoDriver");
        return DriverManager.getConnection(url, user, pass);
    }
}
MySqlConnector.java
public class MySqlConnector extends DatabaseConnector {
    @Override
    public Connection  connect(String url) {
        Class.forName("com.mysql.jdbc.Driver");  
        return DriverManager.getConnection(url, user, pass);
    }
}
DB2SqlConnector.java
public class DB2SqlConnector  extends DatabaseConnector{
    @Override
    public Connection connect(String url) {
        Class.forName("com.ibm.db2.jdbc.app.DB2Driver");
        return DriverManager.getConnection(url, user, pass);
    }
}
AppConfig.java
import org.springframework.context.annotation.Bean;
import org.springframework.context.annotation.Configuration;

@Configuration
public class AppConfig {

    @Bean("mysqlConnector")
    DatabaseConnector mysqlConfigure() {
        DatabaseConnector mySqlConnector = new MySqlConnector();
        mySqlConnector.connect("jdbc:mysql://localhost:3306/database","user","pass");
        return mySqlConnector;
    }

    @Bean("mongodbConnector")
    DatabaseConnector mongodbConfigure() {
        DatabaseConnector mongoDbConnector = new MongoDbConnector();
        mongoDbConnector.connect("jdbc:mongo://localhost:27017/database","user","pass");
        return mongoDbConnector;
    }

    @Bean("db2Connector")
    DatabaseConnector db2Configure(){
        DatabaseConnector db2Connector = new DB2SqlConnector();
        db2Connector.connect("jdbc:db2://localhost:50001/database","user","pass");
        return db2Connector ;
    }

}

Via this example, we realize that when we want to initialize multiple beans and setup for these beans at the same time before running, we should use @Configuration and @Bean

Field-Based Dependency Injection

In field-based dependency injection, fields/properties are annotated with @Autowired. Spring container will set these fields once the class is instantiated.

@Component
public class ConstructorBasedInjection {
 
    @Autowired
    private InjectedBean injectedBean;
 
}

Field-based dependency injection will not work on fields that are declared final/immutable as these fields must be instantiated at class instantiation. The only way to declare immutable dependencies is by using constructor-based dependency injection.

Field injection is not recommended because:

  • You cannot create immutable objects, as you can with constructor injection
  • Your classes have tight coupling with your DI container and cannot be used outside of it
  • Your classes cannot be instantiated (for example in unit tests) without reflection. You need the DI container to instantiate them, which makes your tests more like integration tests
  • Your real dependencies are hidden from the outside and are not reflected in your interface (either constructors or methods)
  • It is really easy to have like ten dependencies. If you were using constructor injection, you would have a constructor with ten arguments, which would signal that something is fishy. But you can add injected fields using field injection indefinitely. Having too many dependencies is a red flag that the class usually does more than one thing and that it may violate the Single Responsibility Principle.