Docker is an open platform for developing, shipping, and running applications. In this posts you will learn how to use Docker as a beginner. If you don’t know about Docker you can read more at Docker introduction
In this lab, you will learn how to do the following:
- How to run and debug Docker containers.
- How to build Docker images for your NodeJS application.
Run Docker image
At first you can run a container from a created Docker image on DockerHub
docker@learncode24h.com:~/docker$ docker run hello-world
Unable to find image 'hello-world:latest' locally
latest: Pulling from library/hello-world
2db29710123e: Pull complete
Digest: sha256:7d246653d0511db2a6b2e0436cfd0e52ac8c066000264b3ce63331ac66dca625
Status: Downloaded newer image for hello-world:latest

Hello from Docker!
This message shows that your installation appears to be working correctly.

To generate this message, Docker took the following steps:
 1. The Docker client contacted the Docker daemon.
 2. The Docker daemon pulled the "hello-world" image from the Docker Hub.
    (amd64)
 3. The Docker daemon created a new container from that image which runs the
    executable that produces the output you are currently reading.
 4. The Docker daemon streamed that output to the Docker client, which sent it
    to your terminal.

To try something more ambitious, you can run an Ubuntu container with:
 $ docker run -it ubuntu bash

Share images, automate workflows, and more with a free Docker ID:
 https://hub.docker.com/

For more examples and ideas, visit:
 https://docs.docker.com/get-started/
The above command is only simple print Hello from Docker! on your terminal. The docker daemon searched for the hello-world image, didn’t find the image locally, pulled the image from Docker Hub, then created a container from that image, and ran the container for you. Now we can list downloaded image on your local repository
docker@learncode24h.com:~/docker$ docker images
REPOSITORY    TAG       IMAGE ID       CREATED         SIZE
hello-world   latest    feb5d9fea6a5   11 months ago   13.3kB
Execute command docker run hello-world again
docker@learncode24h.com:~/docker$ docker run hello-world

Hello from Docker!
This message shows that your installation appears to be working correctly.

To generate this message, Docker took the following steps:
 1. The Docker client contacted the Docker daemon.
 2. The Docker daemon pulled the "hello-world" image from the Docker Hub.
    (amd64)
 3. The Docker daemon created a new container from that image which runs the
    executable that produces the output you are currently reading.
 4. The Docker daemon streamed that output to the Docker client, which sent it
    to your terminal.

To try something more ambitious, you can run an Ubuntu container with:
 $ docker run -it ubuntu bash

Share images, automate workflows, and more with a free Docker ID:
 https://hub.docker.com/

For more examples and ideas, visit:
 https://docs.docker.com/get-started/
Notice the second time you run this, the docker daemon finds the image in your local registry and runs the container from that image. It doesn’t have to pull the image from Docker Hub. Now you can list all containers on your server with the command: docker ps -a
docker@learncode24h.com:~/docker$ docker ps -a
CONTAINER ID   IMAGE         COMMAND    CREATED          STATUS                      PORTS     NAMES
323548164a2c   hello-world   "/hello"   43 seconds ago   Exited (0) 42 seconds ago             vigorous_bhaskara
22ffa7df1f15   hello-world   "/hello"   2 minutes ago    Exited (0) 2 minutes ago              reverent_ride
Build Docker image
Continue we will create a Node js project and build it to Docker image
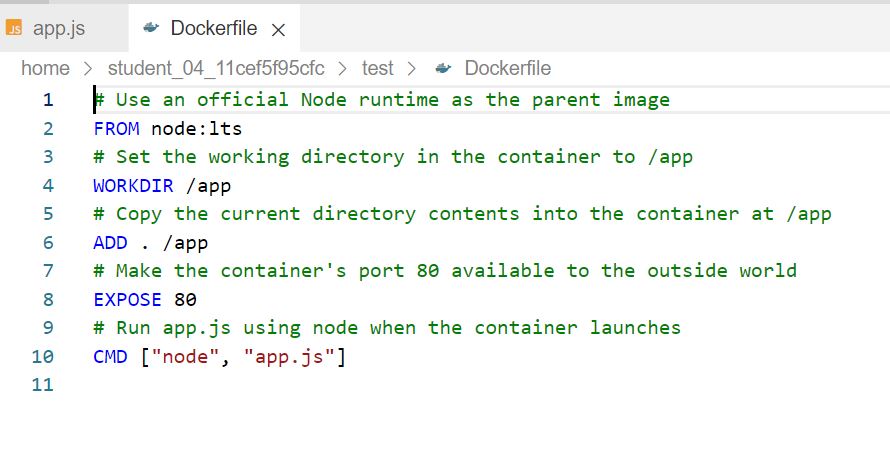
Create file app.js and Dockerfile with the following contents


You can use the following commands to create these files quicker
cat > app.js <<EOF
const http = require('http');
const hostname = '0.0.0.0';
const port = 80;
const server = http.createServer((req, res) => {
    res.statusCode = 200;
    res.setHeader('Content-Type', 'text/plain');
    res.end('Welcome to learncode24h.com\n');
});
server.listen(port, hostname, () => {
    console.log('Server running at http://%s:%s/', hostname, port);
});
process.on('SIGINT', function() {
    console.log('Caught interrupt signal and will exit');
    process.exit();
});
EOF
cat > Dockerfile <<EOF
# Use an official Node runtime as the parent image
FROM node:lts
# Set the working directory in the container to /app
WORKDIR /app
# Copy the current directory contents into the container at /app
ADD . /app
# Make the container's port 80 available to the outside world
EXPOSE 80
# Run app.js using node when the container launches
CMD ["node", "app.js"]
EOF
This file instructs the Docker daemon on how to build your image.
- FROM: specifies the base parent image, which in this case is the official Docker image for node version long term support (lts).
- WORKDIR: you set the working (current) directory of the container.
- ADD: you add the current directory’s contents (indicated by the
".") into the container. - EXPOSE: expose the container’s port so it can accept connections on that port
- CMD: run the node command node app.js to start the application.
Continue, we will build the Docker image
docker@learncode24h.com:~/docker$ docker build -t node-app:0.1 .
Sending build context to Docker daemon  3.072kB
Step 1/5 : FROM node:lts
lts: Pulling from library/node
76dff75df4d9: Pull complete
3e8c90a1c4bb: Pull complete
b3662c105080: Pull complete
ad5dcb7dd592: Pull complete
fa57cc7ce341: Pull complete
2d623c8b550d: Pull complete
56ed828b953c: Pull complete
09ff1abee05c: Pull complete
b596abc1ac96: Pull complete
Digest: sha256:0c672d547405fe64808ea28b49c5772b1026f81b3b716ff44c10c96abf177d6a
Status: Downloaded newer image for node:lts
 ---> c8af85aa3027
Step 2/5 : WORKDIR /app
 ---> Running in aa1268cdc5a2
Removing intermediate container aa1268cdc5a2
 ---> 729863436ef1
Step 3/5 : ADD . /app
 ---> b5b2698f08fc
Step 4/5 : EXPOSE 80
 ---> Running in 8a3bb7d617f2
Removing intermediate container 8a3bb7d617f2
 ---> 7794f2e80515
Step 5/5 : CMD ["node", "app.js"]
 ---> Running in c9bcddbf4f7e
Removing intermediate container c9bcddbf4f7e
 ---> ea3b5ba85c1b
Successfully built ea3b5ba85c1b
Successfully tagged node-app:0.1
The -t flag means to name and tag an image with the name:tag syntax. The name of the image is node-app and the tag is 0.1. The tag is highly recommended when building Docker images. If you don’t specify a tag, the tag will default to latest and it becomes more difficult to distinguish newer images from older ones.
After Docker image is built successfully, you can check image has been created on your local repository
docker@learncode24h.com:~/docker$ docker images
REPOSITORY    TAG       IMAGE ID       CREATED          SIZE
node-app      0.1       ea3b5ba85c1b   34 seconds ago   910MB
node          lts       c8af85aa3027   2 weeks ago      910MB
hello-world   latest    feb5d9fea6a5   11 months ago    13.3kB
Now run node-app image that we have built
docker@learncode24h.com:~/docker$ docker run -p 4000:80 --name my-app -d node-app:0.1
086785e32405c8f818921f95bae232ee3be9538036c63c3f1a9353bffc7ea47a
--nameflag allows you to name the container if you like.-pinstructs Docker to map the host’s port 4000 to the container’s port 80. Without port mapping, you would not be able to reach the container at localhost.-dflag allows container can run daemon, without you need keep terminal session open when run container.
Now you can reach the server at http://localhost:4000.
docker@learncode24h.com:~/docker$ curl http://localhost:4000
Welcome to learncode24h.com
You can view running container with command: docker ps
docker@learncode24h.com:~/docker$ docker ps
CONTAINER ID   IMAGE          COMMAND                  CREATED          STATUS          PORTS                  NAMES
086785e32405   node-app:0.1   "docker-entrypoint.s…"   17 seconds ago   Up 16 seconds   0.0.0.0:4000->80/tcp   my-app
Can read more about how to build Docker image if you want to dig deeper.
Debug and interact shell in Docker container
To view log created by a specific container you can use command: docker logs <container_id>
docker@learncode24h.com:~/docker$ docker logs 086785e32405
Server running at http://0.0.0.0:80/
If you want to start an interactive Bash session inside the running container. You can use docker exec -it <container_id> bash – to do this.
docker@learncode24h.com:~/docker$ docker exec -it 086785e32405 bash
root@086785e32405:/app# ls -la
total 16
drwxr-xr-x 1 root root 4096 Sep 10 09:22 .
drwxr-xr-x 1 root root 4096 Sep 10 09:24 ..
-rw-r--r-- 1 root root  354 Sep 10 08:38 Dockerfile
-rw-r--r-- 1 root root  464 Sep 10 08:48 app.js
root@086785e32405:/app# ls -la /
total 76
drwxr-xr-x   1 root root 4096 Sep 10 09:24 .
drwxr-xr-x   1 root root 4096 Sep 10 09:24 ..
-rwxr-xr-x   1 root root    0 Sep 10 09:24 .dockerenv
drwxr-xr-x   1 root root 4096 Sep 10 09:22 app
drwxr-xr-x   1 root root 4096 Aug 23 00:50 bin
drwxr-xr-x   2 root root 4096 Mar 19 13:44 boot
drwxr-xr-x   5 root root  340 Sep 10 09:24 dev
drwxr-xr-x   1 root root 4096 Sep 10 09:24 etc
drwxr-xr-x   1 root root 4096 Aug 23 04:03 home
drwxr-xr-x   1 root root 4096 Aug 23 00:50 lib
drwxr-xr-x   2 root root 4096 Aug 22 00:00 lib64
drwxr-xr-x   2 root root 4096 Aug 22 00:00 media
drwxr-xr-x   2 root root 4096 Aug 22 00:00 mnt
drwxr-xr-x   1 root root 4096 Aug 23 04:06 opt
dr-xr-xr-x 225 root root    0 Sep 10 09:24 proc
drwx------   1 root root 4096 Aug 23 04:06 root
drwxr-xr-x   3 root root 4096 Aug 22 00:00 run
drwxr-xr-x   1 root root 4096 Aug 23 00:49 sbin
drwxr-xr-x   2 root root 4096 Aug 22 00:00 srv
dr-xr-xr-x  13 root root    0 Sep 10 09:24 sys
drwxrwxrwt   1 root root 4096 Aug 23 04:06 tmp
drwxr-xr-x   1 root root 4096 Aug 22 00:00 usr
drwxr-xr-x   1 root root 4096 Aug 22 00:00 var
You can also examine a container’s metadata in Docker by using Docker inspect: docker inspect <container_id>
docker@learncode24h.com:~/docker$ docker inspect 086785e32405
[
    {
        "Id": "086785e32405c8f818921f95bae232ee3be9538036c63c3f1a9353bffc7ea47a",
        "Created": "2022-09-10T09:24:06.722783576Z",
        "Path": "docker-entrypoint.sh",
        "Args": [
            "node",
            "app.js"
        ],
        "State": {
            "Status": "running",
            "Running": true,
            "Paused": false,
            "Restarting": false,
            "OOMKilled": false,
            "Dead": false,
            "Pid": 3321,
            "ExitCode": 0,
            "Error": "",
            "StartedAt": "2022-09-10T09:24:07.031524536Z",
            "FinishedAt": "0001-01-01T00:00:00Z"
        },
        "Image": "sha256:ea3b5ba85c1b0ef28e66cc258363049c5d583e6cb2361f5f34f659422c063b4d",
        "ResolvConfPath": "/var/lib/docker/containers/086785e32405c8f818921f95bae232ee3be9538036c63c3f1a9353bffc7ea47a/resolv.conf",
        "HostnamePath": "/var/lib/docker/containers/086785e32405c8f818921f95bae232ee3be9538036c63c3f1a9353bffc7ea47a/hostname",
        "HostsPath": "/var/lib/docker/containers/086785e32405c8f818921f95bae232ee3be9538036c63c3f1a9353bffc7ea47a/hosts",
        "LogPath": "/var/lib/docker/containers/086785e32405c8f818921f95bae232ee3be9538036c63c3f1a9353bffc7ea47a/086785e32405c8f818921f95bae232ee3be9538036c63c3f1a9353bffc7ea47a-json.log",
        "Name": "/my-app",
        "RestartCount": 0,
        "Driver": "overlay2",
        "Platform": "linux",
        "MountLabel": "",
        "ProcessLabel": "",
        "AppArmorProfile": "docker-default",
        "ExecIDs": null,
        "HostConfig": {
            "Binds": null,
            "ContainerIDFile": "",
            "LogConfig": {
                "Type": "json-file",
                "Config": {}
            },
            "NetworkMode": "default",
            "PortBindings": {
                "80/tcp": [
                    {
                        "HostIp": "",
                        "HostPort": "4000"
                    }
                ]
            },
            "RestartPolicy": {
                "Name": "no",
                "MaximumRetryCount": 0
            },
            "AutoRemove": false,
            "VolumeDriver": "",
            "VolumesFrom": null,
            "CapAdd": null,
            "CapDrop": null,
            "CgroupnsMode": "host",
            "Dns": [],
            "DnsOptions": [],
            "DnsSearch": [],
            "ExtraHosts": null,
            "GroupAdd": null,
            "IpcMode": "private",
            "Cgroup": "",
            "Links": null,
            "OomScoreAdj": 0,
            "PidMode": "",
            "Privileged": false,
            "PublishAllPorts": false,
            "ReadonlyRootfs": false,
            "SecurityOpt": null,
            "UTSMode": "",
            "UsernsMode": "",
            "ShmSize": 67108864,
            "Runtime": "runc",
            "ConsoleSize": [
                0,
                0
            ],
            "Isolation": "",
            "CpuShares": 0,
            "Memory": 0,
            "NanoCpus": 0,
            "CgroupParent": "",
            "BlkioWeight": 0,
            "BlkioWeightDevice": [],
            "BlkioDeviceReadBps": null,
            "BlkioDeviceWriteBps": null,
            "BlkioDeviceReadIOps": null,
            "BlkioDeviceWriteIOps": null,
            "CpuPeriod": 0,
            "CpuQuota": 0,
            "CpuRealtimePeriod": 0,
            "CpuRealtimeRuntime": 0,
            "CpusetCpus": "",
            "CpusetMems": "",
            "Devices": [],
            "DeviceCgroupRules": null,
            "DeviceRequests": null,
            "KernelMemory": 0,
            "KernelMemoryTCP": 0,
            "MemoryReservation": 0,
            "MemorySwap": 0,
            "MemorySwappiness": null,
            "OomKillDisable": false,
            "PidsLimit": null,
            "Ulimits": null,
            "CpuCount": 0,
            "CpuPercent": 0,
            "IOMaximumIOps": 0,
            "IOMaximumBandwidth": 0,
            "MaskedPaths": [
                "/proc/asound",
                "/proc/acpi",
                "/proc/kcore",
                "/proc/keys",
                "/proc/latency_stats",
                "/proc/timer_list",
                "/proc/timer_stats",
                "/proc/sched_debug",
                "/proc/scsi",
                "/sys/firmware"
            ],
            "ReadonlyPaths": [
                "/proc/bus",
                "/proc/fs",
                "/proc/irq",
                "/proc/sys",
                "/proc/sysrq-trigger"
            ]
        },
        "GraphDriver": {
            "Data": {
                "LowerDir": "/var/lib/docker/overlay2/1099e808dc32c5c2f300a04a611f4e006c4a649493254fab39364ac52c8f721d-init/diff:/var/lib/docker/overlay2/f8dc7c8a42aefa660a2210053bf8956fcf58056eceed54e3e189093cc992a214/diff:/var/lib/docker/overlay2/c7c5dea9afe7fb5e54a4c6ee31058c9af34cb91ff441efd67377c4ffc3686e6b/diff:/var/lib/docker/overlay2/fb241c54a223256778702a10f2173c2a4f1912654904b189aed79e535aa49253/diff:/var/lib/docker/overlay2/6372d1901f6487abc7cdd00c6759f3ac8355e2e4c5f1c51bfda56e53d65a8350/diff:/var/lib/docker/overlay2/8e54ad37e9618fcbab032902d20f0b0810cbbec8af6fcb17caa6d8f66fda2606/diff:/var/lib/docker/overlay2/18dab100d0c6a106b846a50186d45940372df86ddb0d49e0c546e28db9c242be/diff:/var/lib/docker/overlay2/98c8d75203c3ac50b63cc9aca10d53d7dcde0ec3eace286275073721bf01be14/diff:/var/lib/docker/overlay2/d0d8308c4f446a712c85ade80d8ccc8ec6b647542422255e4f4433a75fa5d20d/diff:/var/lib/docker/overlay2/4e882e509057be393259a975d54277ad27ce34eab6f346edd530ebadacc991f7/diff:/var/lib/docker/overlay2/0b3503d18311ea835cffea8198bf0f6d69c90596c5862a0a67f42c427a06c58d/diff:/var/lib/docker/overlay2/3f8b51c373ff80d46e9ad13bb4ce98c3df190b979f7d5b0e88cb5b27c1a400d4/diff",
                "MergedDir": "/var/lib/docker/overlay2/1099e808dc32c5c2f300a04a611f4e006c4a649493254fab39364ac52c8f721d/merged",
                "UpperDir": "/var/lib/docker/overlay2/1099e808dc32c5c2f300a04a611f4e006c4a649493254fab39364ac52c8f721d/diff",
                "WorkDir": "/var/lib/docker/overlay2/1099e808dc32c5c2f300a04a611f4e006c4a649493254fab39364ac52c8f721d/work"
            },
            "Name": "overlay2"
        },
        "Mounts": [],
        "Config": {
            "Hostname": "086785e32405",
            "Domainname": "",
            "User": "",
            "AttachStdin": false,
            "AttachStdout": false,
            "AttachStderr": false,
            "ExposedPorts": {
                "80/tcp": {}
            },
            "Tty": false,
            "OpenStdin": false,
            "StdinOnce": false,
            "Env": [
                "PATH=/usr/local/sbin:/usr/local/bin:/usr/sbin:/usr/bin:/sbin:/bin",
                "NODE_VERSION=16.17.0",
                "YARN_VERSION=1.22.19"
            ],
            "Cmd": [
                "node",
                "app.js"
            ],
            "Image": "node-app:0.1",
            "Volumes": null,
            "WorkingDir": "/app",
            "Entrypoint": [
                "docker-entrypoint.sh"
            ],
            "OnBuild": null,
            "Labels": {}
        },
        "NetworkSettings": {
            "Bridge": "",
            "SandboxID": "21202a2d20183f1f4c67db92b5082dacc9975da69115cf99ee900bdd5d2dbb56",
            "HairpinMode": false,
            "LinkLocalIPv6Address": "",
            "LinkLocalIPv6PrefixLen": 0,
            "Ports": {
                "80/tcp": [
                    {
                        "HostIp": "0.0.0.0",
                        "HostPort": "4000"
                    }
                ]
            },
            "SandboxKey": "/var/run/docker/netns/21202a2d2018",
            "SecondaryIPAddresses": null,
            "SecondaryIPv6Addresses": null,
            "EndpointID": "0ae0cd3711ba14896ff7f50127bc2b5e3993eddc05b316e9513f38bc2c0914b1",
            "Gateway": "172.18.0.1",
            "GlobalIPv6Address": "",
            "GlobalIPv6PrefixLen": 0,
            "IPAddress": "172.18.0.2",
            "IPPrefixLen": 16,
            "IPv6Gateway": "",
            "MacAddress": "02:42:ac:12:00:02",
            "Networks": {
                "bridge": {
                    "IPAMConfig": null,
                    "Links": null,
                    "Aliases": null,
                    "NetworkID": "c3b8112c859578d40ac78f8e271b8e77cfdc0a8f8978214fd1235bf1fe00e8e7",
                    "EndpointID": "0ae0cd3711ba14896ff7f50127bc2b5e3993eddc05b316e9513f38bc2c0914b1",
                    "Gateway": "172.18.0.1",
                    "IPAddress": "172.18.0.2",
                    "IPPrefixLen": 16,
                    "IPv6Gateway": "",
                    "GlobalIPv6Address": "",
                    "GlobalIPv6PrefixLen": 0,
                    "MacAddress": "02:42:ac:12:00:02",
                    "DriverOpts": null
                }
            }
        }
    }
]
To view IP of container you can use this command
docker inspect --format='{{range .NetworkSettings.Networks}}{{.IPAddress}}{{end}}' <container_id>
Now if you want to reuse your container image you can upload it to Docker Hub. You can follow this guide to achieve this: upload Docker image to Docker hub
Thank you.


Comments are closed.