
Sometimes you want to validate payload on a specific environment before submitting data to orches via API Proxy but you can’t apply any pre-existing policies. To achieve this, you must develop a custom policy for API Proxy.
We need to perform a few steps for implementing the Custom policies in MuleSoft 4.
- Install Maven (if you haven’t had maven on your PC yet)
- Create settings.xml in .m2 folder of Maven profile
- Create project for your custom policy
- Develop your custom policy
- Deploy your custom policy to Exchange assets
- Apply the policy to any API through API Manager
Install maven
At first, you need to download Maven, then add the path of Maven’s bin folder to PATH environment variable. View more at https://maven.apache.org/install.html
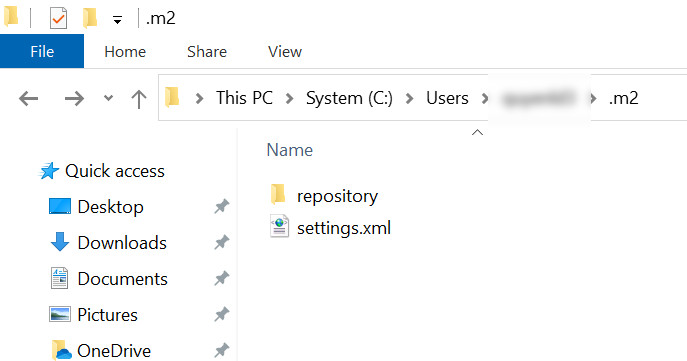
Create settings.xml
Navigate to C:\Users\your_user\.m2 and create settings.xml file with the following content
<?xml version="1.0" encoding="UTF-8"?>
<settings xmlns="http://maven.apache.org/SETTINGS/1.0.0" xmlns:xsi="http://www.w3.org/2001/XMLSchema-instance" xsi:schemaLocation="http://maven.apache.org/SETTINGS/1.0.0 http://maven.apache.org/xsd/settings-1.0.0.xsd">
    <servers>
	<server>
            <id>MuleRepository</id>
            <username>your_user</username>
            <password>your_pass</password>
        </server>
        <server>
            <id>exchange-server</id>
            <username>your_user</username>
            <password>your_pass</password>
        </server>
    </servers>
    <profiles>
        <profile>
            <id>archetype-repository</id>
            <repositories>
                <repository>
                    <id>archetype</id>
                    <name>Mule Repository</name>
                    <url>https://repository-master.mulesoft.org/nexus/content/repositories/public</url>
                    <releases>
                        <enabled>true</enabled>
                        <checksumPolicy>fail</checksumPolicy>
                    </releases>
                    <snapshots>
                        <enabled>true</enabled>
                        <checksumPolicy>warn</checksumPolicy>
                    </snapshots>
                </repository>
            </repositories>
        </profile>
        <profile>
            <id>Mule</id>
            <activation>
                <activeByDefault>true</activeByDefault>
            </activation>
            <repositories>
                <repository>
                    <id>MuleRepository</id>
                    <name>MuleRepository</name>
                    <url>https://repository.mulesoft.org/nexus-ee/content/repositories/releases-ee/</url>
                    <layout>default</layout>
                    <releases>
                        <enabled>true</enabled>
                    </releases>
                    <snapshots>
                        <enabled>true</enabled>
                    </snapshots>
                </repository>
            </repositories>
        </profile>
    </profiles>
</settings>
Maven will download all dependencies for your project from pre-configured repositories in settings.xml
Create custom policy project
Open cmd command and navigate to a folder that you put your project, then run the following command:
mvn -Parchetype-repository archetype:generate -DarchetypeGroupId=org.mule.tools -DarchetypeArtifactId=api-gateway-custom-policy-archetype -DarchetypeVersion=1.2.0 -DgroupId=your-group-id -DartifactId=my-custom-policy -Dversion=1.0.0-SNAPSHOT -Dpackage=mule-policy
You must fill your organization id to the above command. GroupId is defined as the organization ID used with the archetype. To get this value you need to login anypoint platform and get the organization ID from your home URL (after organizations segment)
https://anypoint.mulesoft.com/home/organizations/93fdsafa100-9c81-448a-a0c2-5d65fdaffa15/
After build successfully, you will get a project like this
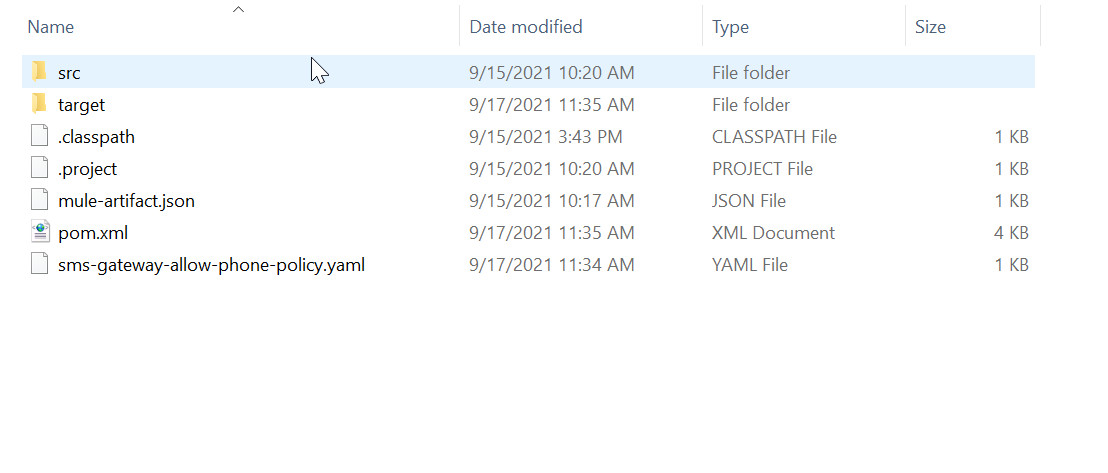
Develop your custom policy Mule project
Open src/templates.xml and develop your custom policy project. In this case I will develop a custom policy allow send SMS to phone whitelist and this policy will be applied to some of client_id (in headers). If the payload has receivers field which contains some phones that do not belong to whitelist, it will throw an error message.
templates.xml
<?xml version="1.0" encoding="UTF-8"?>
<mule xmlns:ee="http://www.mulesoft.org/schema/mule/ee/core"
      xmlns:doc="http://www.mulesoft.org/schema/mule/documentation"
      xmlns="http://www.mulesoft.org/schema/mule/core"
      xmlns:xsi="http://www.w3.org/2001/XMLSchema-instance"
      xmlns:http-policy="http://www.mulesoft.org/schema/mule/http-policy" xmlns:http-transform="http://www.mulesoft.org/schema/mule/http-policy-transform" xsi:schemaLocation="http://www.mulesoft.org/schema/mule/core http://www.mulesoft.org/schema/mule/core/current/mule.xsd
               http://www.mulesoft.org/schema/mule/http-policy http://www.mulesoft.org/schema/mule/http-policy/current/mule-http-policy.xsd
               http://www.mulesoft.org/schema/mule/http-policy-transform http://www.mulesoft.org/schema/mule/http-policy-transform/current/mule-http-policy-transform.xsd
http://www.mulesoft.org/schema/mule/ee/core http://www.mulesoft.org/schema/mule/ee/core/current/mule-ee.xsd">


    <http-policy:proxy name="{{{policyId}}}-custom-policy">
        <http-policy:source>
        	<!-- <logger level="INFO" doc:name="Logger" doc:id="e4937065-06df-4699-ada9-9fd038a79acc" message="#[attributes.headers.client_id]"/> -->

        	<set-variable variableName="listPhoneFilter" value="#[[]]" />

        	{{#each whitelistPhone}}
	        	<logger level="INFO" doc:name="Logger" message="{{{this.key}}}:{{{this.value}}}"/>
	        	<set-variable variableName="keyData" value="{{{this.key}}}" />
	        	<set-variable variableName="valueData" value="{{{this.value}}}" />
	        	<set-variable variableName="listPhoneFilter" value="#[vars.listPhoneFilter ++ [{key: vars.keyData, value: vars.valueData}]]" />
	        {{/each}}

        	<logger level="INFO" doc:name="Logger" message="#[vars.listPhoneFilter]"/>

        	<set-variable variableName="whitelistPhoneByClientId" value="#[(vars.listPhoneFilter filter ((item, index) -> item.key==attributes.headers.client_id)).value[0] default '' ]" />

        	<set-variable variableName="allowPhone" value="#[vars.whitelistPhoneByClientId splitBy ',' map trim($)]" />

        	<logger level="INFO" doc:name="test" message="#[vars.allowPhone]"/>

        	<set-variable variableName="notAllowPhone" value="#[output application/json --- payload.receivers filter ((item, index) -> not (vars.allowPhone contains  item))]" />

            <choice>
			<when expression="#[(vars.listPhoneFilter.key default[] contains attributes.headers.client_id) and sizeOf(vars.notAllowPhone)>0]">
				<http-transform:set-response statusCode="403">
						<http-transform:body>#[output application/json --- {'status':0, 'error': 'The Phone number is not allowed! ' ++ (vars.notAllowPhone default[] joinBy ",")}]</http-transform:body>
				</http-transform:set-response>
			</when>
			<otherwise >
				 <http-policy:execute-next/>
			</otherwise>
		</choice>

        </http-policy:source>
    </http-policy:proxy>

</mule>
mypolicy.yaml
id: Phone number allowlist
name: Phone number allowlist
description:  phone allowlist policy
category: Custom
type: custom
resourceLevelSupported: true
encryptionSupported: false
standalone: true
requiredCharacteristics: []
providedCharacteristics: []
configuration:
  - propertyName: whitelistPhone
    name: Client ID - Whitelist Phone
    description: Client ID - 123456789,123456788
    type: keyvalues
    allowMultiple: true
    defaultValue: false
    optional: true
    sensitive: false
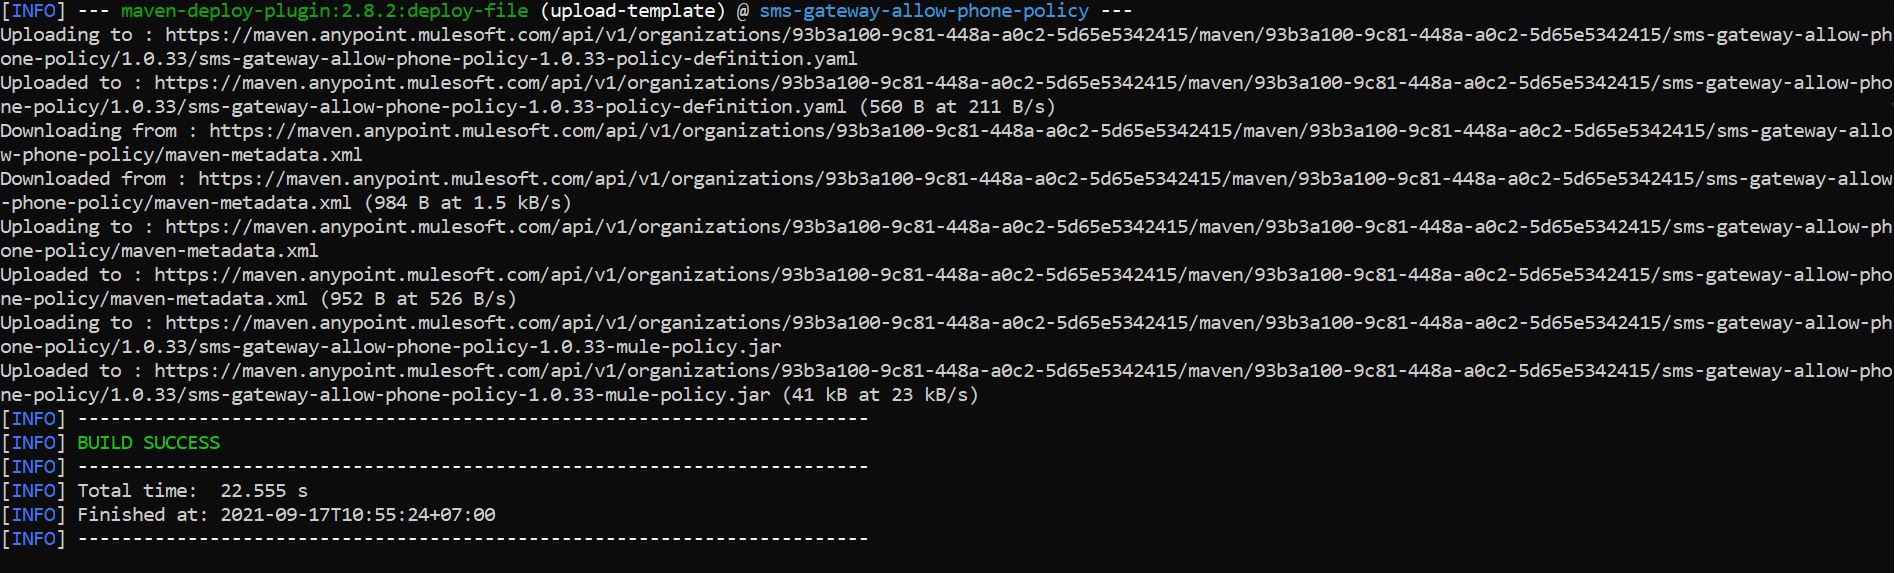
Depoloy project
Run mvn deploy on cmd command to upload your custom policy Mule to Anypoint platform
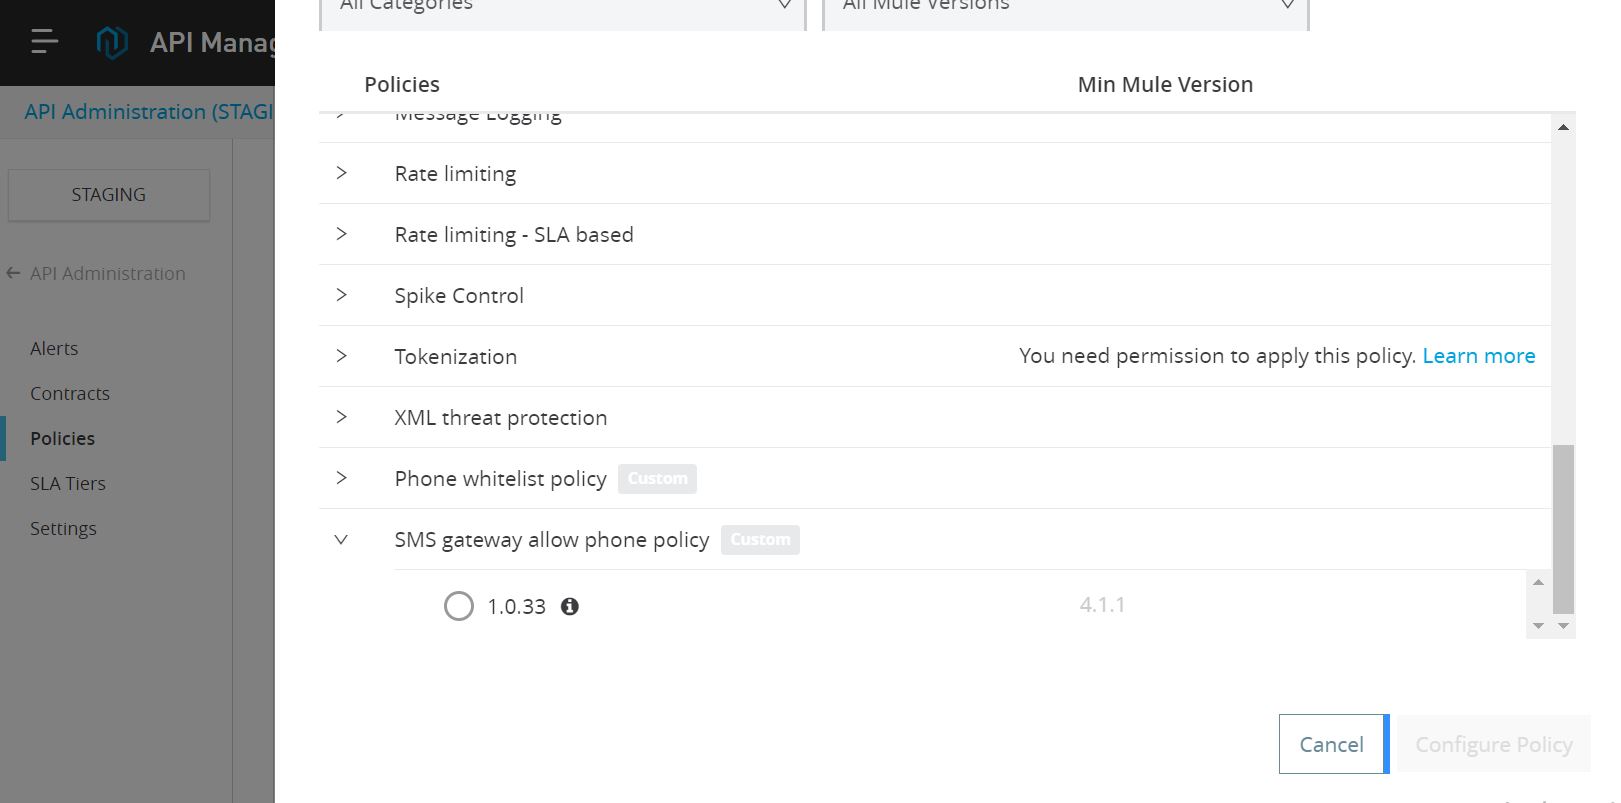
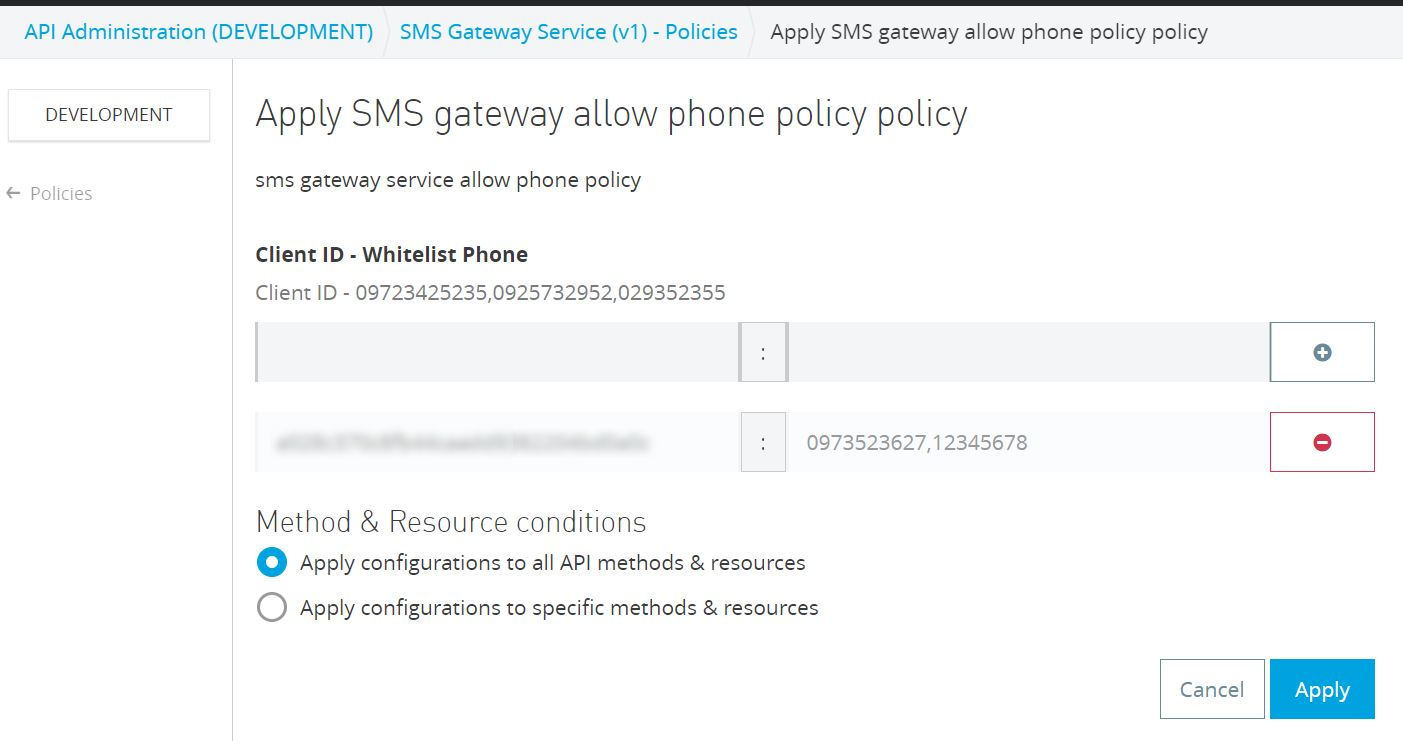
Apply custom policy for your api
In API Manager, navigate to your API Proxy and click the policies link, then apply created policy for your API proxy


Comments are closed.